🔥 [New] Introduction to Manual After Sales Order (Manual Entry of After-Sales Orders)
Update Time: 26 Nov 2025 05:15
Sellers can manually enter Return & Refund, Refund-Only, and Exchange orders, process return stock-in, and generate refund or exchange orders. This feature allows clear tracking of after-sales progress, accurate cost calculation, and streamlined financial reconciliation.
1. Order Status Requirement: After-sales entry is only supported for orders with the status To Pickup, Shipped, Completed, or Cancelled.
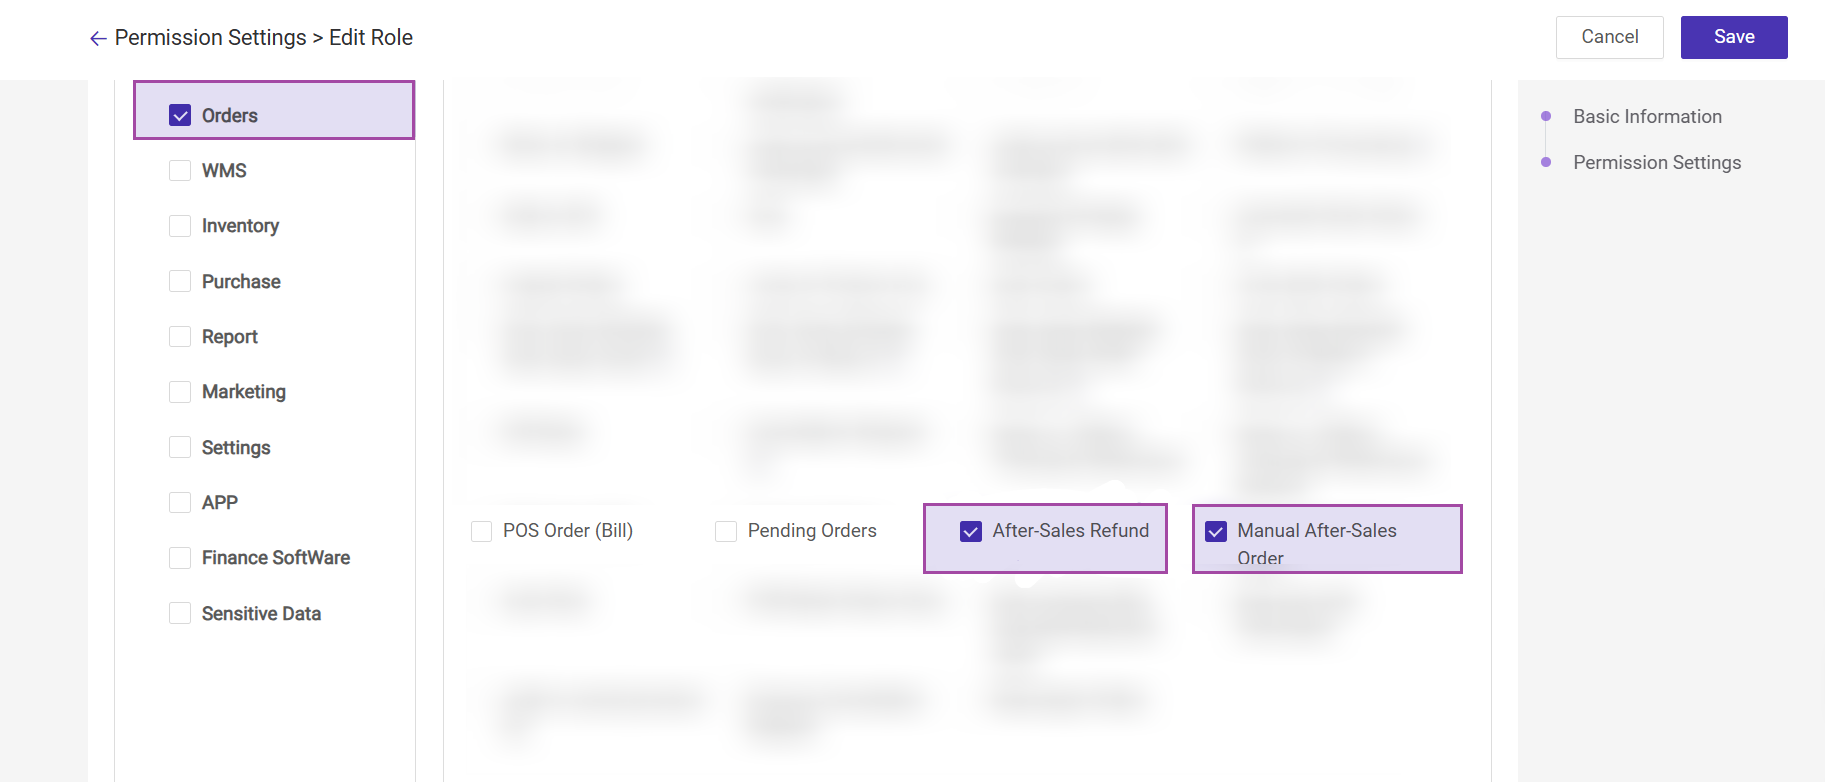
2. Permission Settings: If a sub-account needs to use this feature, the main account must enable the Manual After-Sales Order and After-Sales Refund permissions for its role.
After-Sales Process
-
Return & Refund: Create After-Sales Order > To Confirm > Confirm Return > Received Return > Refund Processing > After-Sales Completed
-
Refund-Only: Create After-Sales Order > To Confirm > Confirm Return > Refund Processing > After-Sales Completed
-
Exchange: Create After-Sales Order > To Confirm > Confirm Return > Received Return > Refund Processing > After-Sales Completed
1. Return & Refund Process
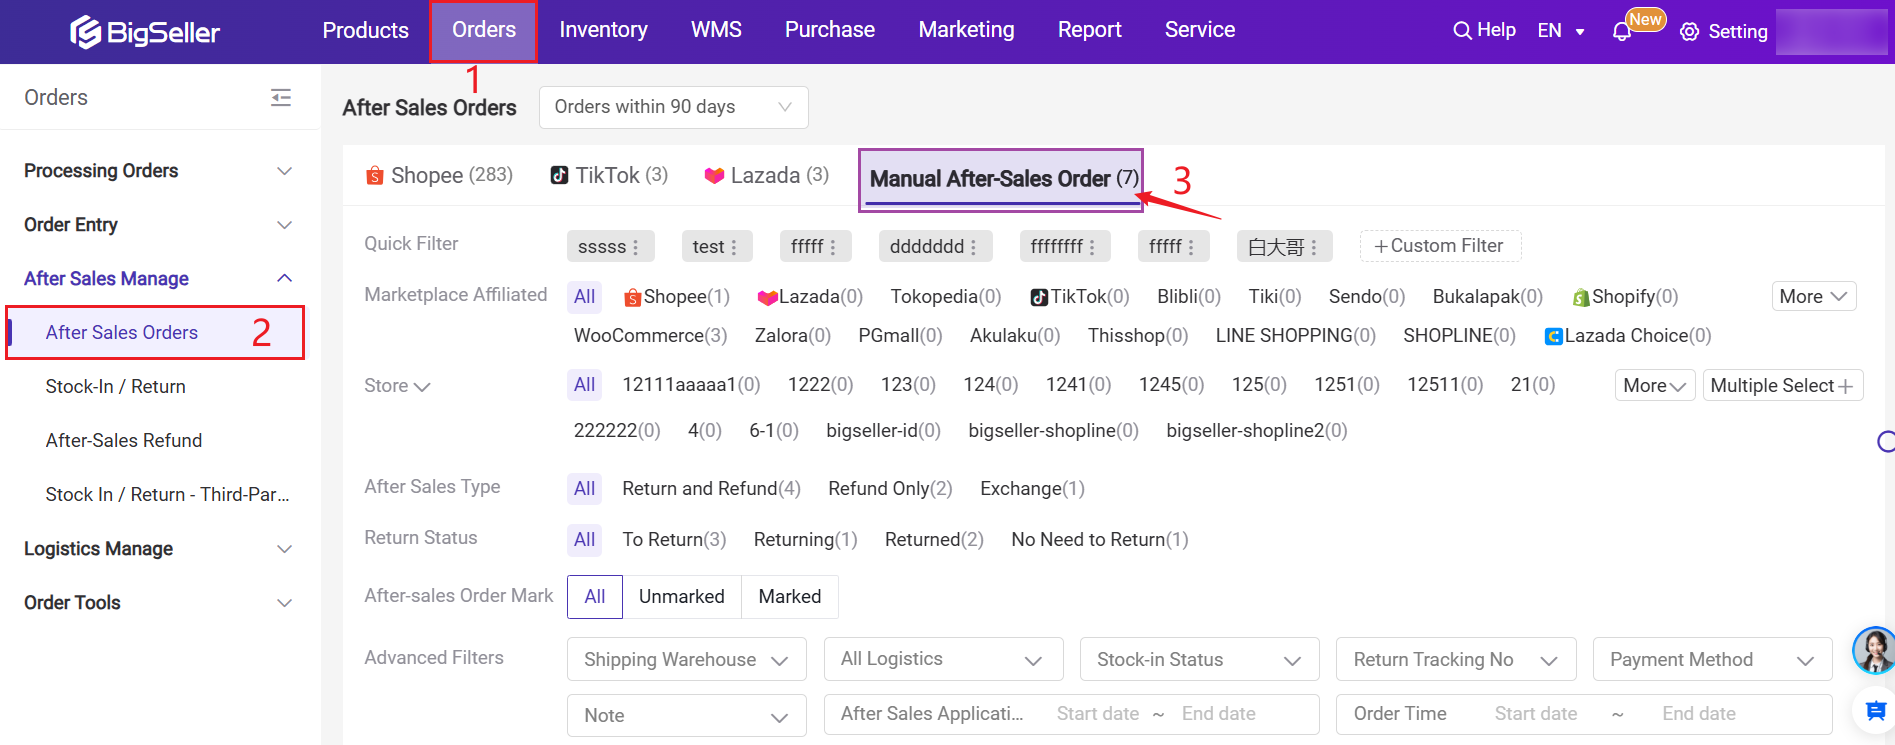
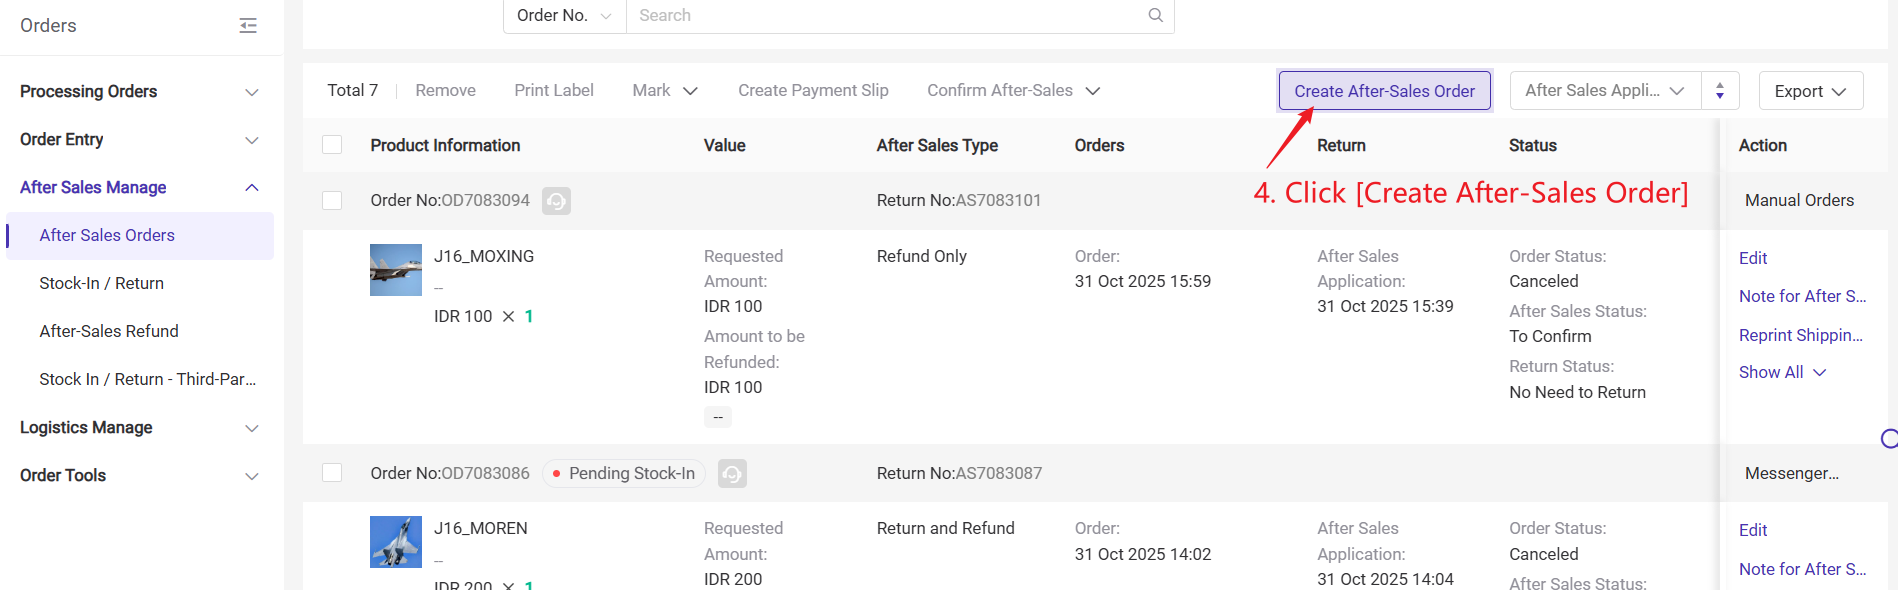
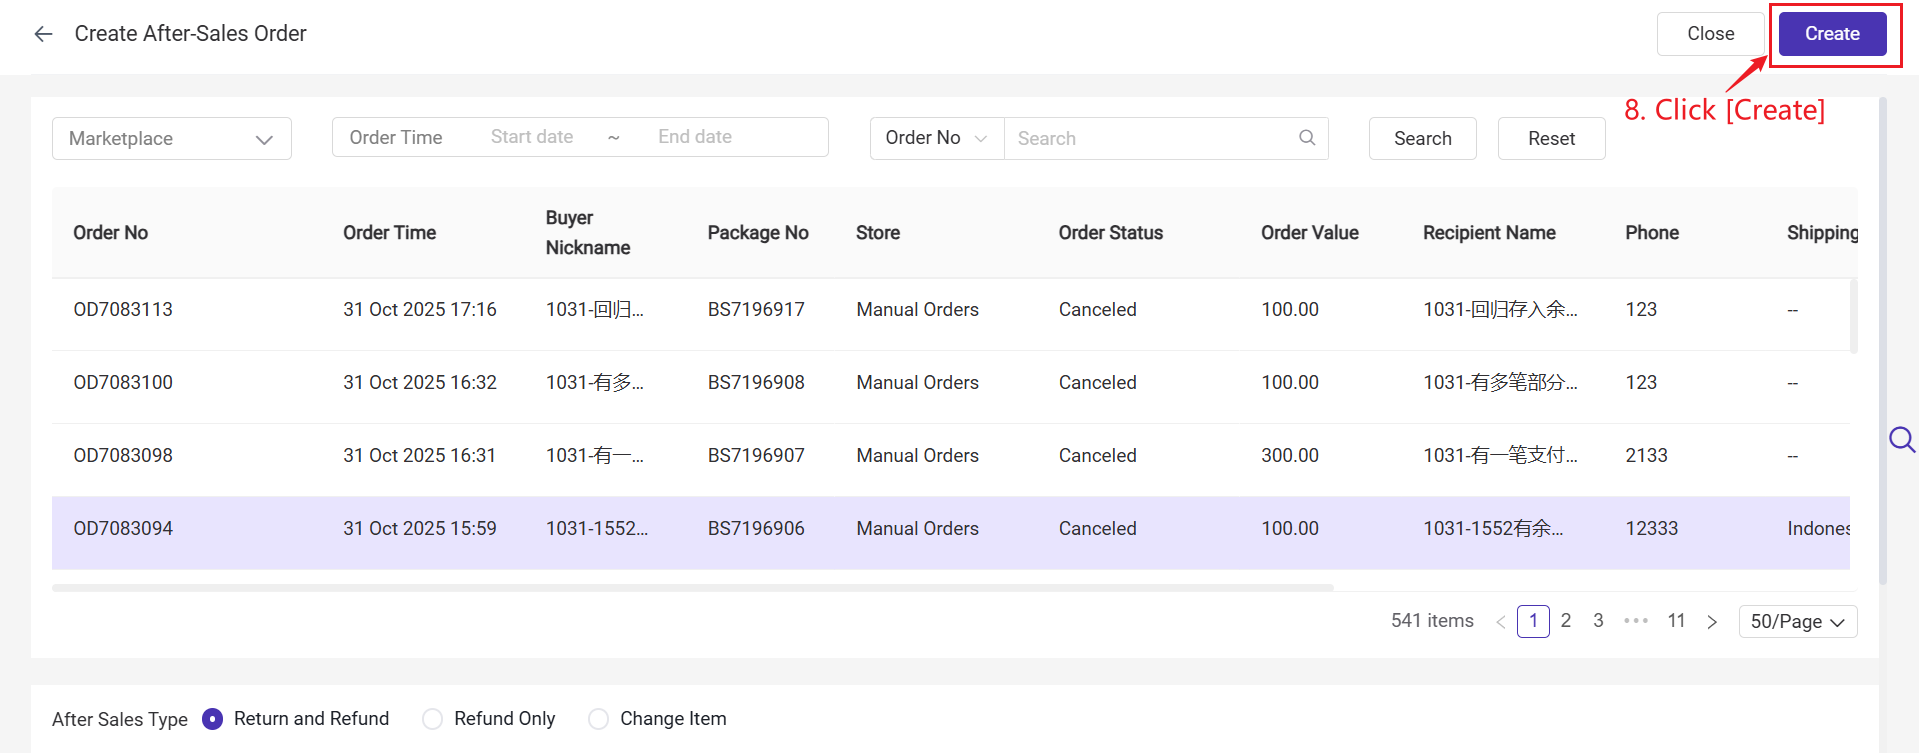
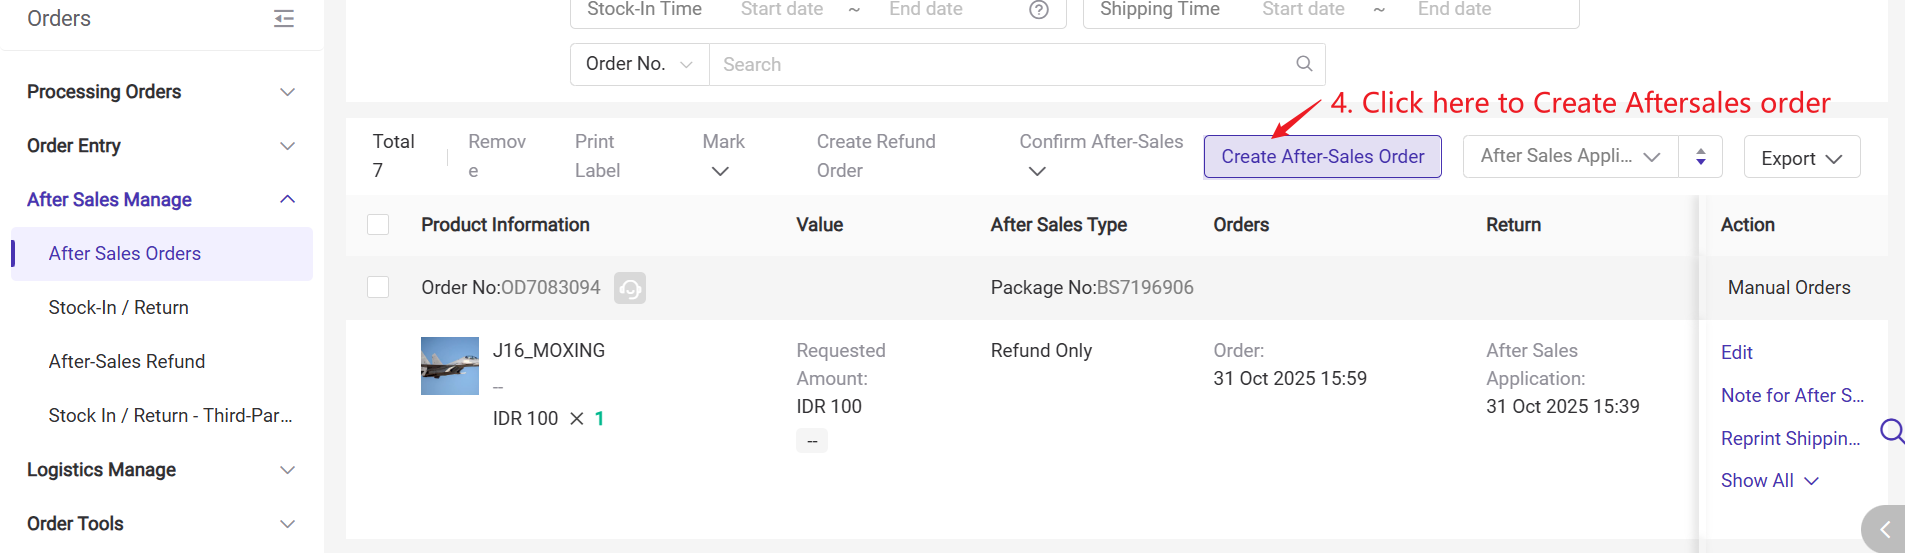
1) Go to After-Sales Order Management > Manual After-Sales Order, click Create After-Sales Order, select the order, and choose Return & Refund.
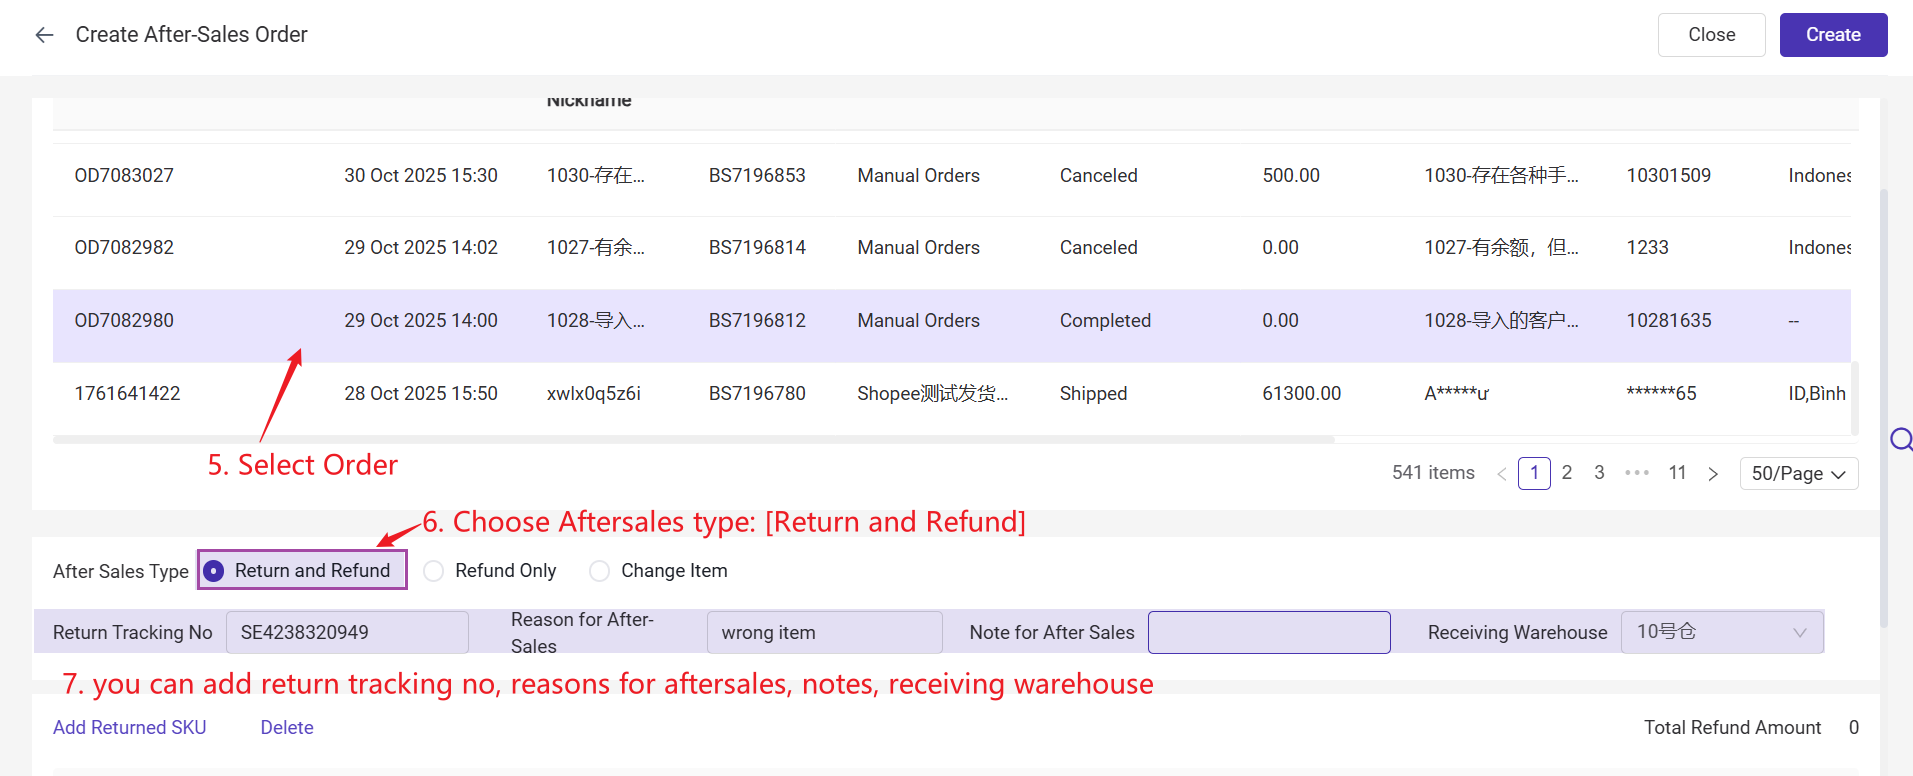
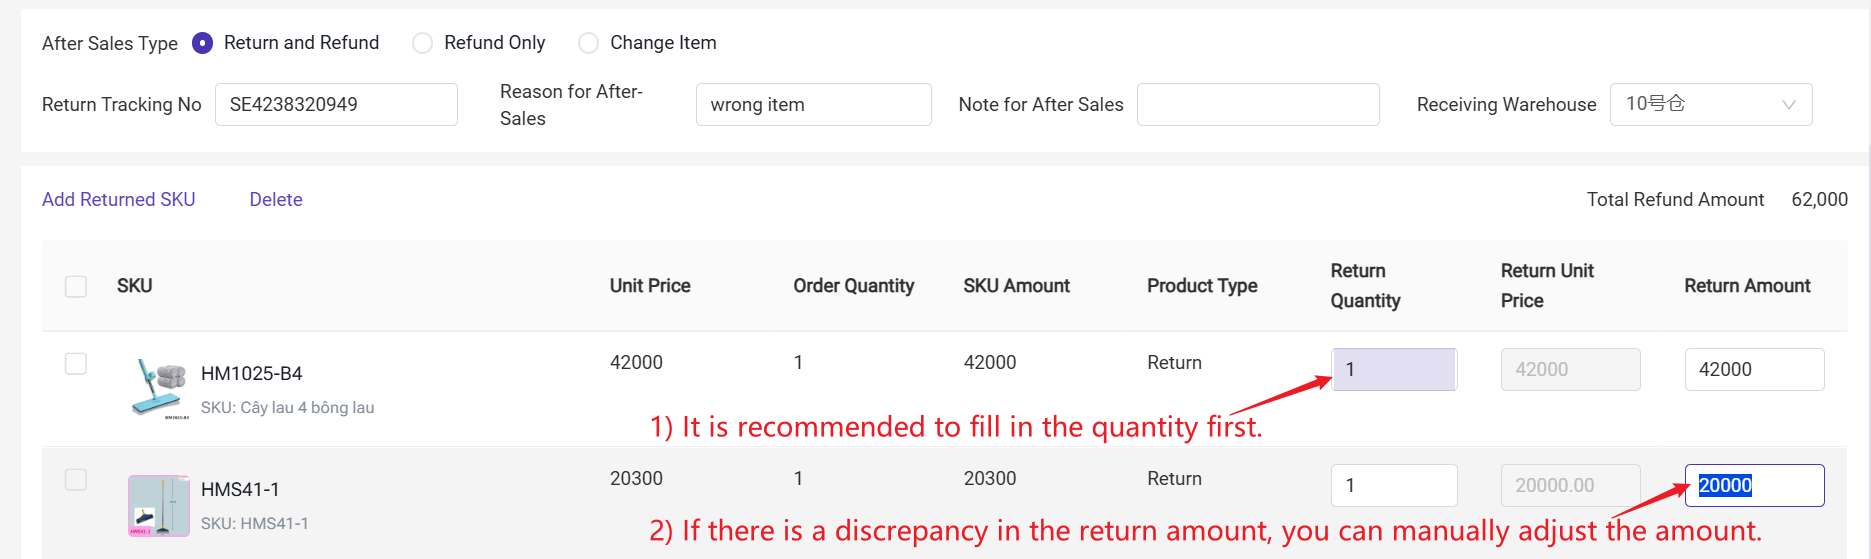
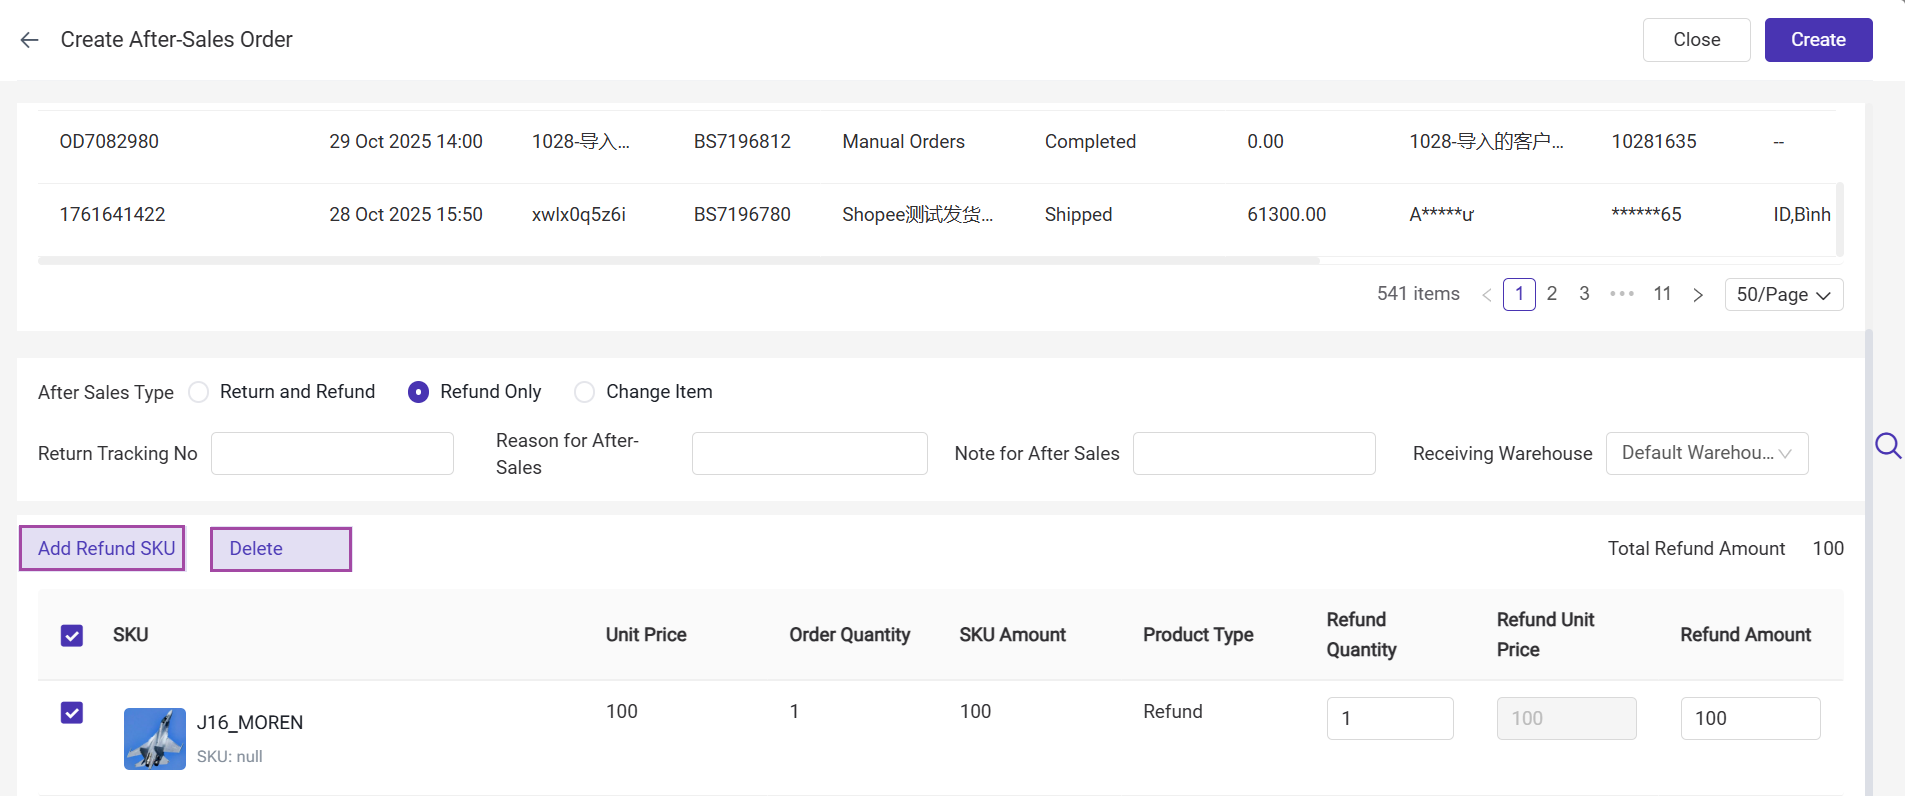
2) Confirm returned SKU and price. You can add new returned items or remove items from the original order.
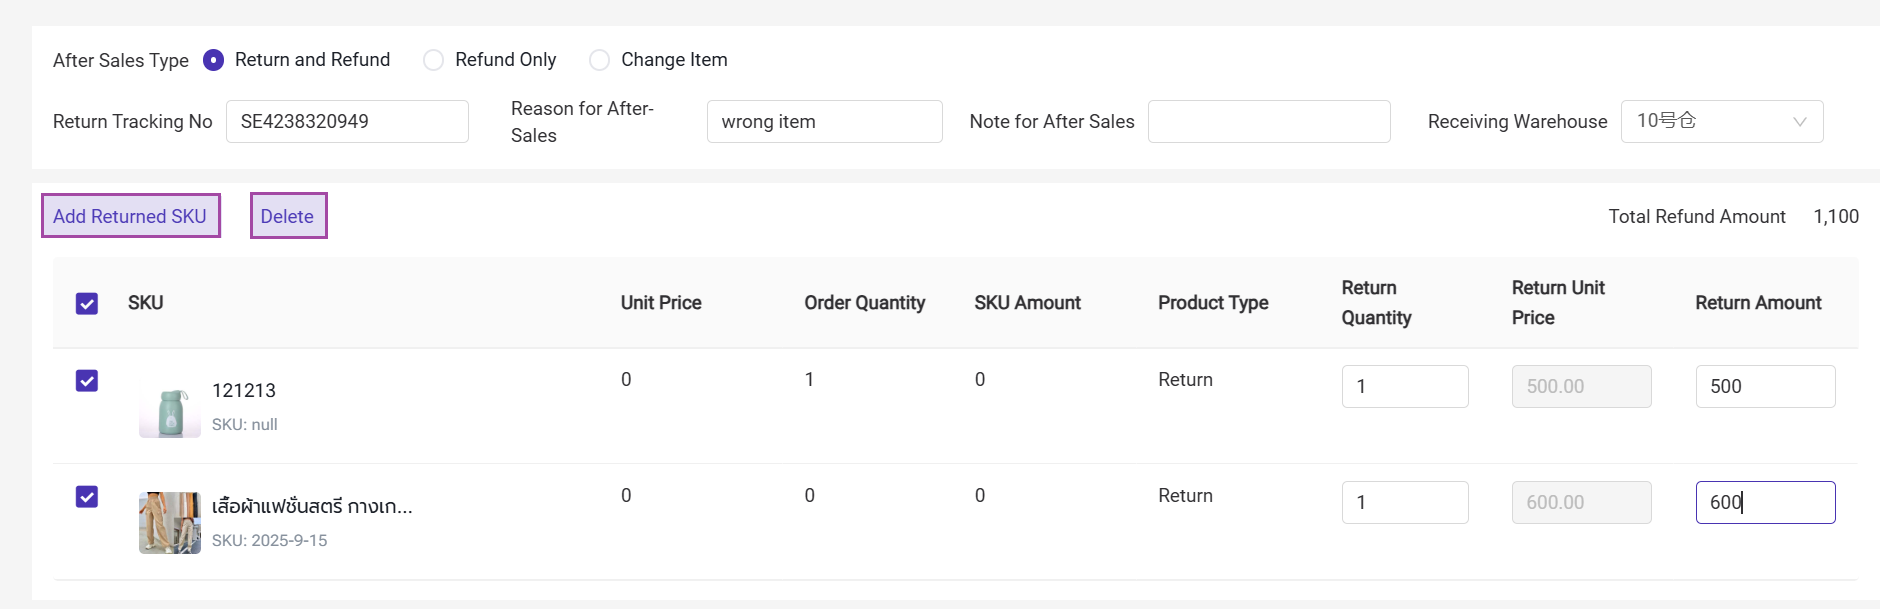
- The price of added returned or exchanged items will follow the customer tier pricing > wholesale price. If no price is found, it will default to 0.
- It is recommended to fill in the quantity first. If there is a discrepancy in the return amount, you can manually adjust the amount.
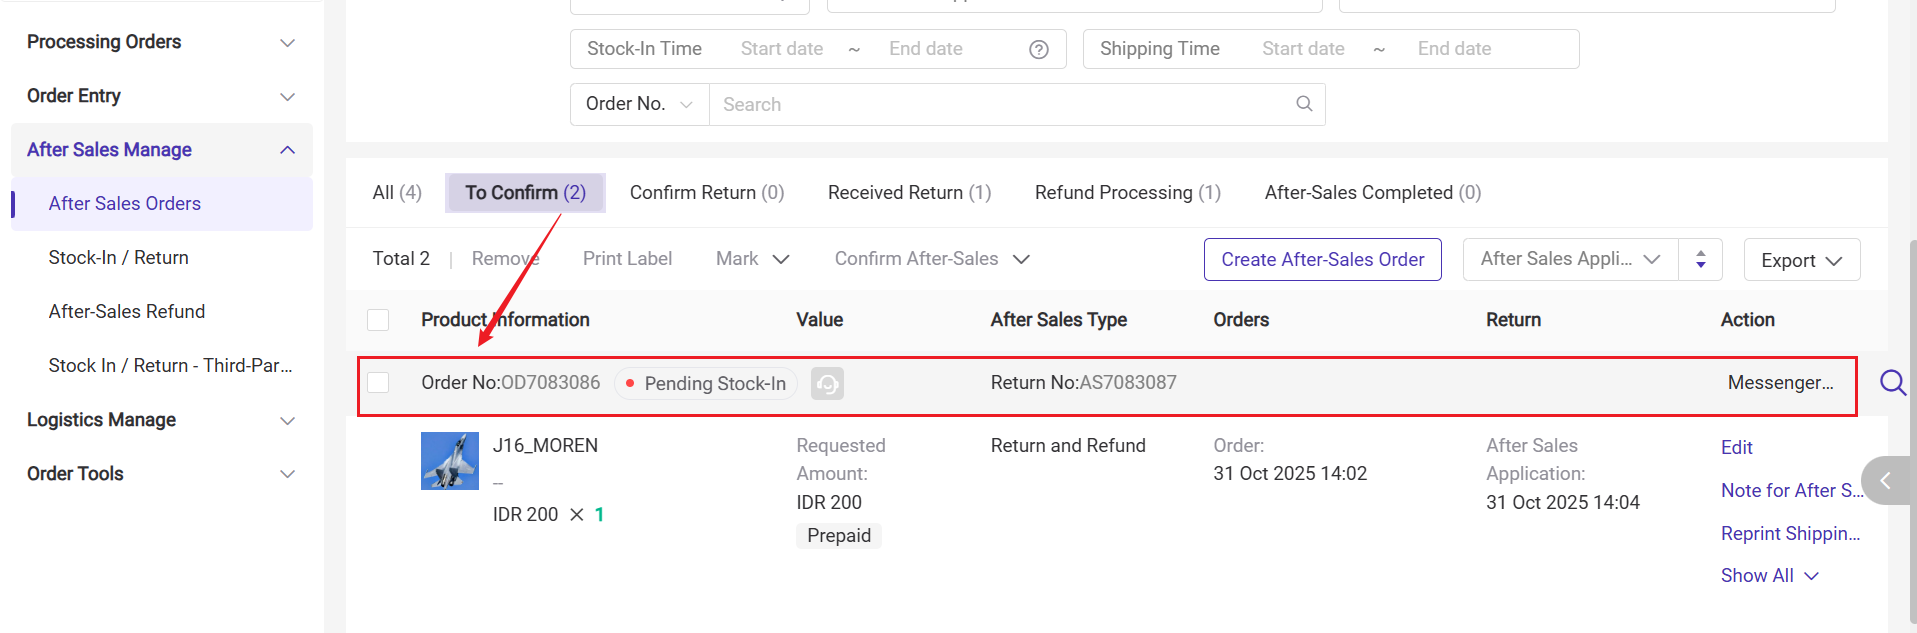
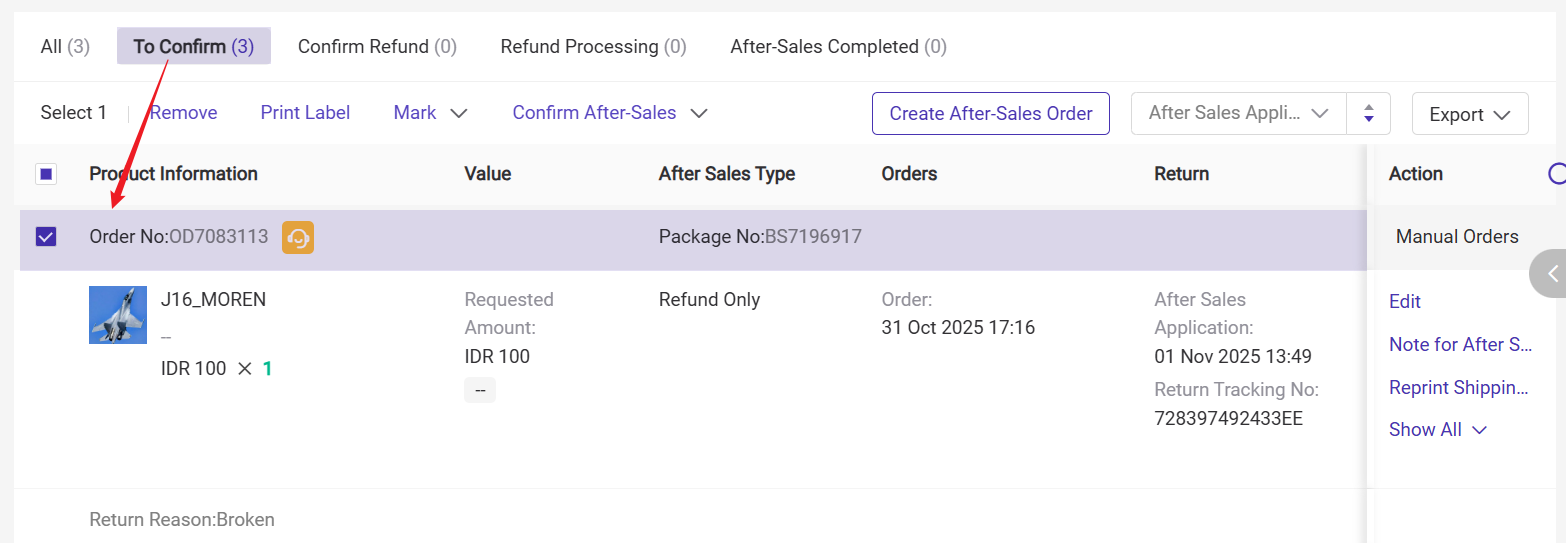
3) After creation, the after-sales order will enter the To Confirm list.
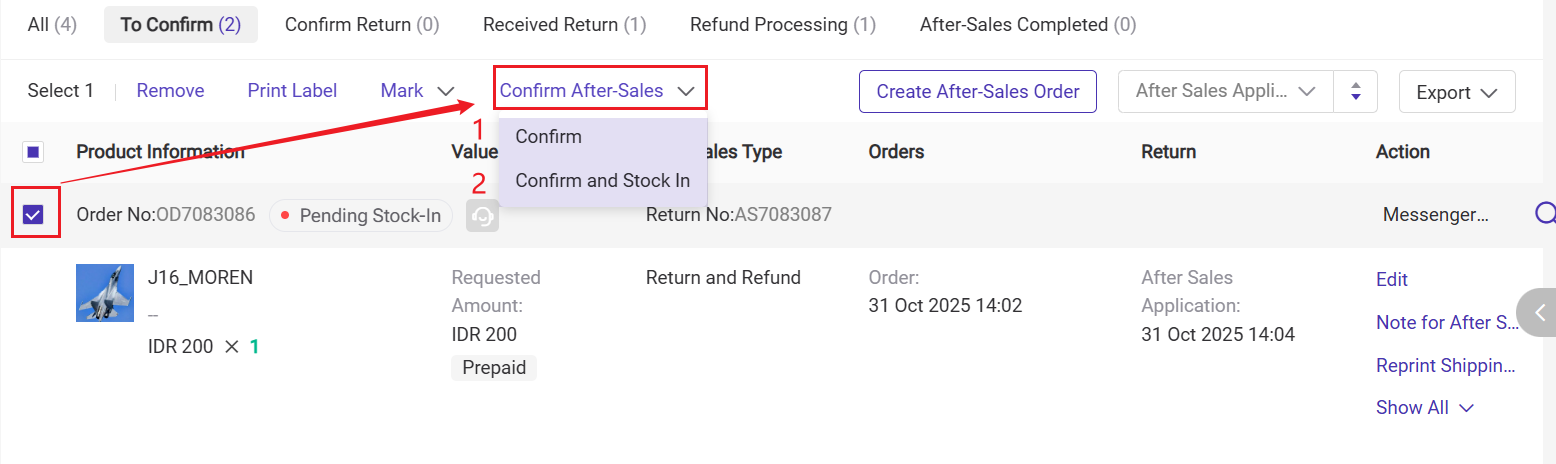
Step 2: Confirm After-Sales & Process Stock-In Return
Go to the To Confirm list to confirm the after-sales order. You can choose one of the following options:
- Confirm After-Sales and Stock-In: The system will automatically complete the return stock-in, and the after-sales order will move to the Received Return list.
- Confirm After-Sales: The after-sales order will move to the Confirm Return list. Once the warehouse receives the package, stock-in can be performed on the Stock-In / Return page. After stock-in, the order will automatically move to the Received Return tab.
1) For instructions on how to perform return stock-in in BigSeller, please refer to Introduction to Stock-In /Return
2) It’s recommended to enter the buyer’s return tracking number in the after-sales order before performing the return stock-in, to avoid issues locating the corresponding after-sales order during the stock-in process.
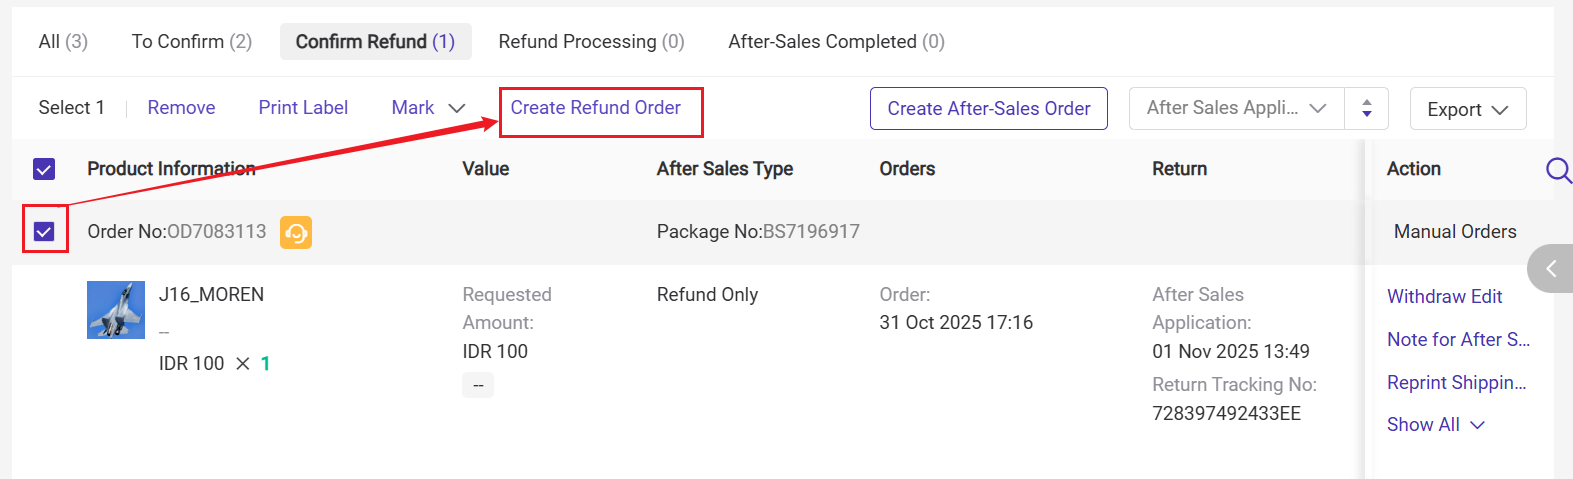
Step 3: Create Refund Order
1) After the returned package is stocked in, go to the Received Return list, select the order, and click Create Refund Order.
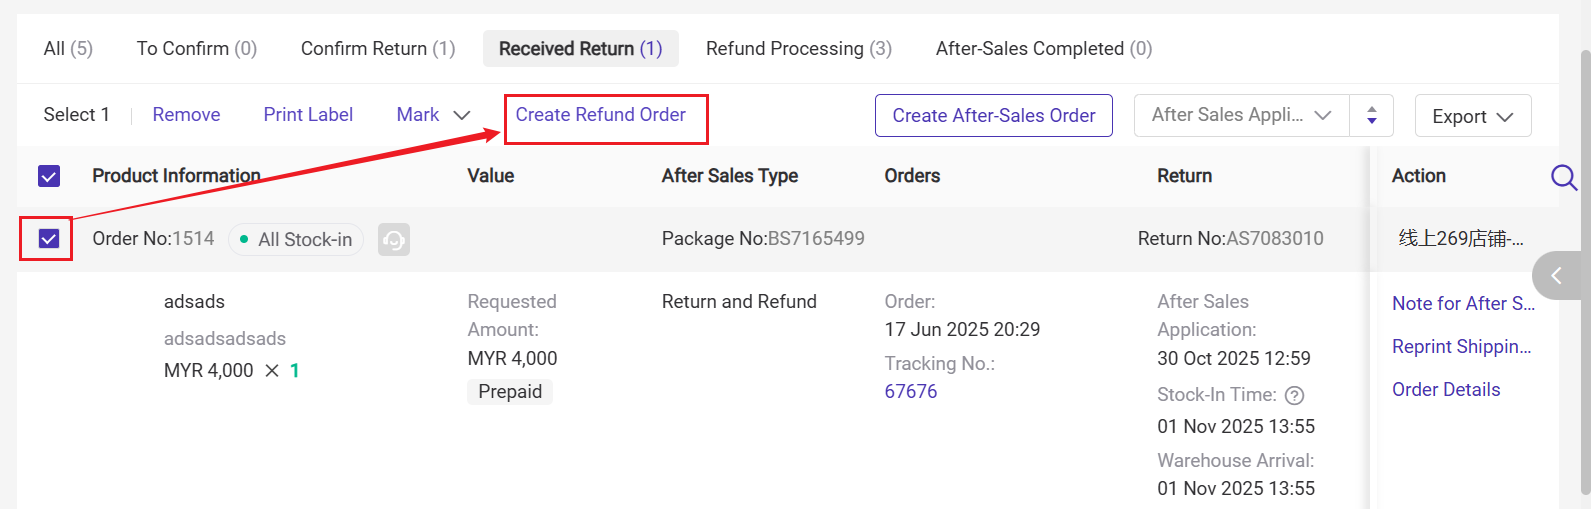
2) Fill in the request refund amount (the amount to be refunded to the buyer), payment information, and payment proof, etc.
- You may choose to issue the refund via bank transfer, which will return the funds directly to the buyer's bank account.
- Alternatively, you can refund the amount to the customer's account balance, which they can use toward their next purchase.
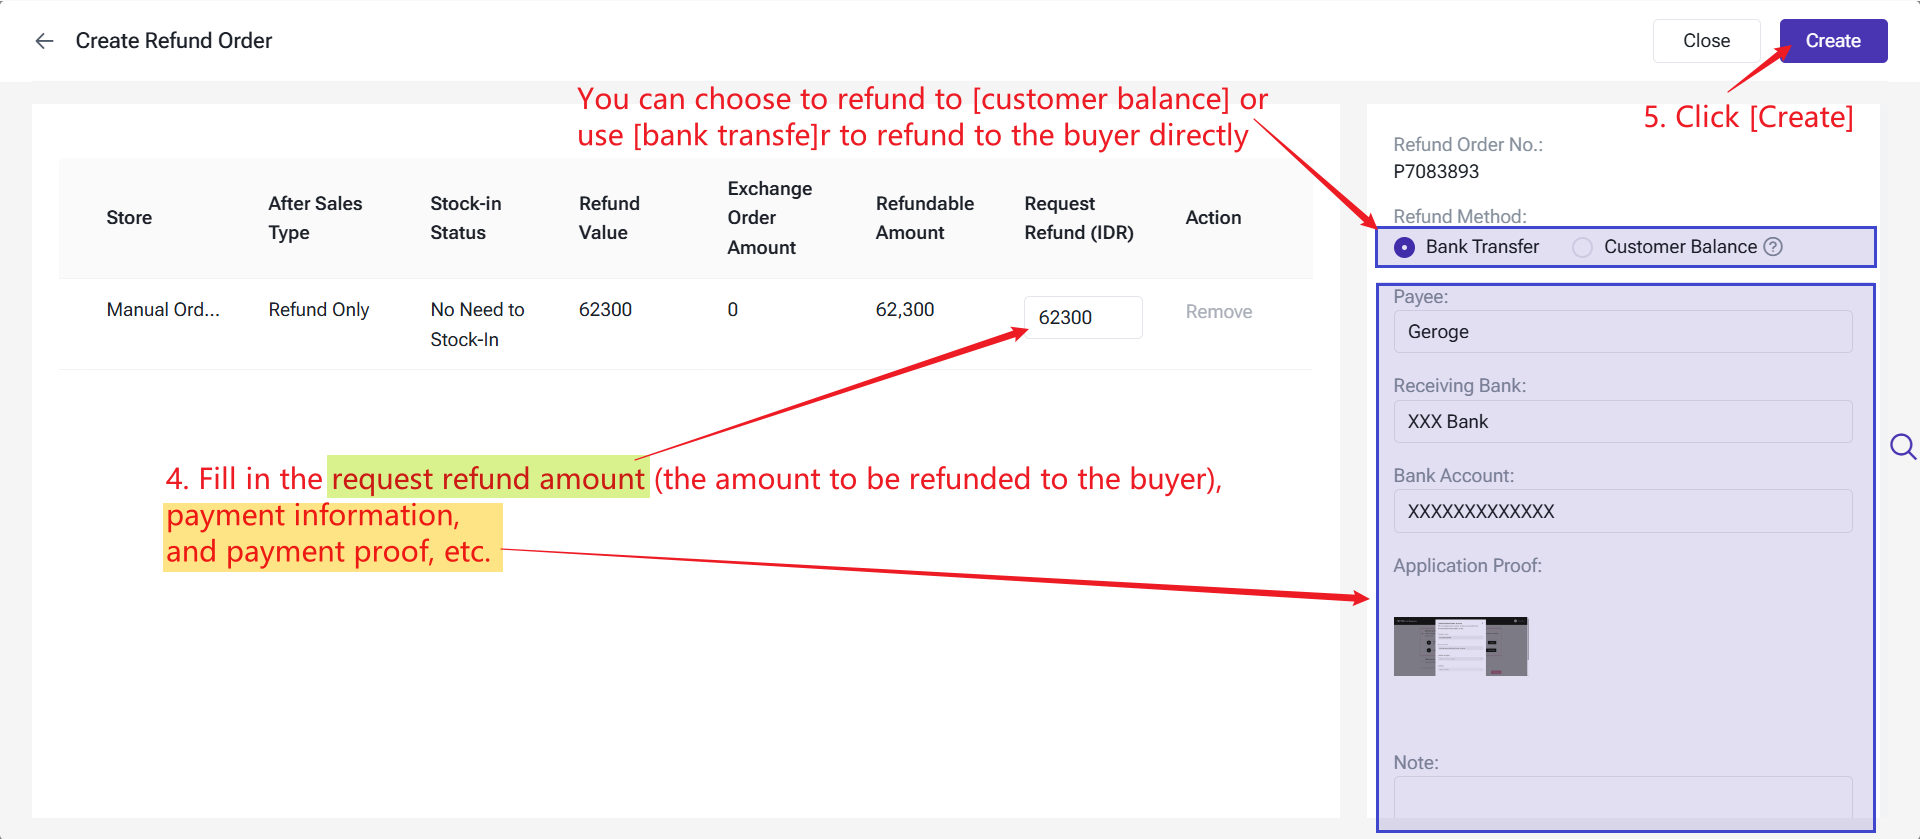
3) Once created, the after-sales order will move to the Refund Processing list.
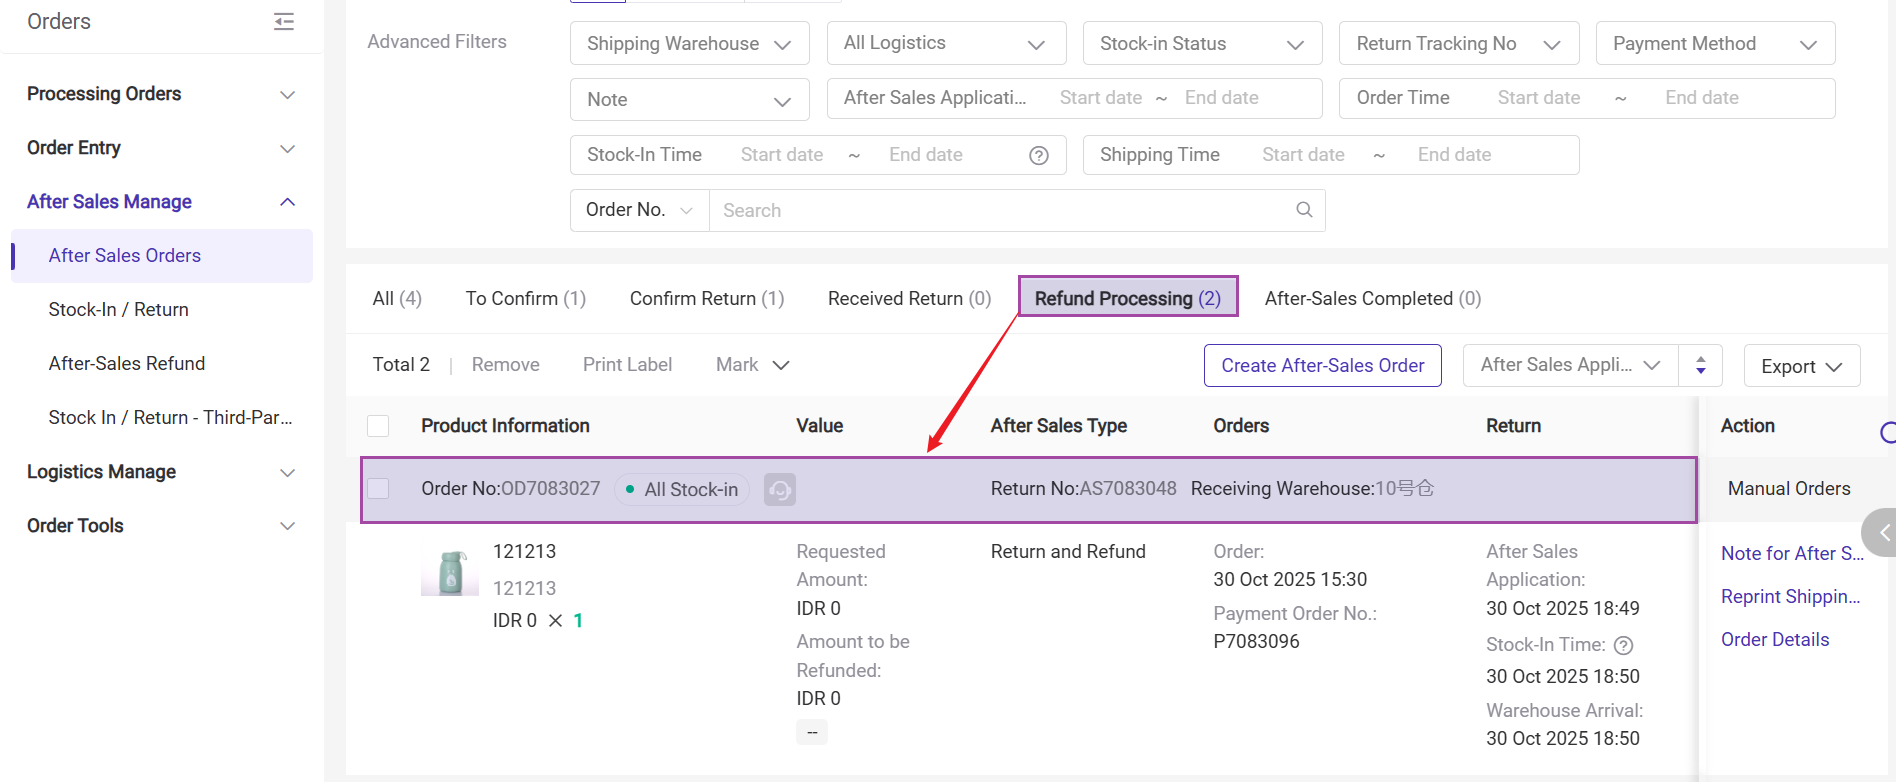
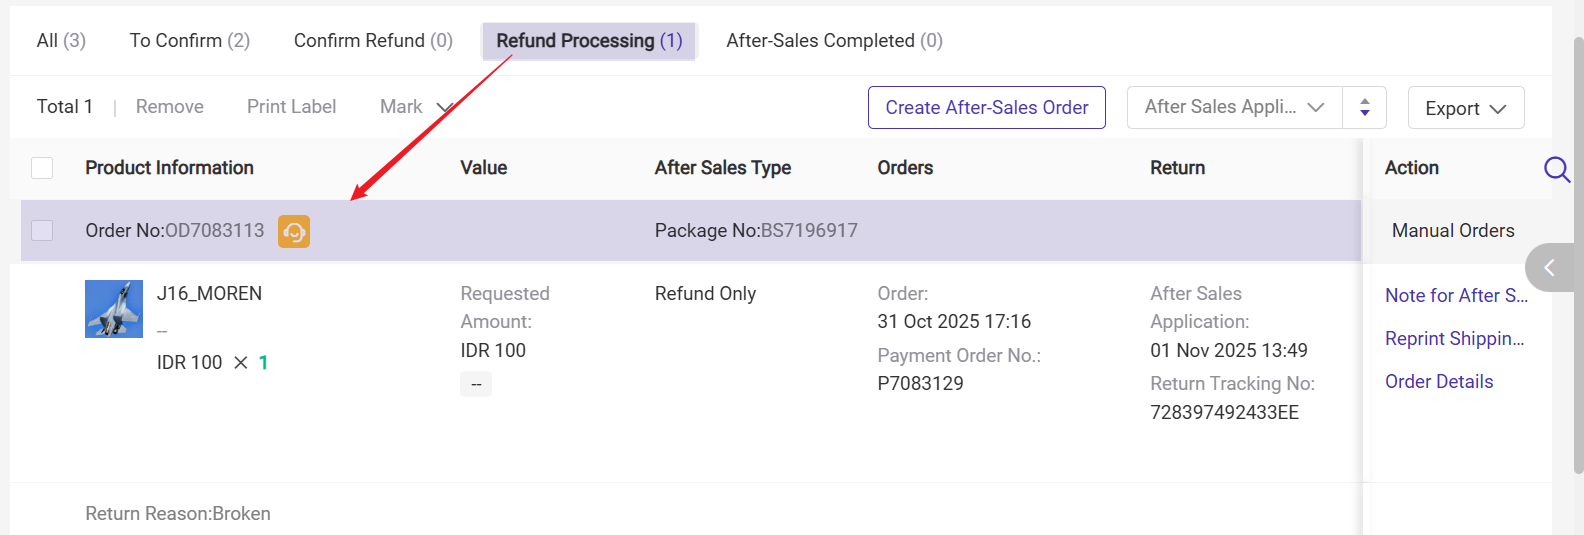
Step 4: Confirm or Reject Refund
Go to the “After-Sales Refund” page to process the refund.
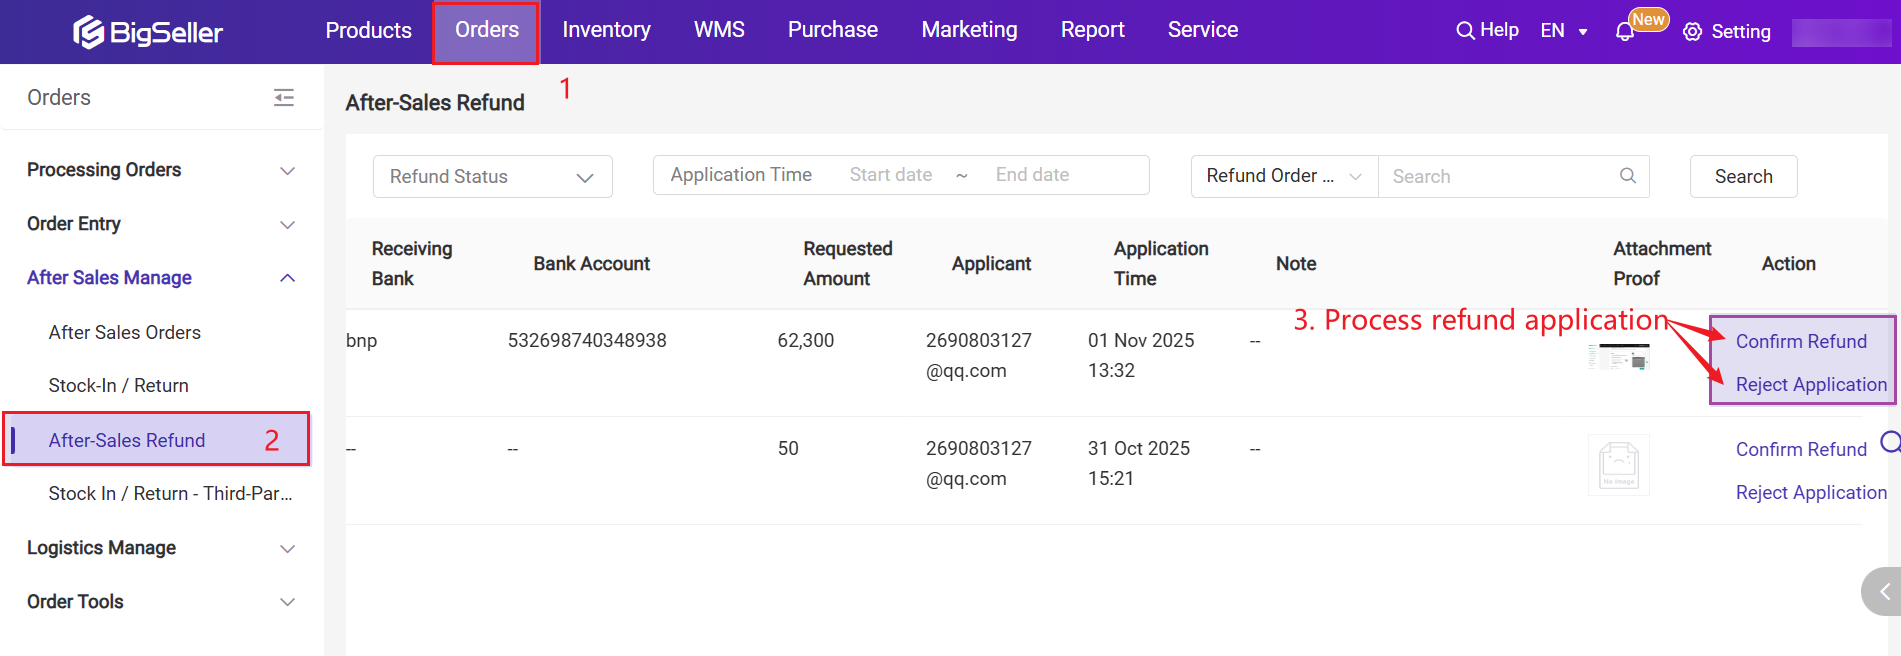
- Confirm Refund: The after-sales order will move to the After-Sales Completed list.
- Reject Application: You must provide a reason for rejection. After rejection, a new Payment Slip can be created from the Received Return list.
2. Refund-Only Process
Step 1: Create an After-Sales Order
1) Go to After-Sales Order Management > Manual After-Sales Order, click Create After-Sales Order, select the order, and choose Refund-Only.
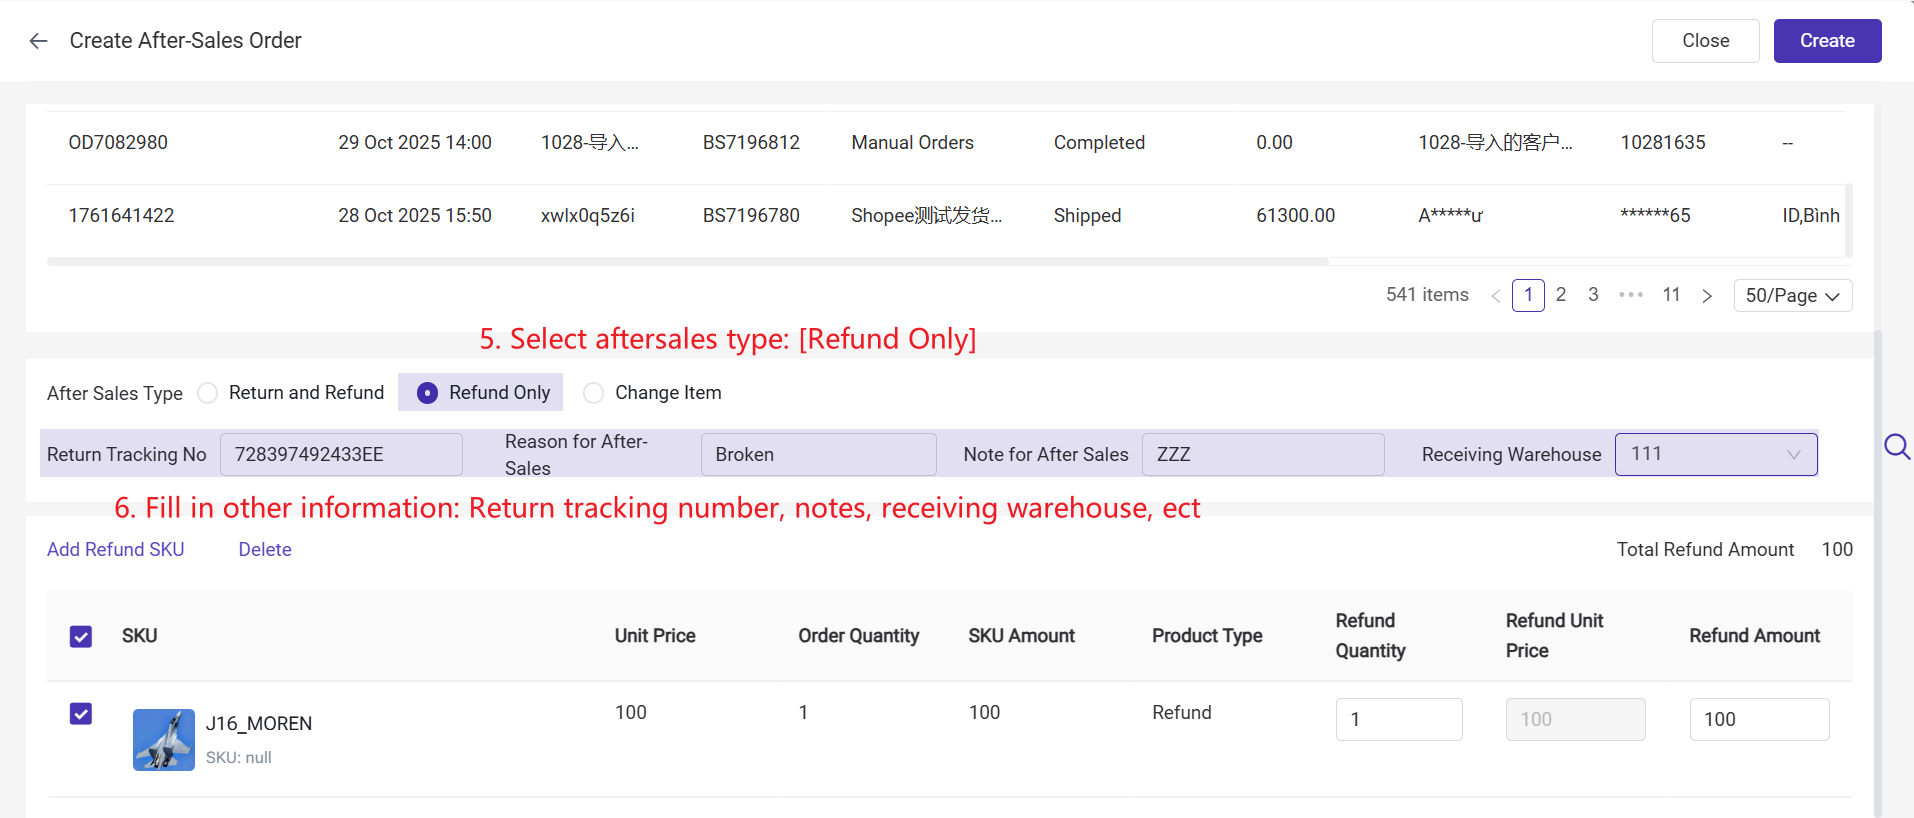
2) You can add new refund items or remove items from the original order.
3) After creation, the after-sales order will move to the To Confirm list.
Step 2: Confirm After-Sales
In the To Confirm list, confirm the after-sales order. It will then move to the Confirm Refund list.

Step 3: Create Refund Order
1) In the Confirm Refund list, select the order and click Create Refund Order.
2) Fill in the refund amount (the amount to be refunded to the buyer), payment information, payment proof, etc.
- You may choose to issue the refund via bank transfer, which will return the funds directly to the buyer's bank account.
- Alternatively, you can refund the amount to the customer's account balance, which they can use toward their next purchase.

3) Once created, the after-sales order will move to the Refund Processing list.
Step 4: Confirm or Reject Refund
Go to the “After-Sales Refund” page:
- Confirm Refund: The after-sales order will move to the After-Sales Completed list.
- Reject Application: You must provide a reason for rejection. After rejection, a new refund order can be created from the Confirm Refund list.
3. Exchange Process
Step 1: Create an After-Sales Order
1) Go to After-Sales Order Management > Manual After-Sales Order, click Create After-Sales Order, select the order, and choose Exchange.

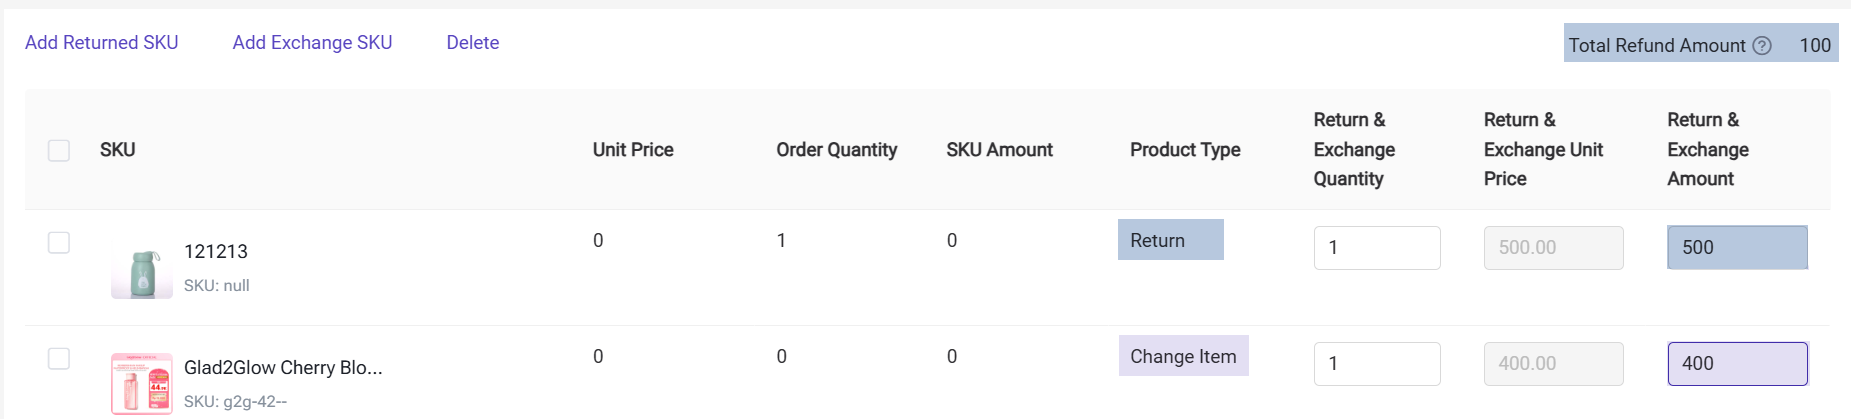
2) You can add returned items, remove original order items, or add exchange items.
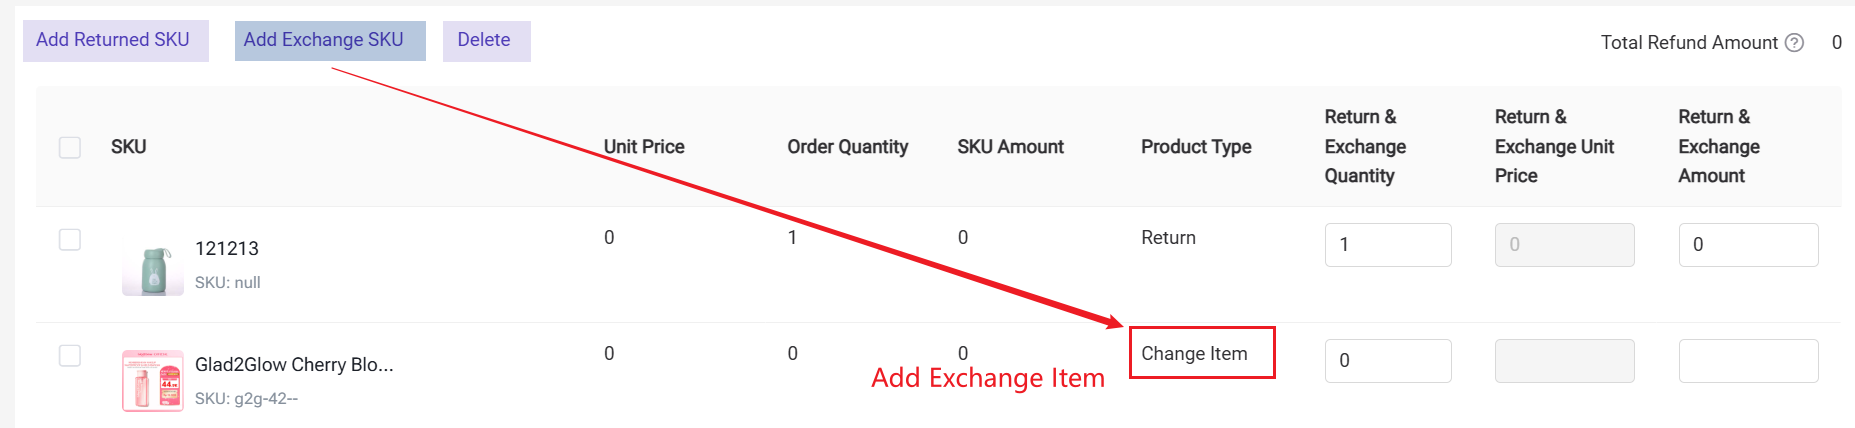
💡 Refund Amount Explanation
- Returned Item Refund Amount = amount paid by the seller to the buyer
- Exchange Item Refund Amount = amount paid by the buyer to the seller
- Total Refund Amount = total returned items amount − total exchange items amount
3) After creation, the after-sales order will move to the To Confirm list.
Step 2: Confirm After-Sales & Process Stock-In Return
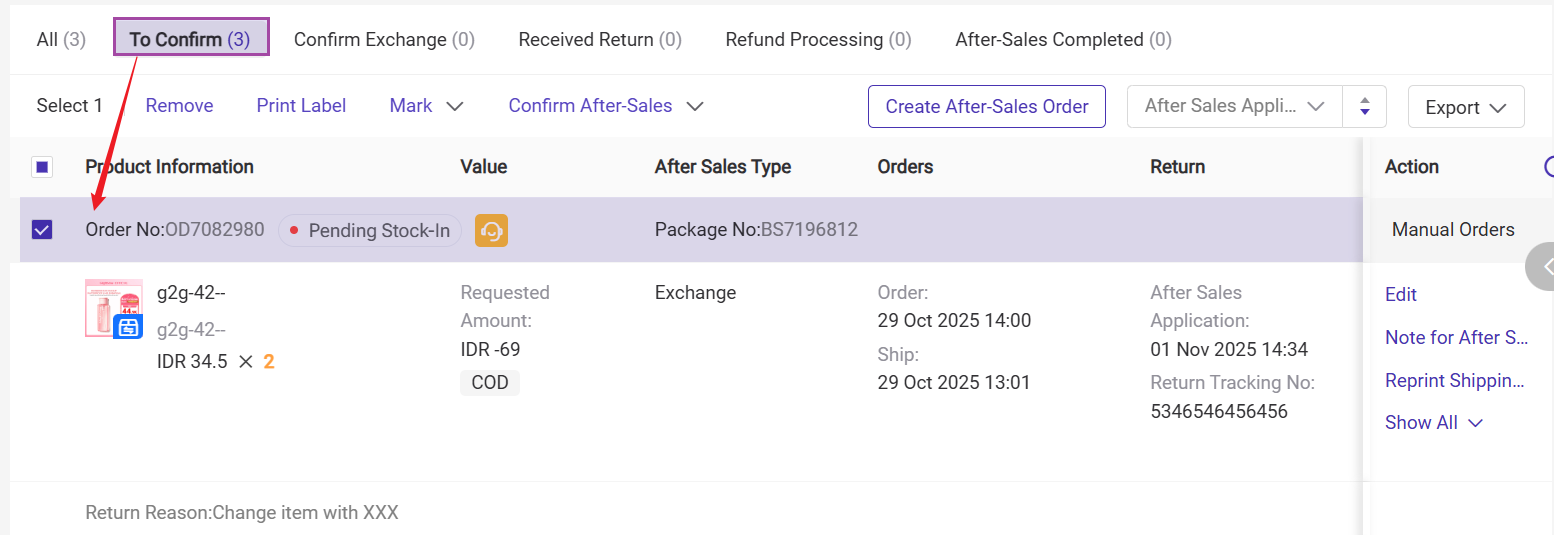
In the To Confirm list, select a processing method:
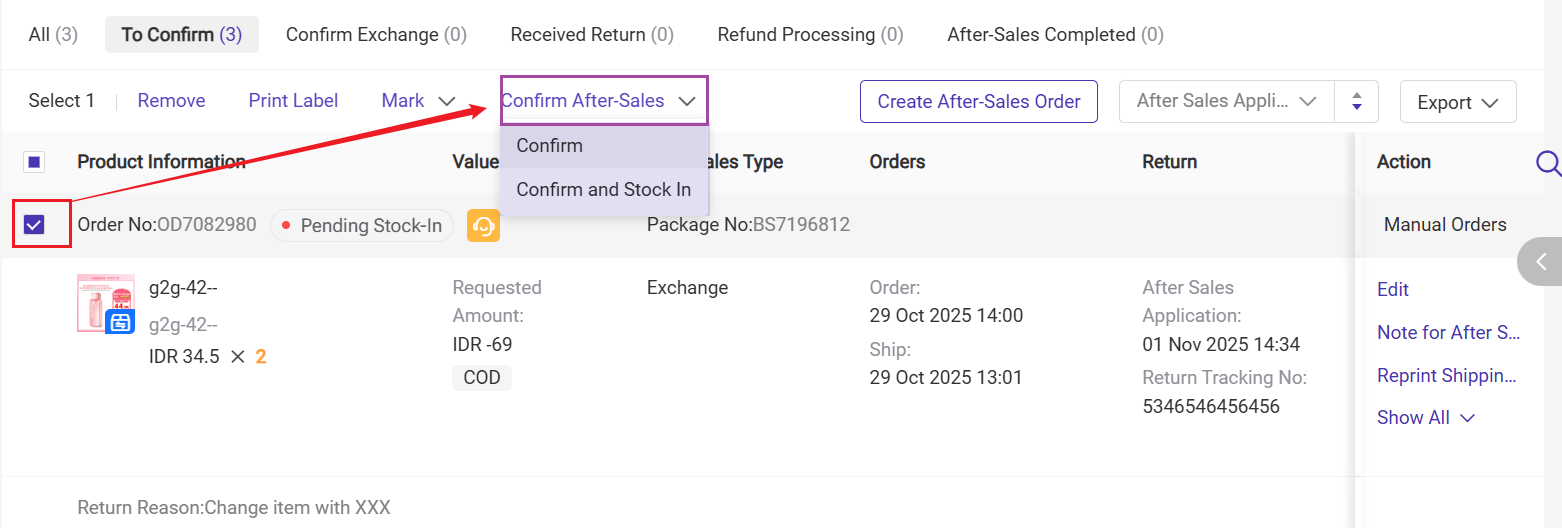
- Confirm After-Sales and Stock-In: The system automatically stocks in the returned items, and the order moves to the Received Return list.
- Confirm After-Sales: The order moves to the Confirm Exchange list. Once the warehouse receives the return package, stock-in can be performed on the Return Stock-In page. After stock-in, the order automatically moves to the Received Return tab.
1) For instructions on how to perform return stock-in in BigSeller, please refer to Introduction to Stock-In /Return
2) It’s recommended to enter the buyer’s return tracking number in the after-sales order before performing the return stock-in, to avoid issues locating the corresponding after-sales order during the stock-in process.
Step 3: Generate Exchange Order
1) In the Confirm Exchange or Received Return list, you can generate the exchange order with one click.
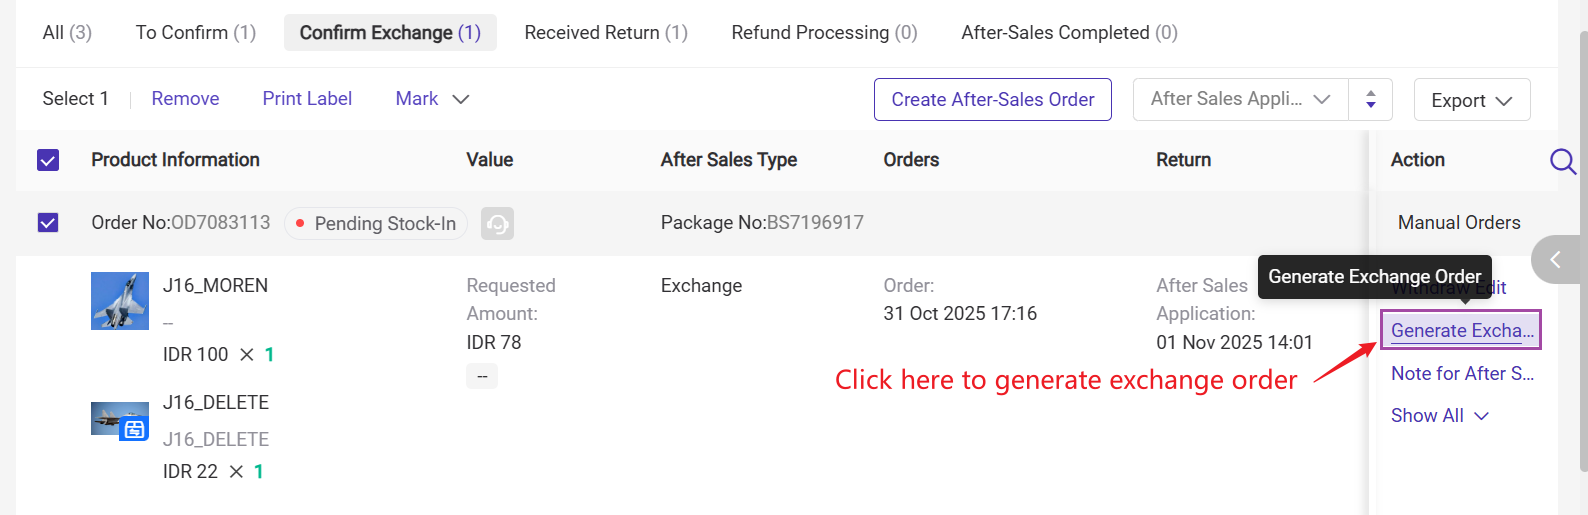
2) The system will automatically create a new messenger order, which will appear in Order Entry > Pending Order list. You can click the Process button to go to the corresponding page.
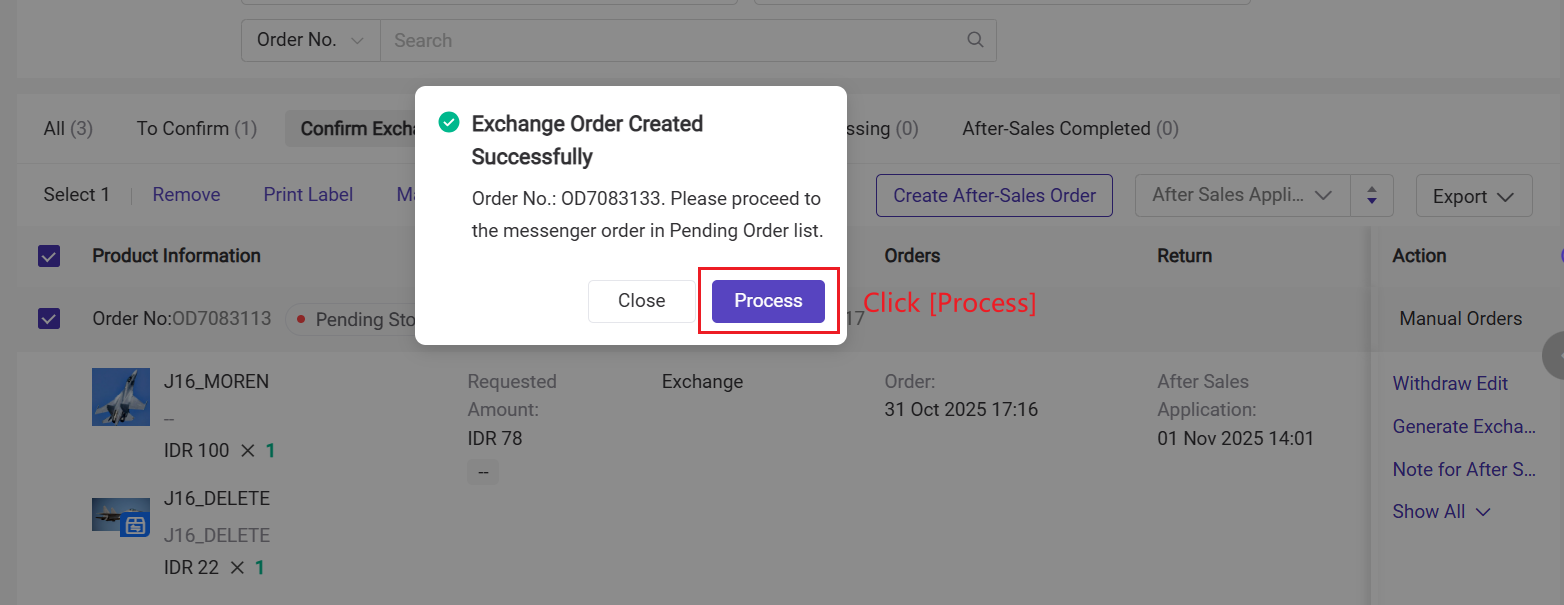
3) You can edit and review order information on this [Pending Order > Waiting to Approve] page.
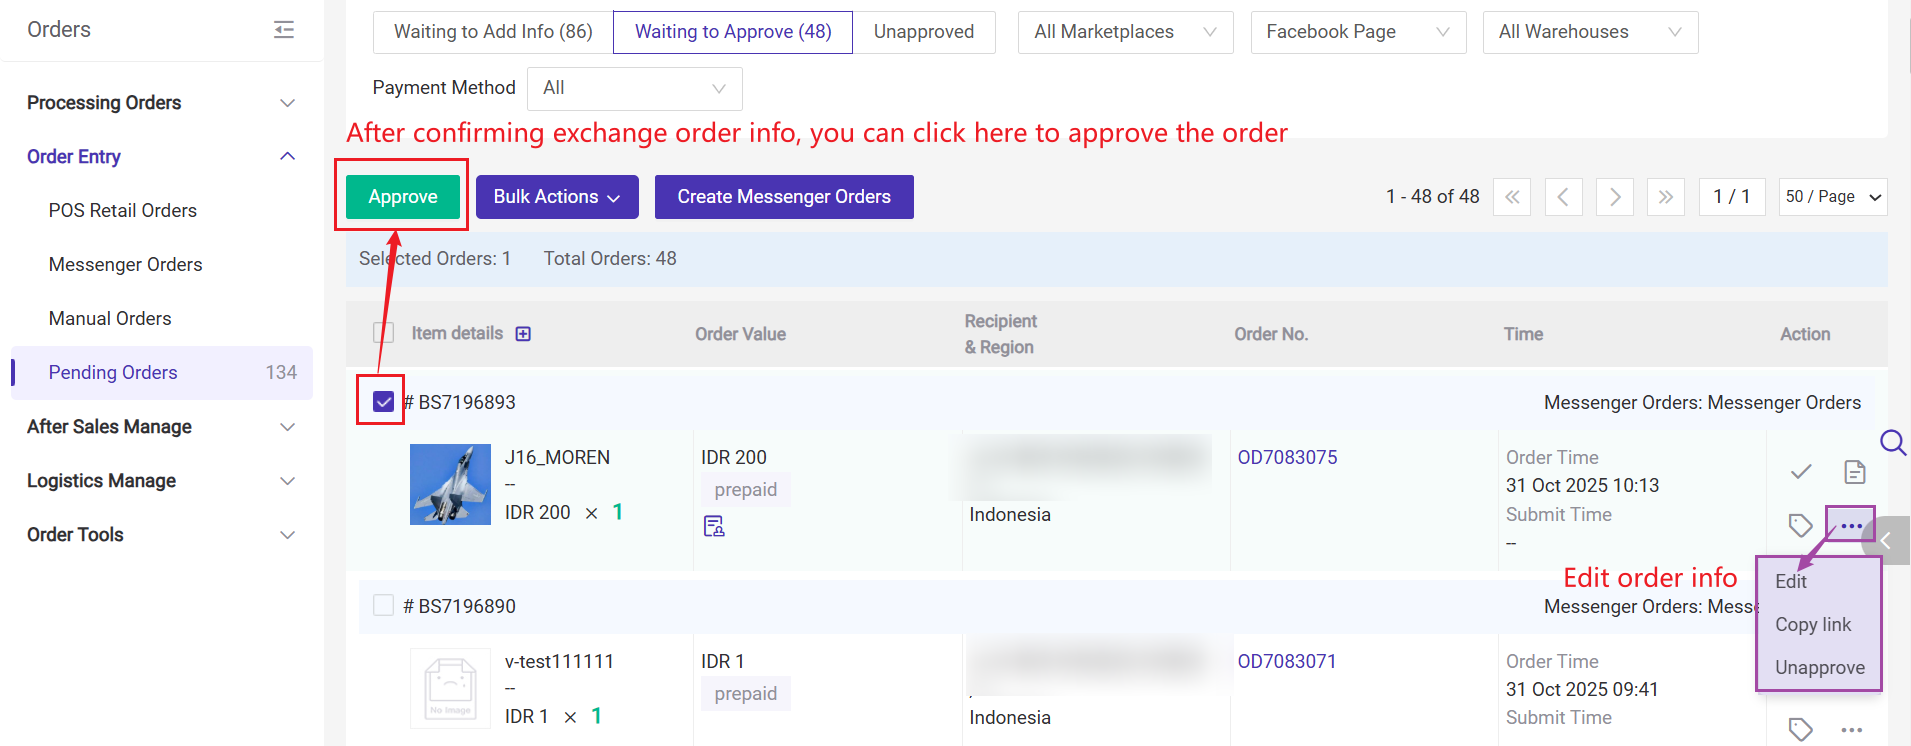
After approval, the order moves to the New Orders page and can continue through the regular fulfillment process.
Step 4: Create Refund Order
1) If a refund is required for the buyer, go to the Received Return list, select the order, and create refund order.
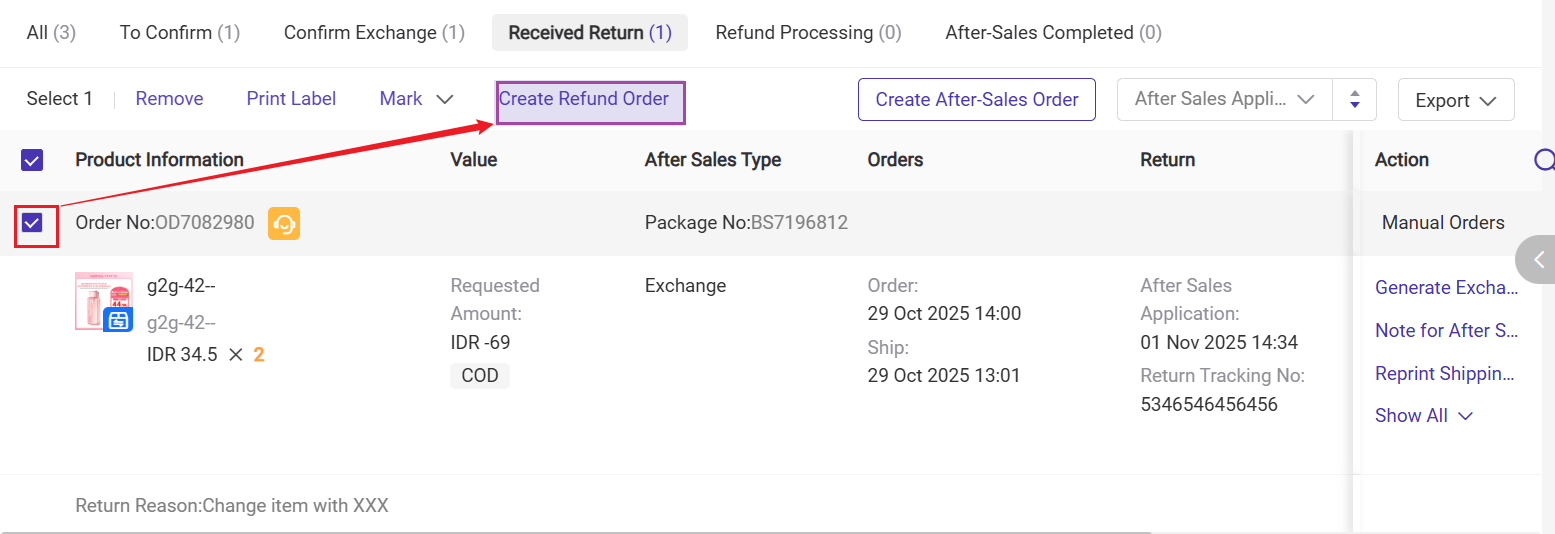
2) Fill in the refund amount (the amount to be refunded to the buyer), payment information, and payment proof.
- You may choose to issue the refund via bank transfer, which will return the funds directly to the buyer's bank account.
- Alternatively, you can refund the amount to the customer's account balance, which they can use toward their next purchase.

3) Once created, the after-sales order will move to the Refund Processing list.
Step 5: Confirm or Reject Refund
Go to the After-Sales Refund page:
- Confirm Refund: The after-sales order moves to the After-Sales Completed list.
- Reject Application: You must provide a reason for rejection. After rejection, a new refund order can be created from the Received Return list.
Note: How After-Sales Refunds Affect Customer Credit
For more information, please refer to Introduction to Credit Term Management
-
Refund amount: For example, the customer requests a refund of PHP 100.
-
Unsettled amount: Suppose PHP 30 of the order has been settled, and PHP 70 remains as credit (unsettled).
-
The requested refund amount
-
The unsettled amount
- Refund requested: PHP 100
- Unsettled amount: PHP 70
- → Credit offset = PHP 70

-
If refunding to customer balance:
Balance change = Refund amount − Credit offset-
Example: Refund PHP 100, offset PHP 70 → credit decreases by PHP 70; customer balance increases by PHP 30.
-
-
If refunding to a bank account:
The credit decreases by PHP 70.
Balance change = 0 (the refund is returned directly to the customer; balance does not change).
▶ Video Tutorial
Is this content helpful?
Thank you for your feedback. It drives us to provide better service.
Please contact us if the document can't answer your questions