How to use mark rules?
Copy link & title
Update Time: 13 May 2025 02:01
If specific orders need to be marked, order mark rules can be set. Orders will be automatically marked after being synchronized to BigSeller, and there is no need to manually add marks yourself.
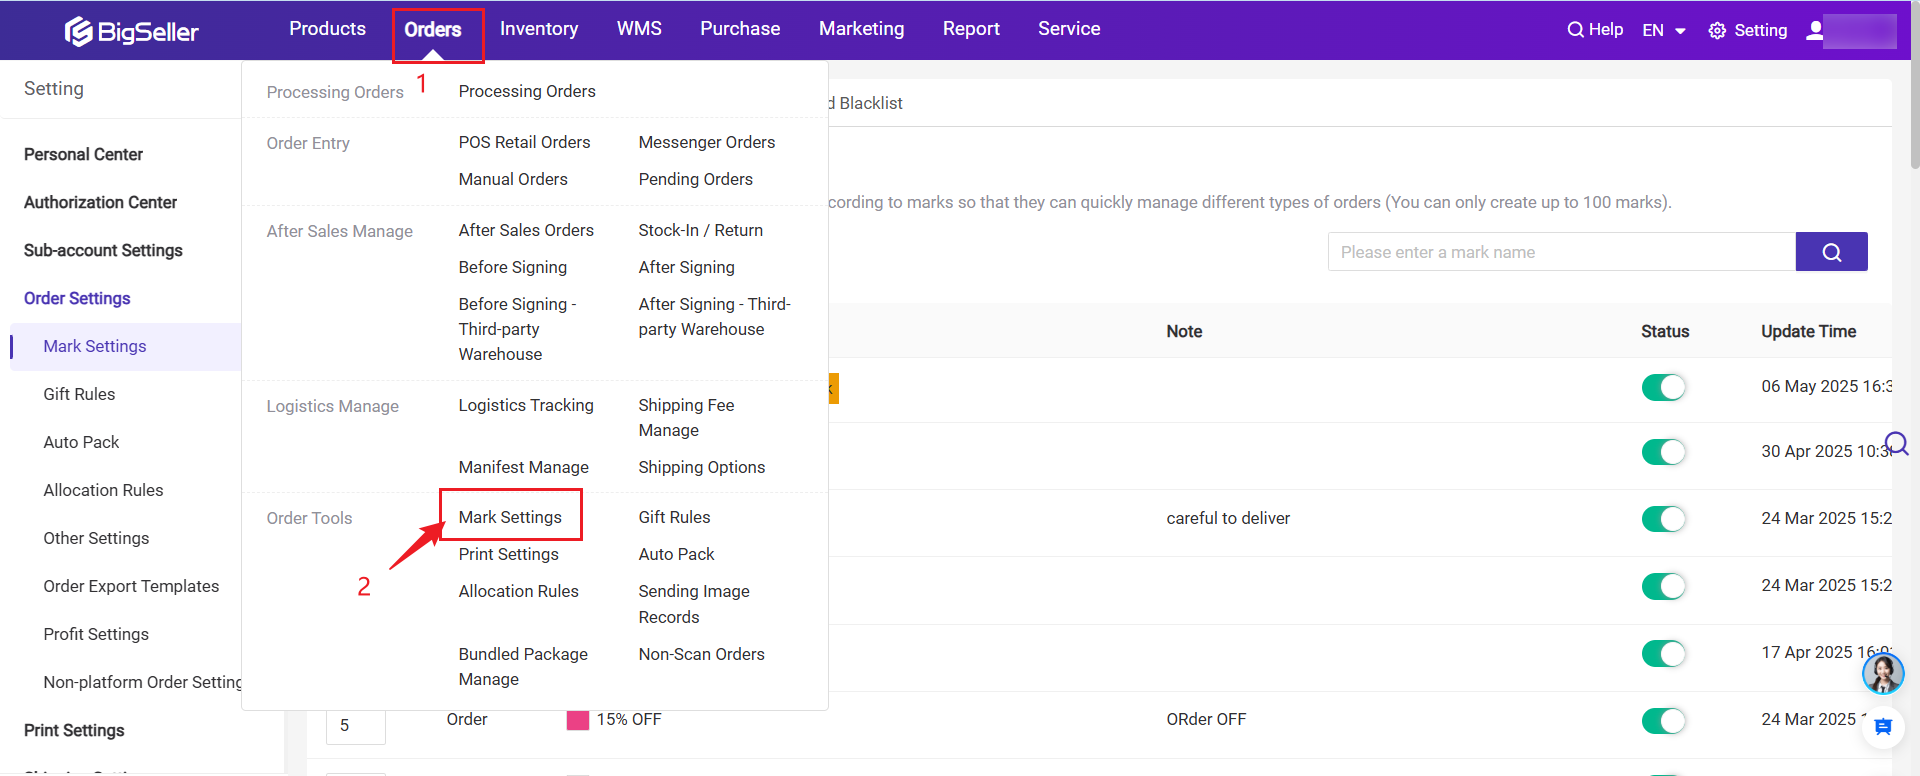
Step 1: Add Marks
Click here to learn 👉 Order Mark
Step 2: Add New Mark Rule
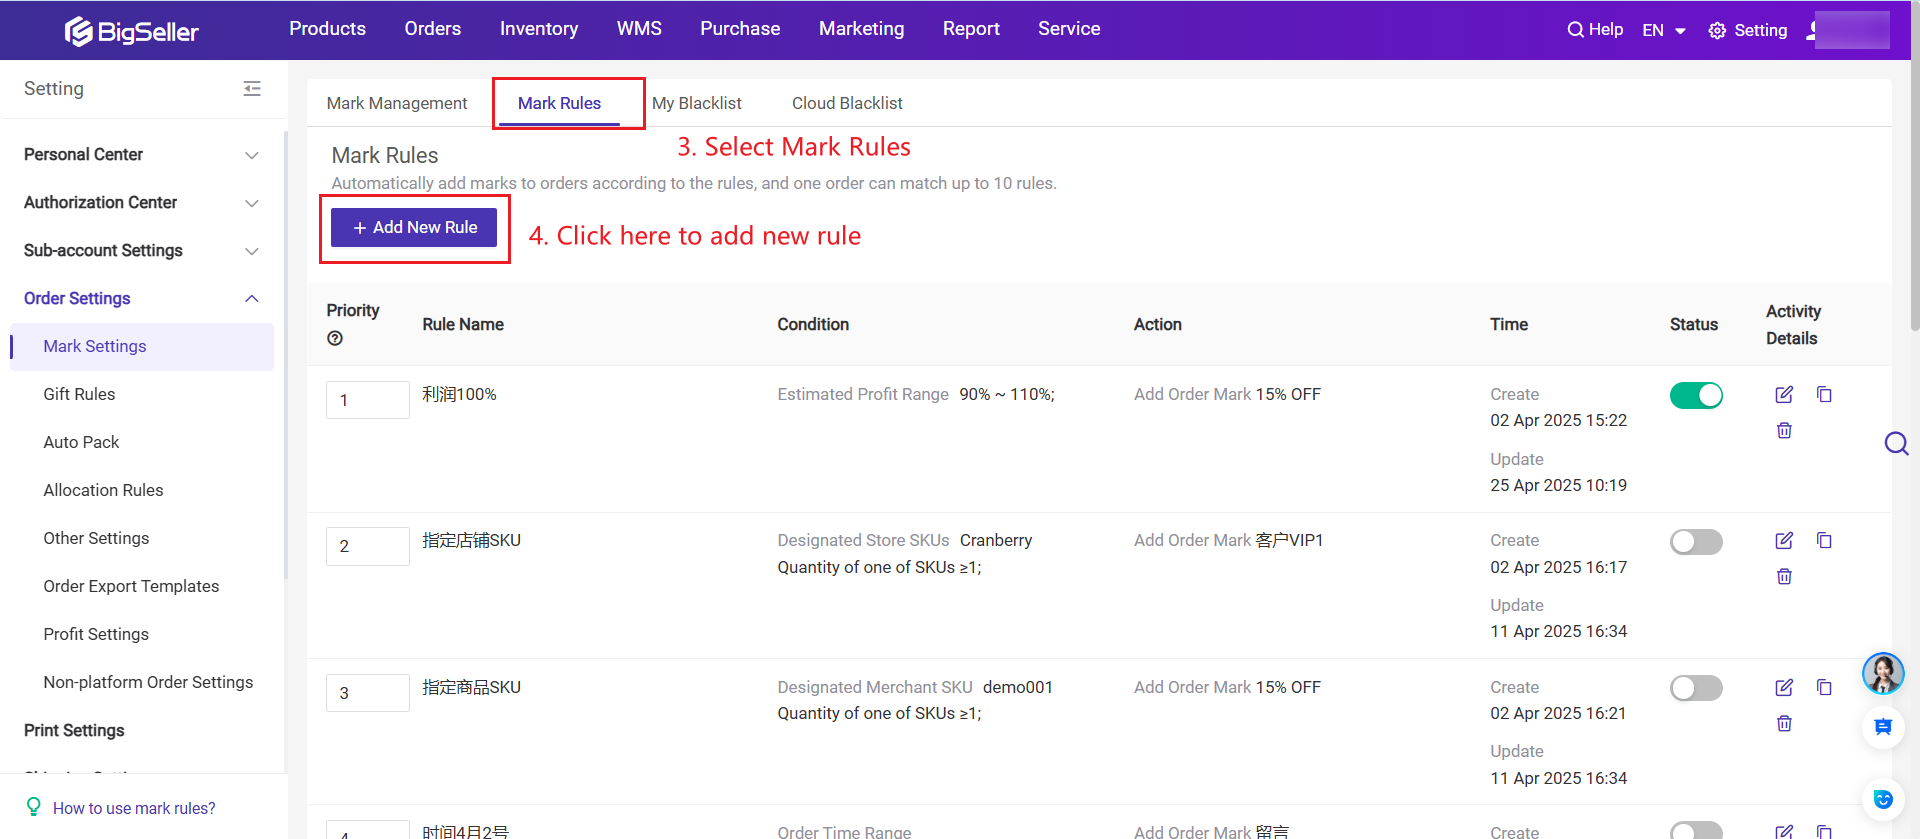
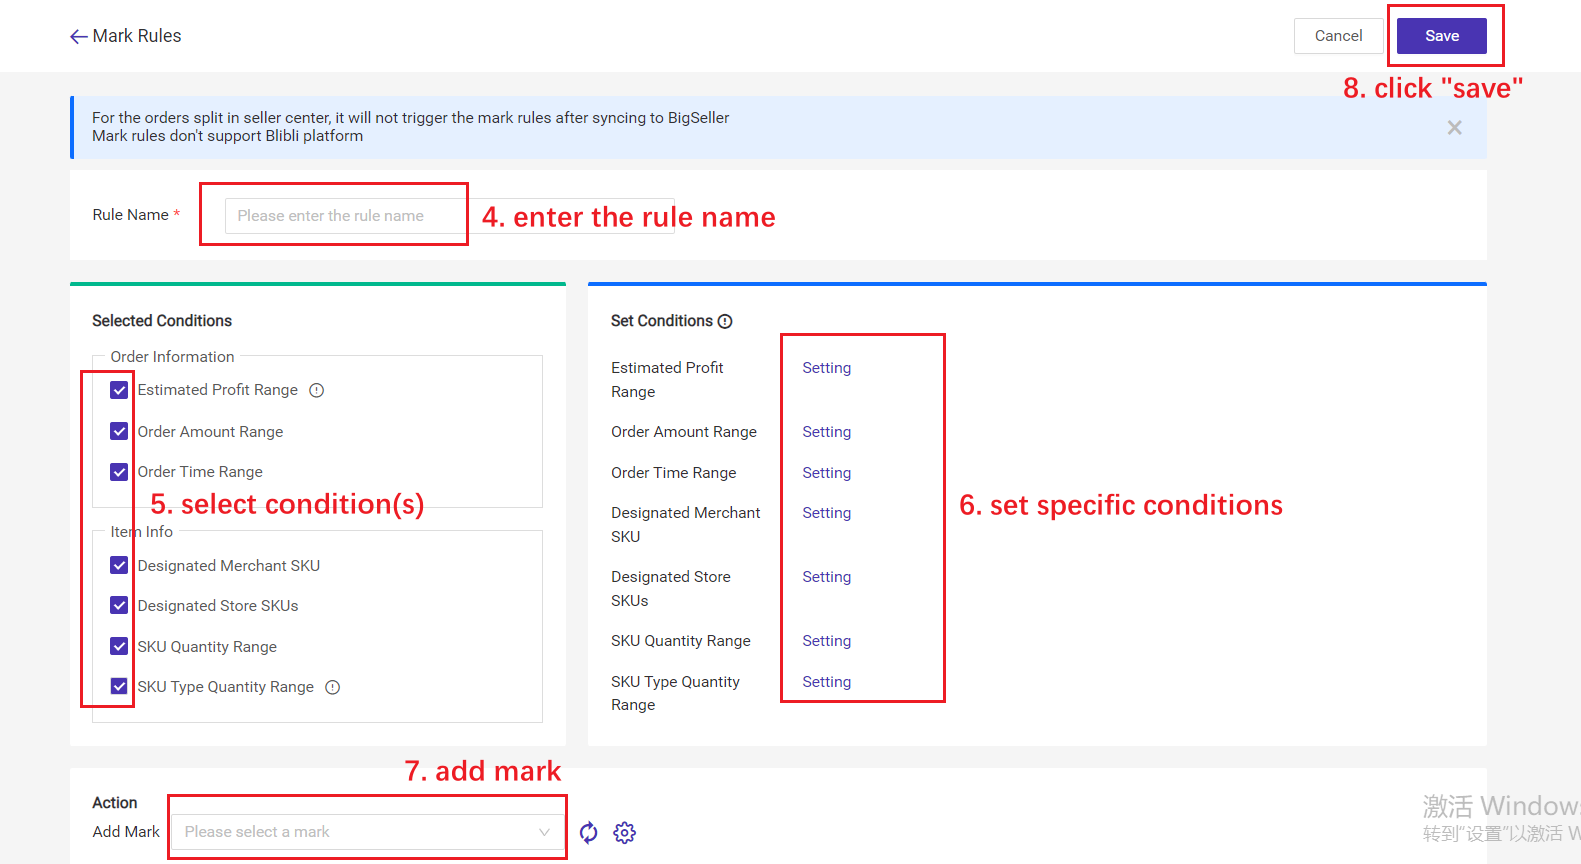
You can set 1) Estimated Profit Range, 2) Order Amount Range, 3) Order Time Range, 4) Designated Merchant SKU, 5) Designated Store SKU, 6) SKU Quantity Range, 7) SKU Type Quantity Range;
(For a detailed introduction, please refer to the Setting Explanation of the settings below.)
🔖 If you set multiple conditions, the order mark can be auto added only if an order meets all the selected conditions.
For example: One mark rule's conditions are: Order Amout Range (Order Amount = 100), Designated Merchant SKU (A001/B001); so only when the order amount is 100 and contains merchant SKU A001 or B001, the mark rule can be triggered.
Step 3: Enable the Mark Rule

Setting Explanation
You can set 1) Estimated Profit Range, 2) Order Amount Range, 3) Order Time Range, 4) Designated Merchant SKU, 5) Designated Store SKU, 6) SKU Quantity Range, 7) SKU Type Quantity Range;
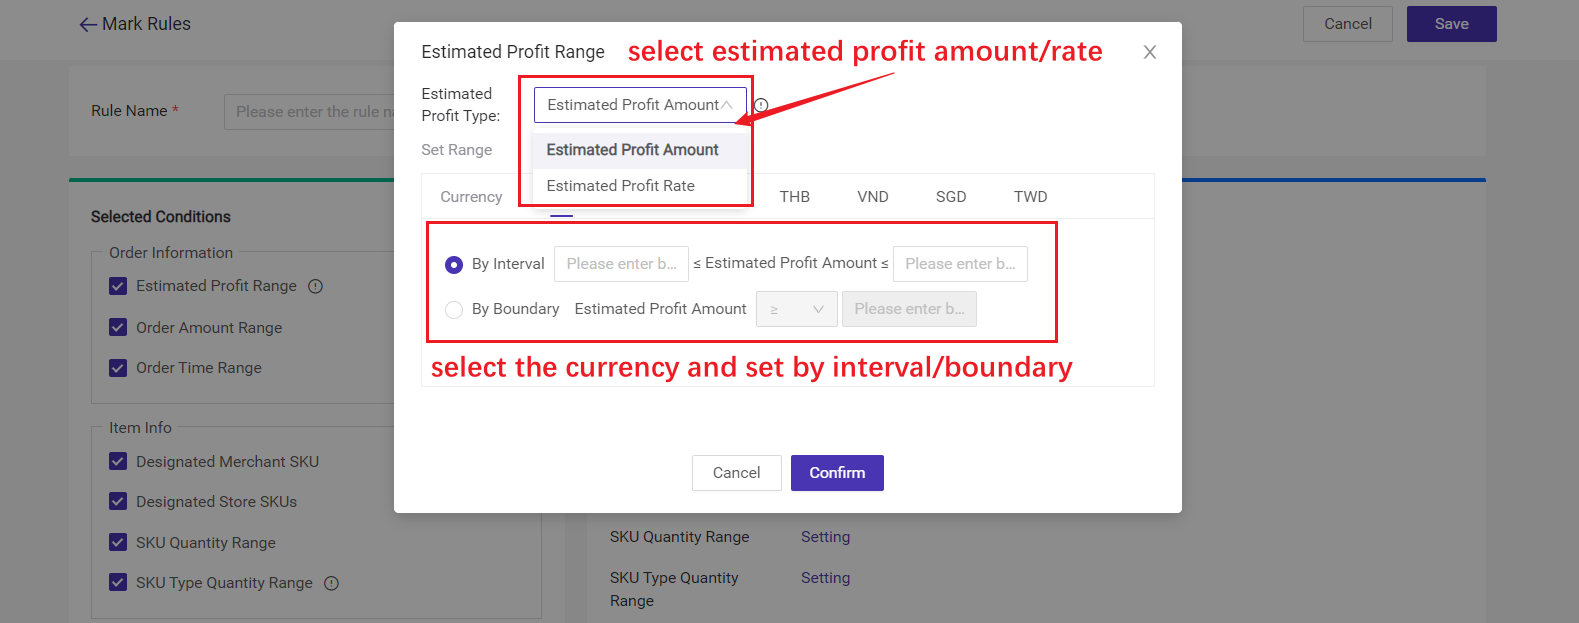
1) Estimated Profit Range
( Click here to learn 👉 Order Estimated profit )
2) Order Amount Range
3) Order Time Range
You can set time by date or week.

4) Designated Merchant SKU
5) Designated Store SKU
6) SKU Quantity Range
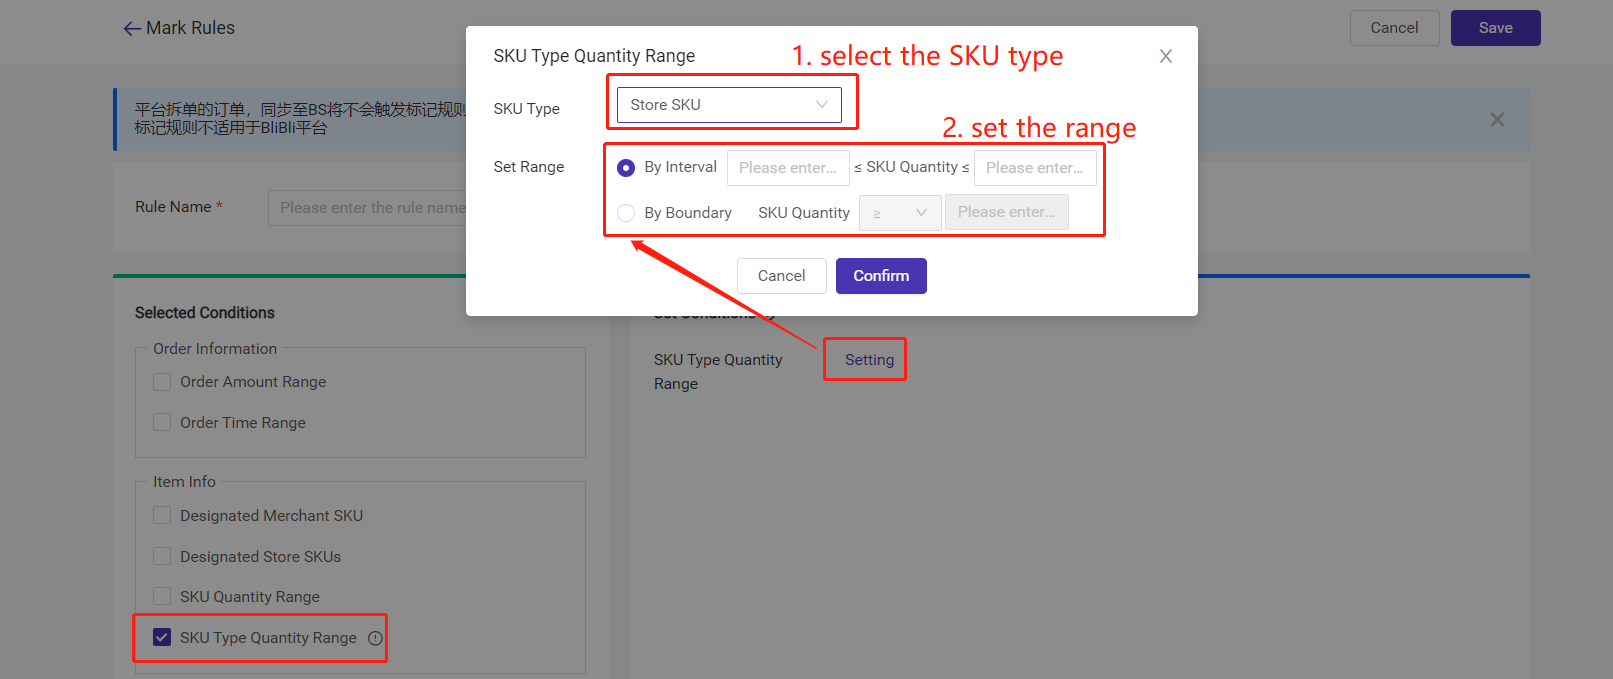
7) SKU Type Quantity Range
The type quantity of merchant SKUs or store SKUs included in the order.
FAQs
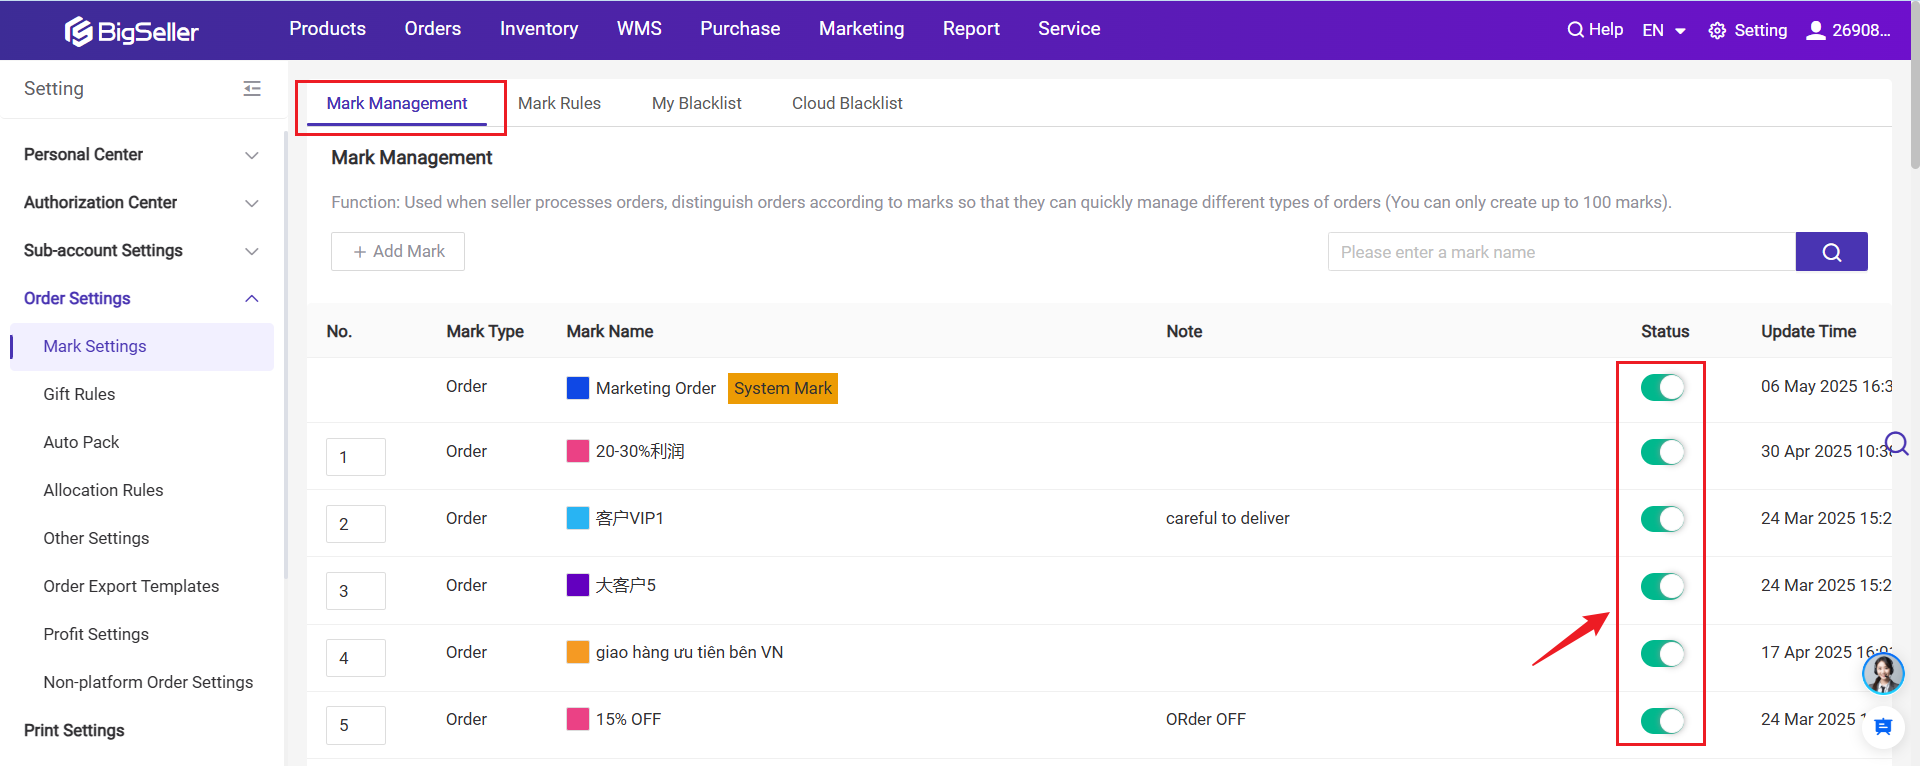
Q1: Why am I unable to select marks that have already been added?
A1: Only marks under "enabled" status can be selected. Please toggle on the button and click the refresh icon.

For example:
A. Priority shipping is required for purchases over a certain quantity, and priority markers are automatically added when the number of products in an order exceeds the quantity, making it easy for staff to quickly filter out and ship;
B. Different picking groups sort orders, pick and pack, one order marker for each picking group;
C. When some SKUs are in click farming, a click-farming mark can be auto added to these orders to facilitate subsequent screening and processing of this batch of orders;
D. Add markers to orders by SKU to quickly filter the same items for printing shipping labels;
E. When the purchase exceeds a certain quantity, need to be reminded;
F. When using third-party warehouse and own warehouse to ship, you want to mark out the orders with own warehouse shipping separately.
.
A. Priority shipping is required for purchases over a certain quantity, and priority markers are automatically added when the number of products in an order exceeds the quantity, making it easy for staff to quickly filter out and ship;
B. Different picking groups sort orders, pick and pack, one order marker for each picking group;
C. When some SKUs are in click farming, a click-farming mark can be auto added to these orders to facilitate subsequent screening and processing of this batch of orders;
D. Add markers to orders by SKU to quickly filter the same items for printing shipping labels;
E. When the purchase exceeds a certain quantity, need to be reminded;
F. When using third-party warehouse and own warehouse to ship, you want to mark out the orders with own warehouse shipping separately.
💡 Notes
1. Up to 50 mark rules can be set;
2. Automatically add marks to orders according to the rules, and one order can match up to 10 rules.
3. Rules are triggered according to rule priority. The lower the number, the higher the priority;
4. If sub-account does not have the mark rule permission, then cannot access to mark rule setting page.
Step 1: Add Marks
Click here to learn 👉 Order Mark
Step 2: Add New Mark Rule


You can set 1) Estimated Profit Range, 2) Order Amount Range, 3) Order Time Range, 4) Designated Merchant SKU, 5) Designated Store SKU, 6) SKU Quantity Range, 7) SKU Type Quantity Range;
(For a detailed introduction, please refer to the Setting Explanation of the settings below.)
🔖 If you set multiple conditions, the order mark can be auto added only if an order meets all the selected conditions.
For example: One mark rule's conditions are: Order Amout Range (Order Amount = 100), Designated Merchant SKU (A001/B001); so only when the order amount is 100 and contains merchant SKU A001 or B001, the mark rule can be triggered.
Step 3: Enable the Mark Rule

Setting Explanation
You can set 1) Estimated Profit Range, 2) Order Amount Range, 3) Order Time Range, 4) Designated Merchant SKU, 5) Designated Store SKU, 6) SKU Quantity Range, 7) SKU Type Quantity Range;
1) Estimated Profit Range
- select estimated profit amount/rate
- select the currency and set the value range by interval/boundary
- Cross-currency conversion is not supported, for example: setting the IDR amount range only applies to Indonesia stores, not stores in other regions
( Click here to learn 👉 Order Estimated profit )

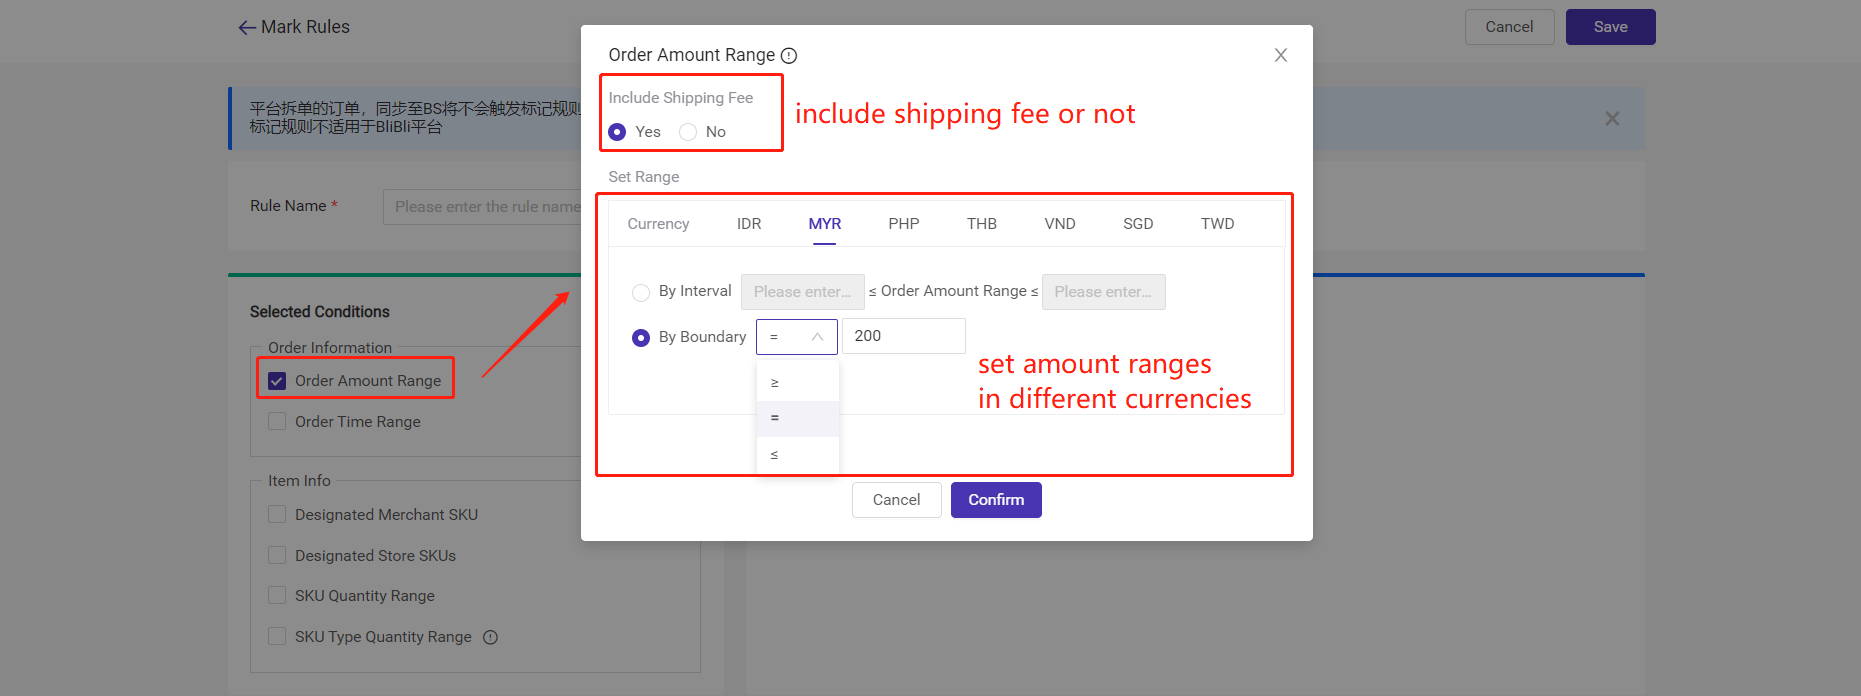
2) Order Amount Range
- You can choose whether to include shipping fees;
- To set a range of multiple currencies, you need to first fill in the amount conditions for each currency. Because cross-currency conversion is not supported, for example: setting the IDR amount range only applies to Indonesian stores, not stores in other regions.

3) Order Time Range
You can set time by date or week.

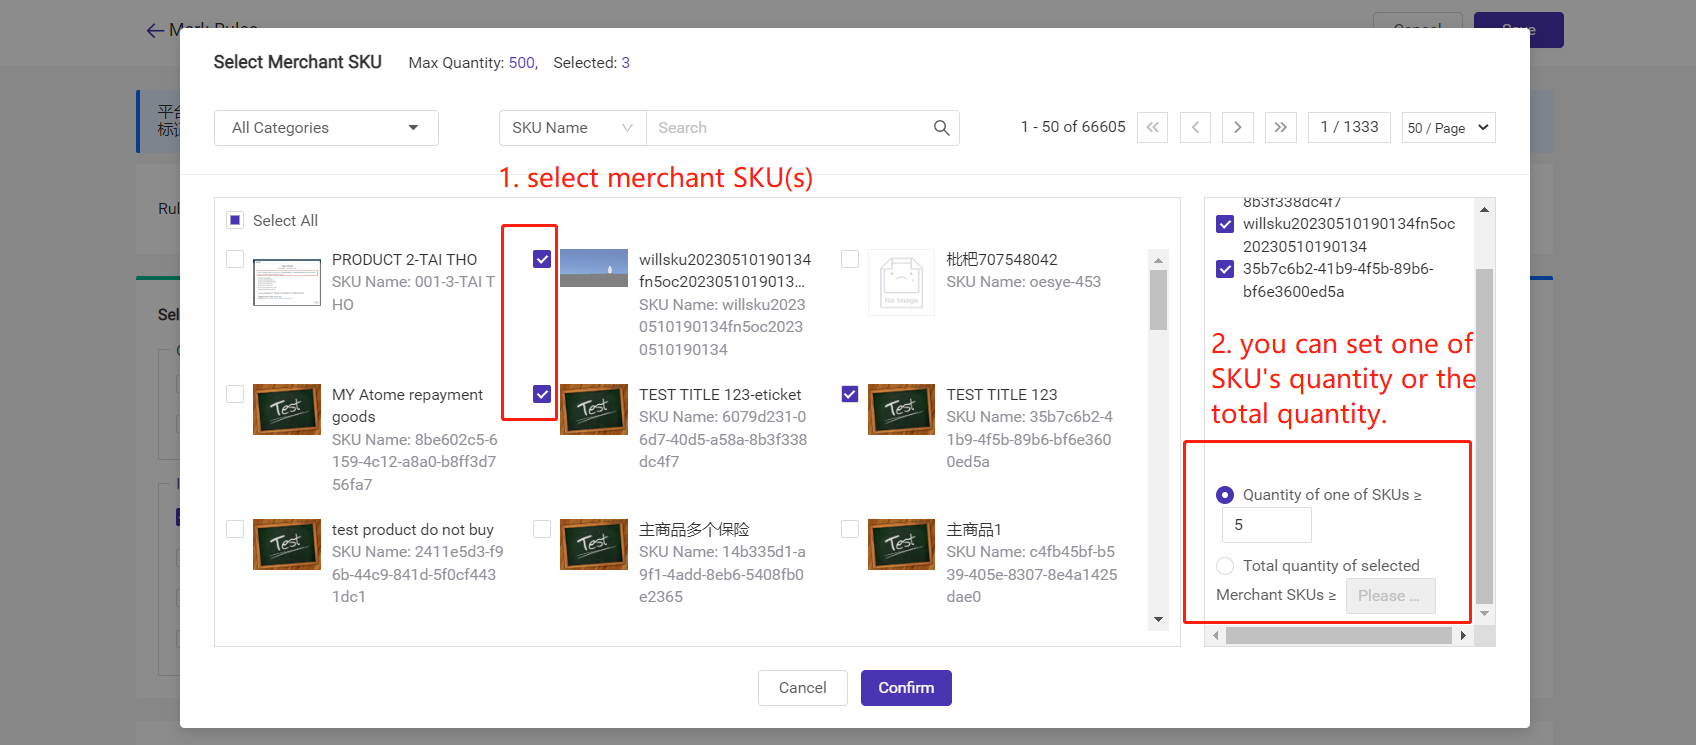
4) Designated Merchant SKU

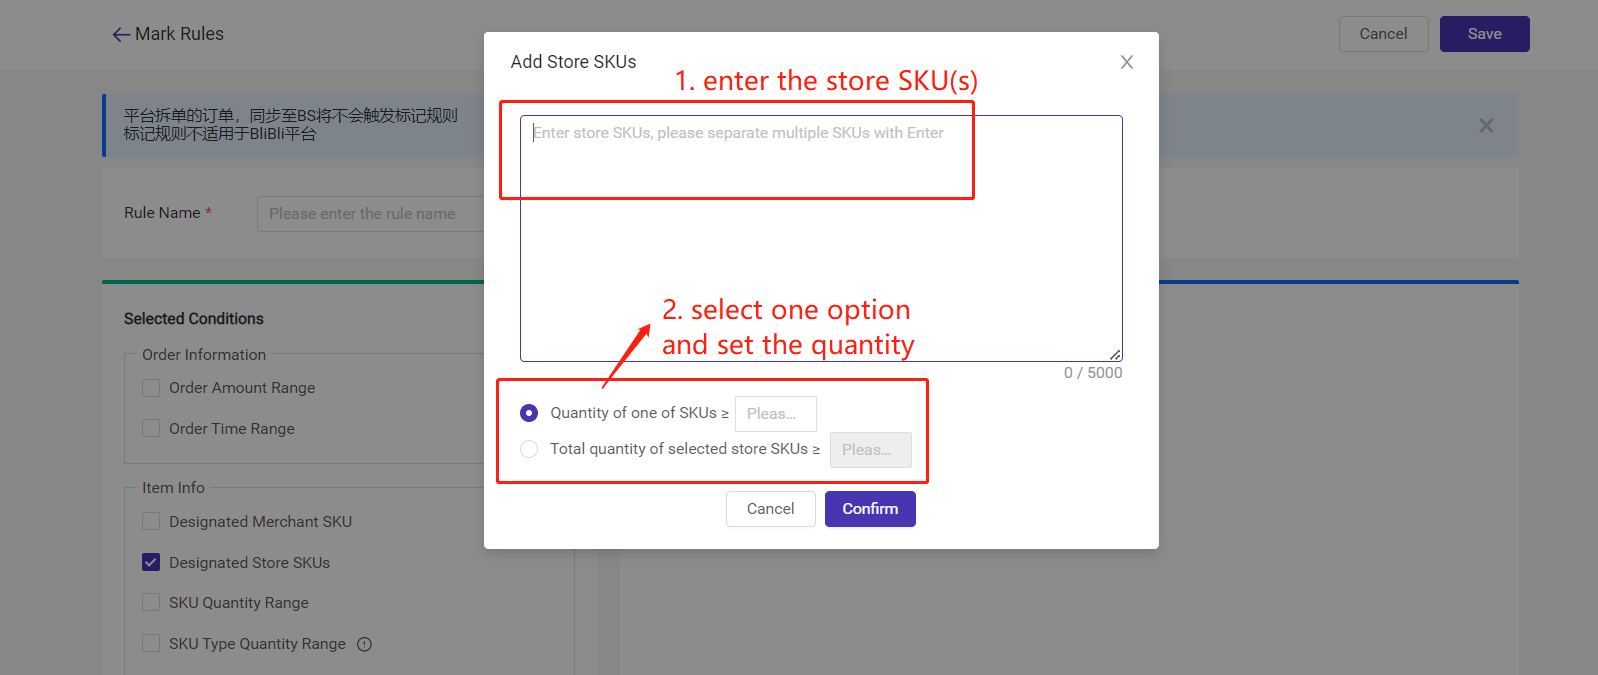
5) Designated Store SKU

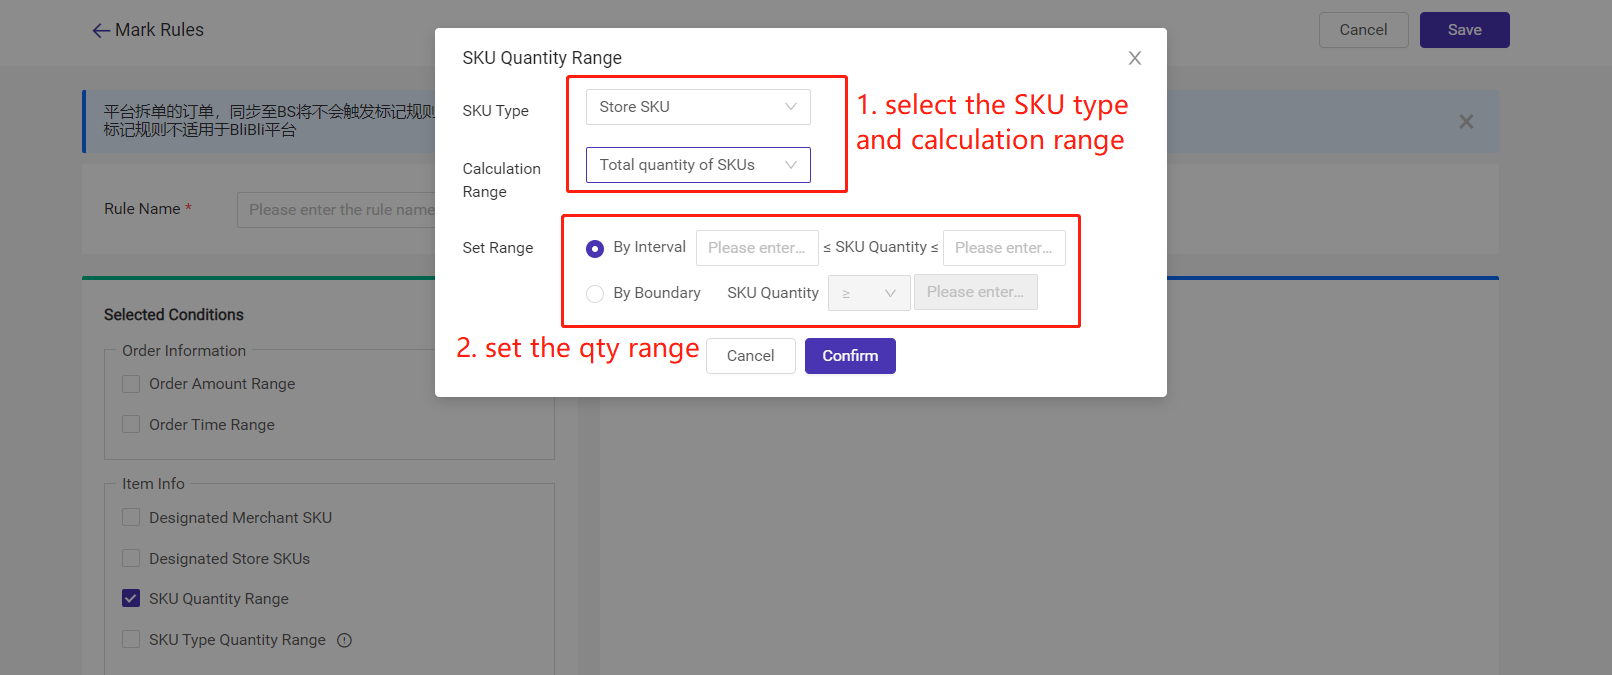
6) SKU Quantity Range
- SKU Type: You can set store SKU or merchant SKU quantity range.
- Calculation Range: total qty of SKUs or max qty of one SKU.
- Set Range: by interval or by boundary

7) SKU Type Quantity Range
The type quantity of merchant SKUs or store SKUs included in the order.

FAQs
Q1: Why am I unable to select marks that have already been added?
A1: Only marks under "enabled" status can be selected. Please toggle on the button and click the refresh icon.


Is this content helpful?
Thank you for your feedback. It drives us to provide better service.
Please contact us if the document can't answer your questions