How to Process Wave Shipments on WMS Module?
Update Time: 23 Oct 2025 04:27
📌 For detailed steps on wave operations, please refer to the BigSeller Wave Shipment Onboarding Guide to learn about warehouse management and how to use wave shipments.
This article explains the order processing workflow after enabling the wave feature. It covers key steps including how to pick and pack items, print shipping labels, and complete the shipment process.

💡 Notes:
- Before using wave shipments, you must first complete the wave strategy settings.
- Before processing orders in waves, go to Order Module > [New Orders], and click Pack. Only after packing the orders will they appear in the Generate Wave page in the WMS module.
- The above steps represent a general process. The wave shipping workflow may vary depending on your settings.
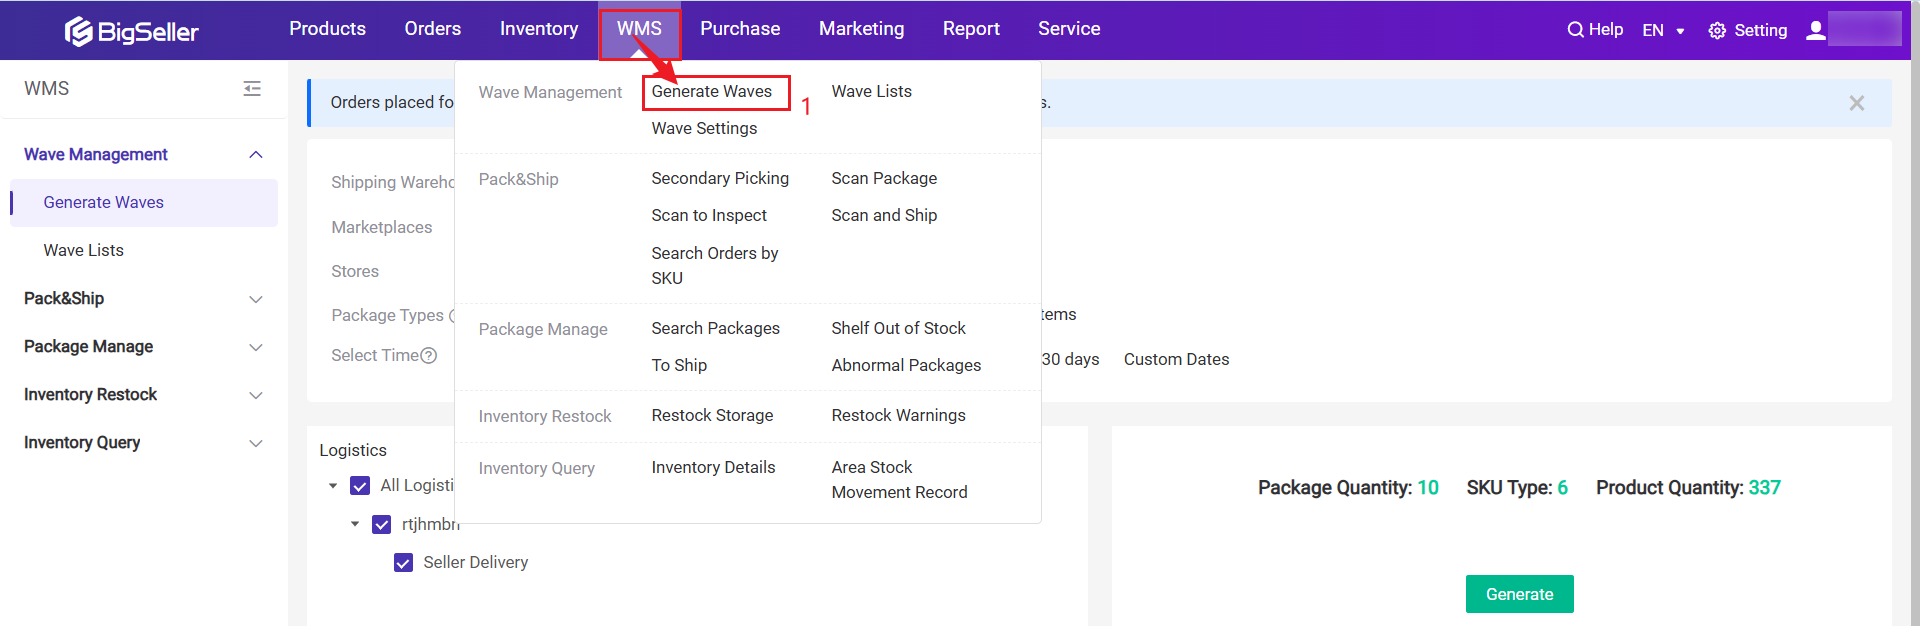
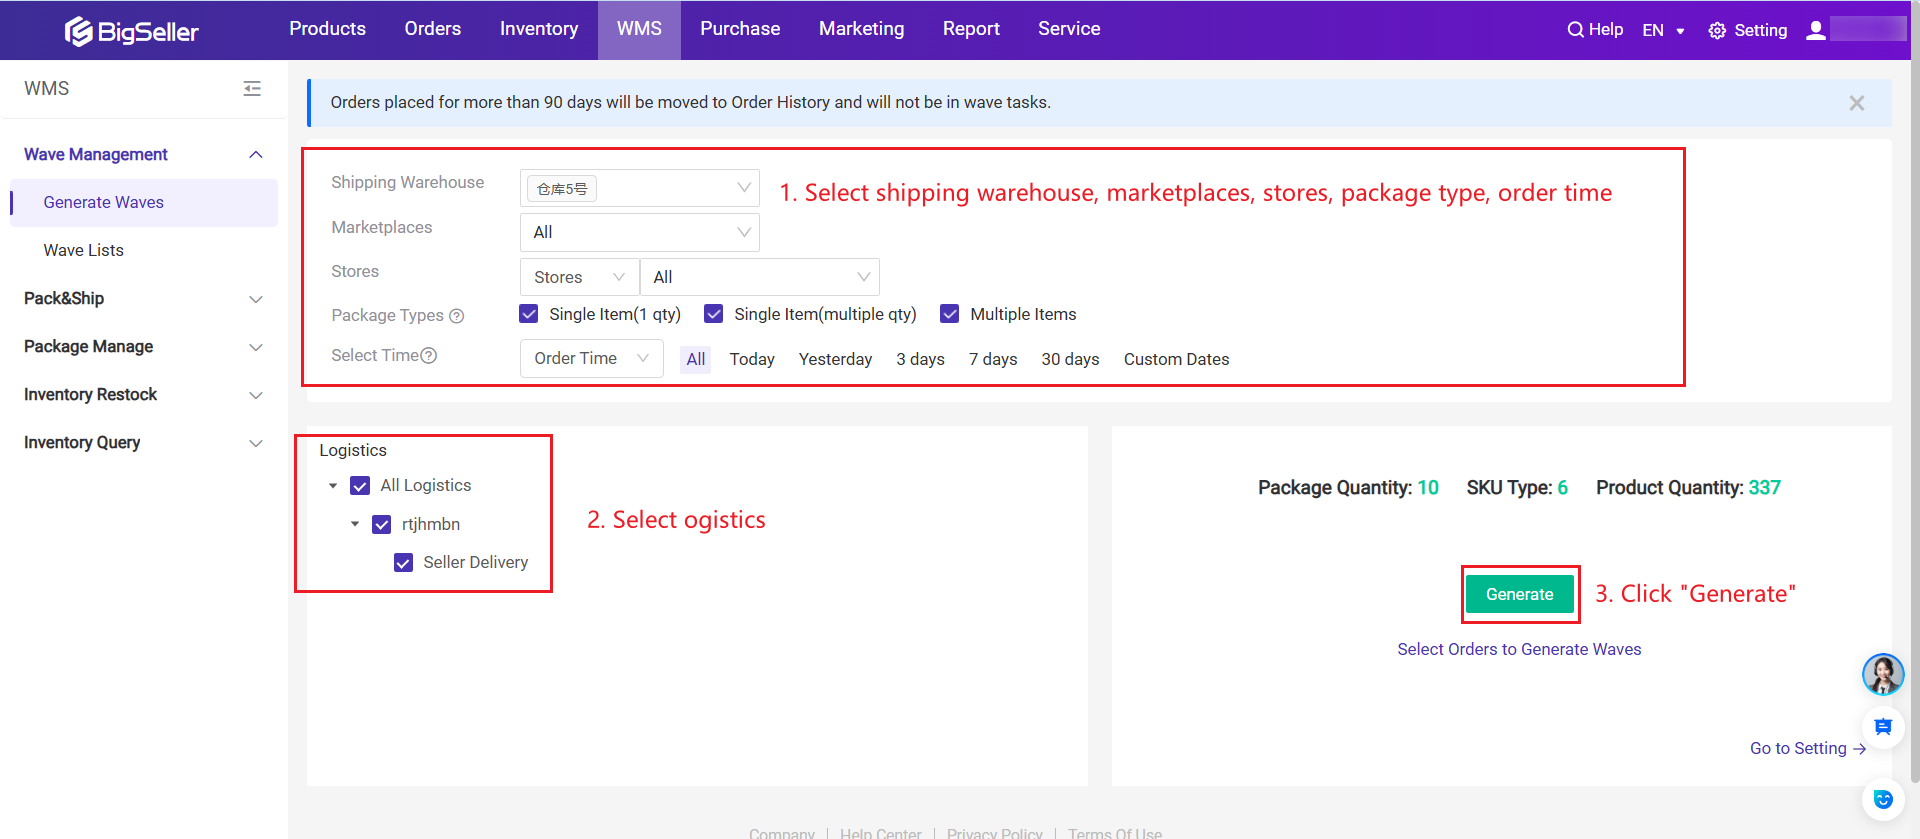
1. Generate Wave
- After packing orders in the [New Orders] list, you can generate waves in the Generate Wave page.
- There are two methods to generate waves: 1) Automatic generation by the system; 2) Manual selection of orders to generate waves.
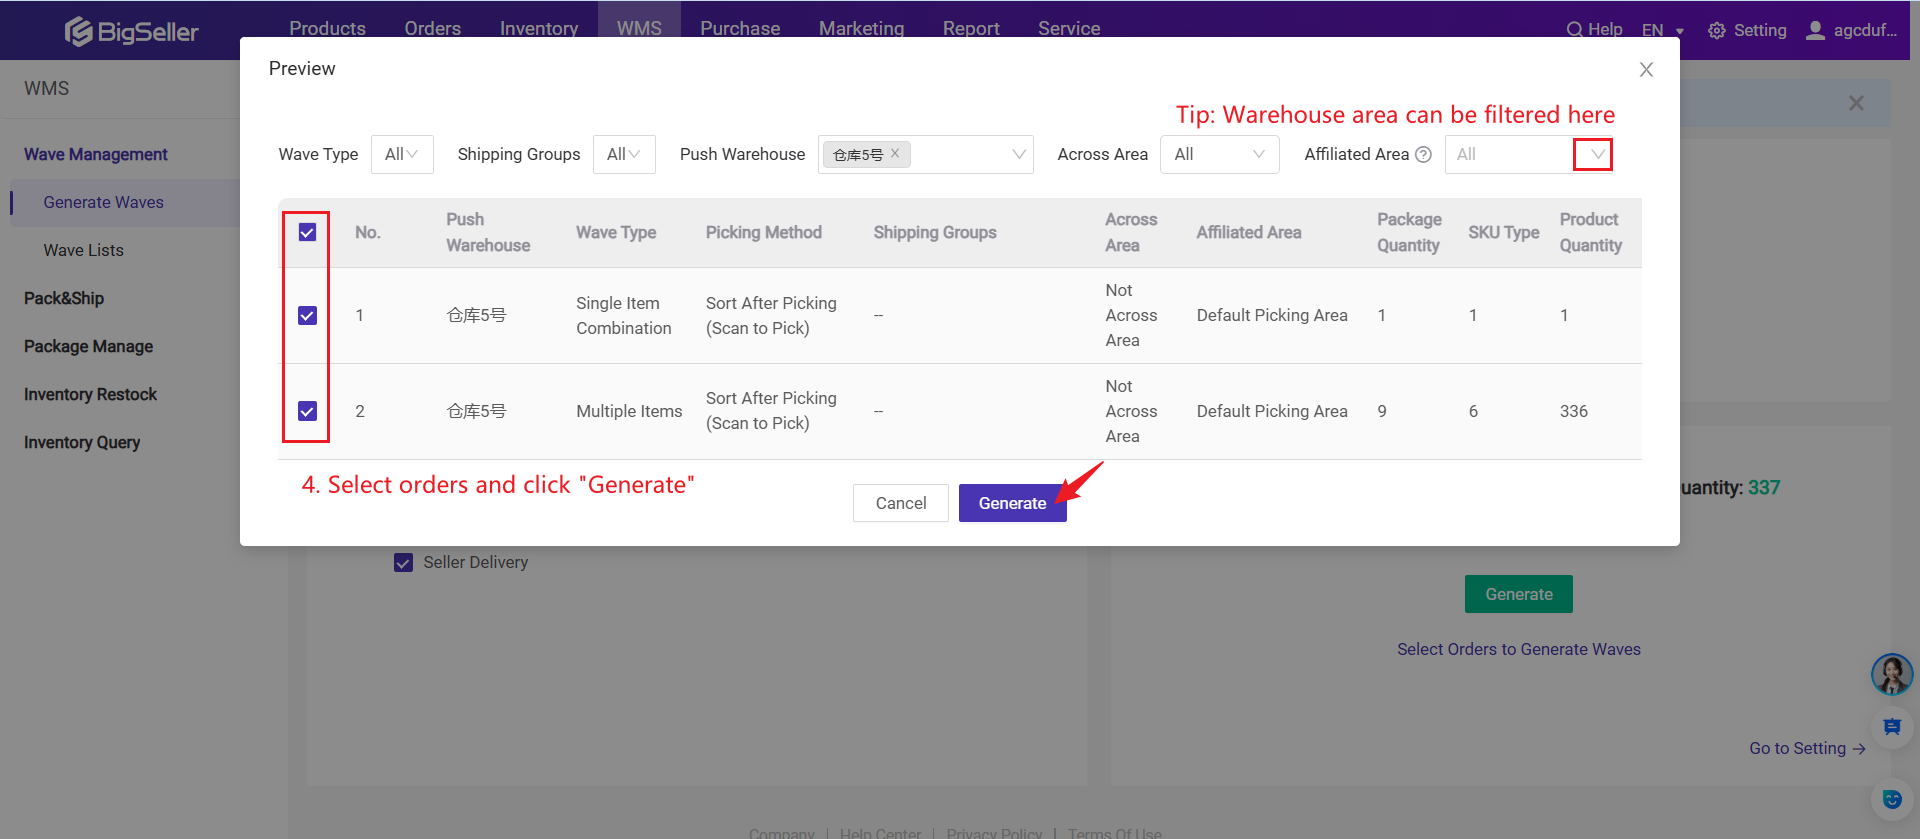
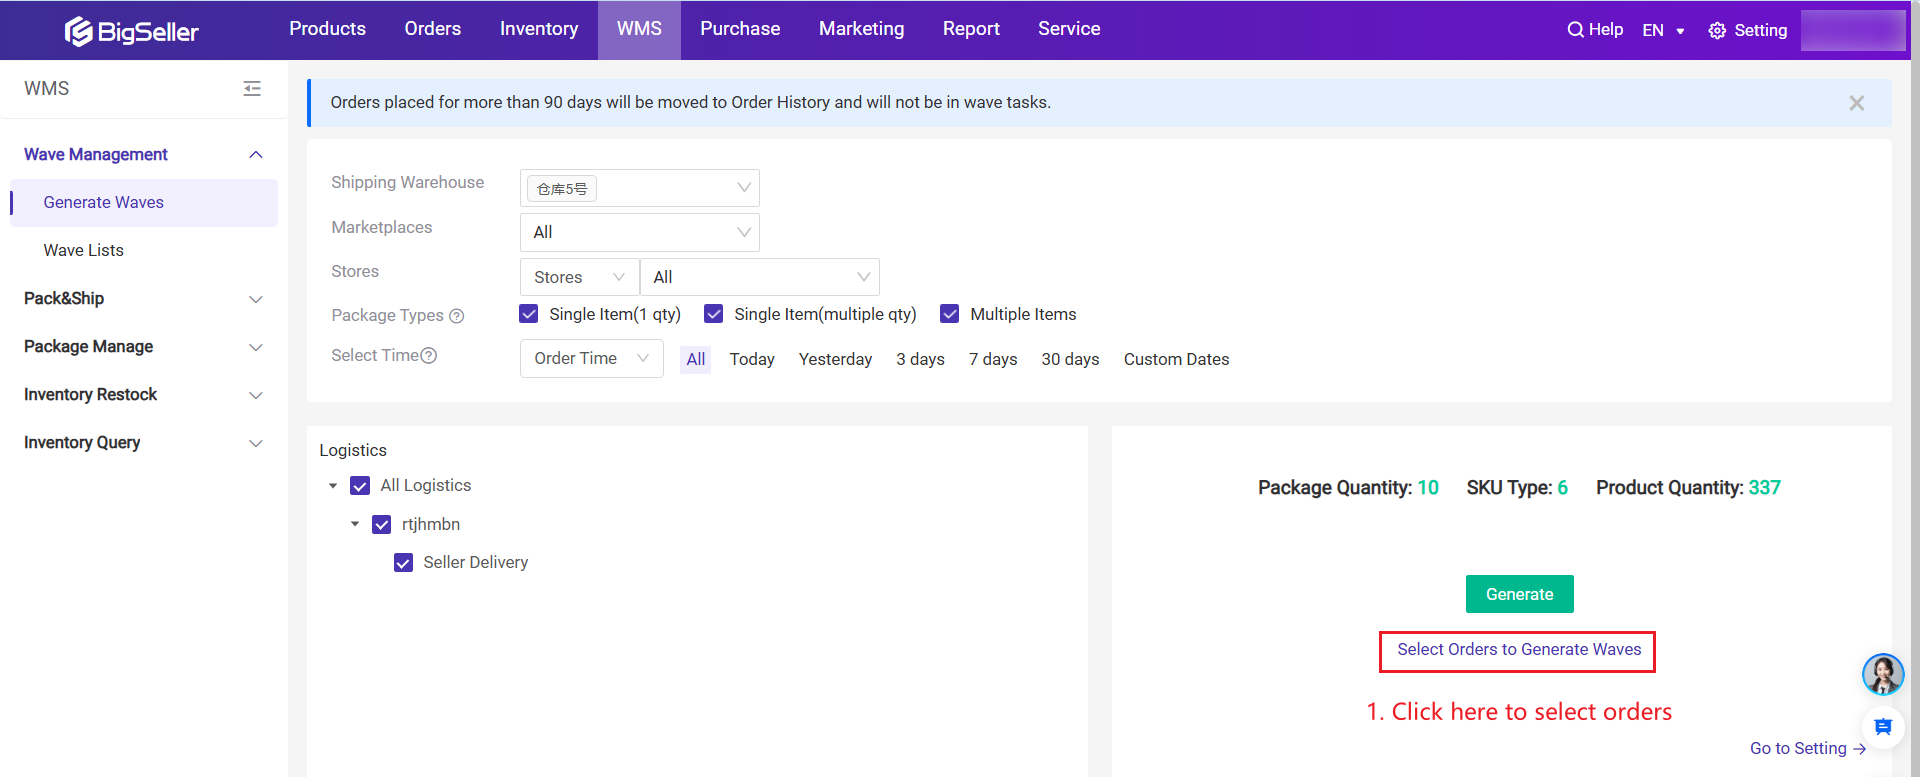
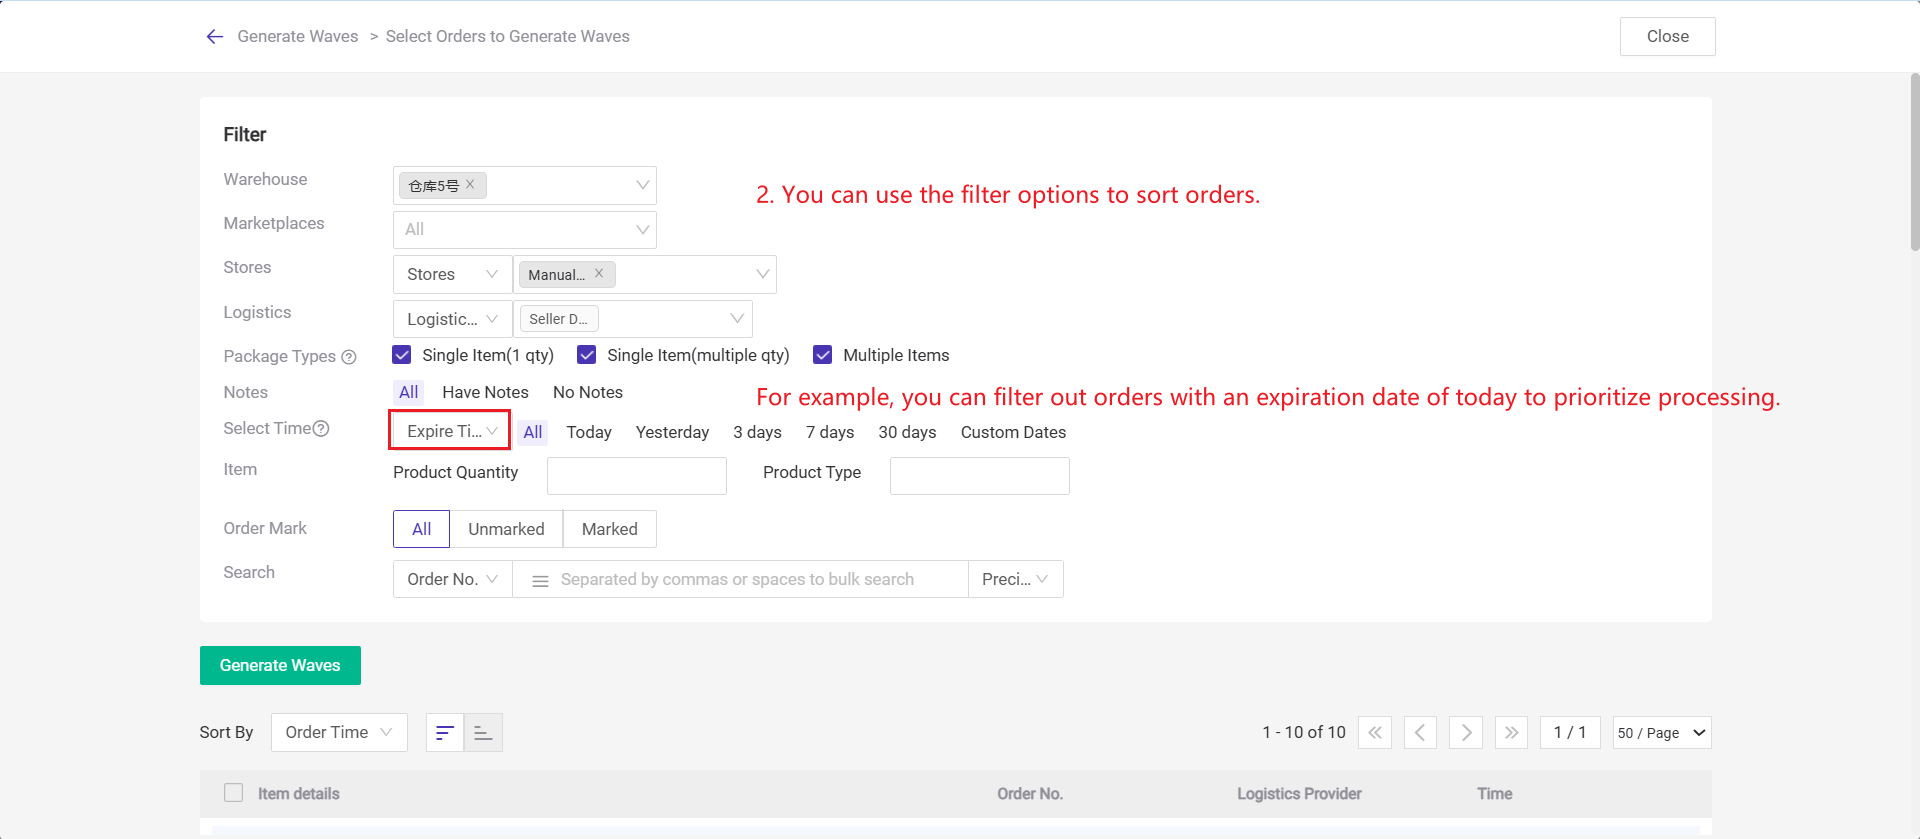
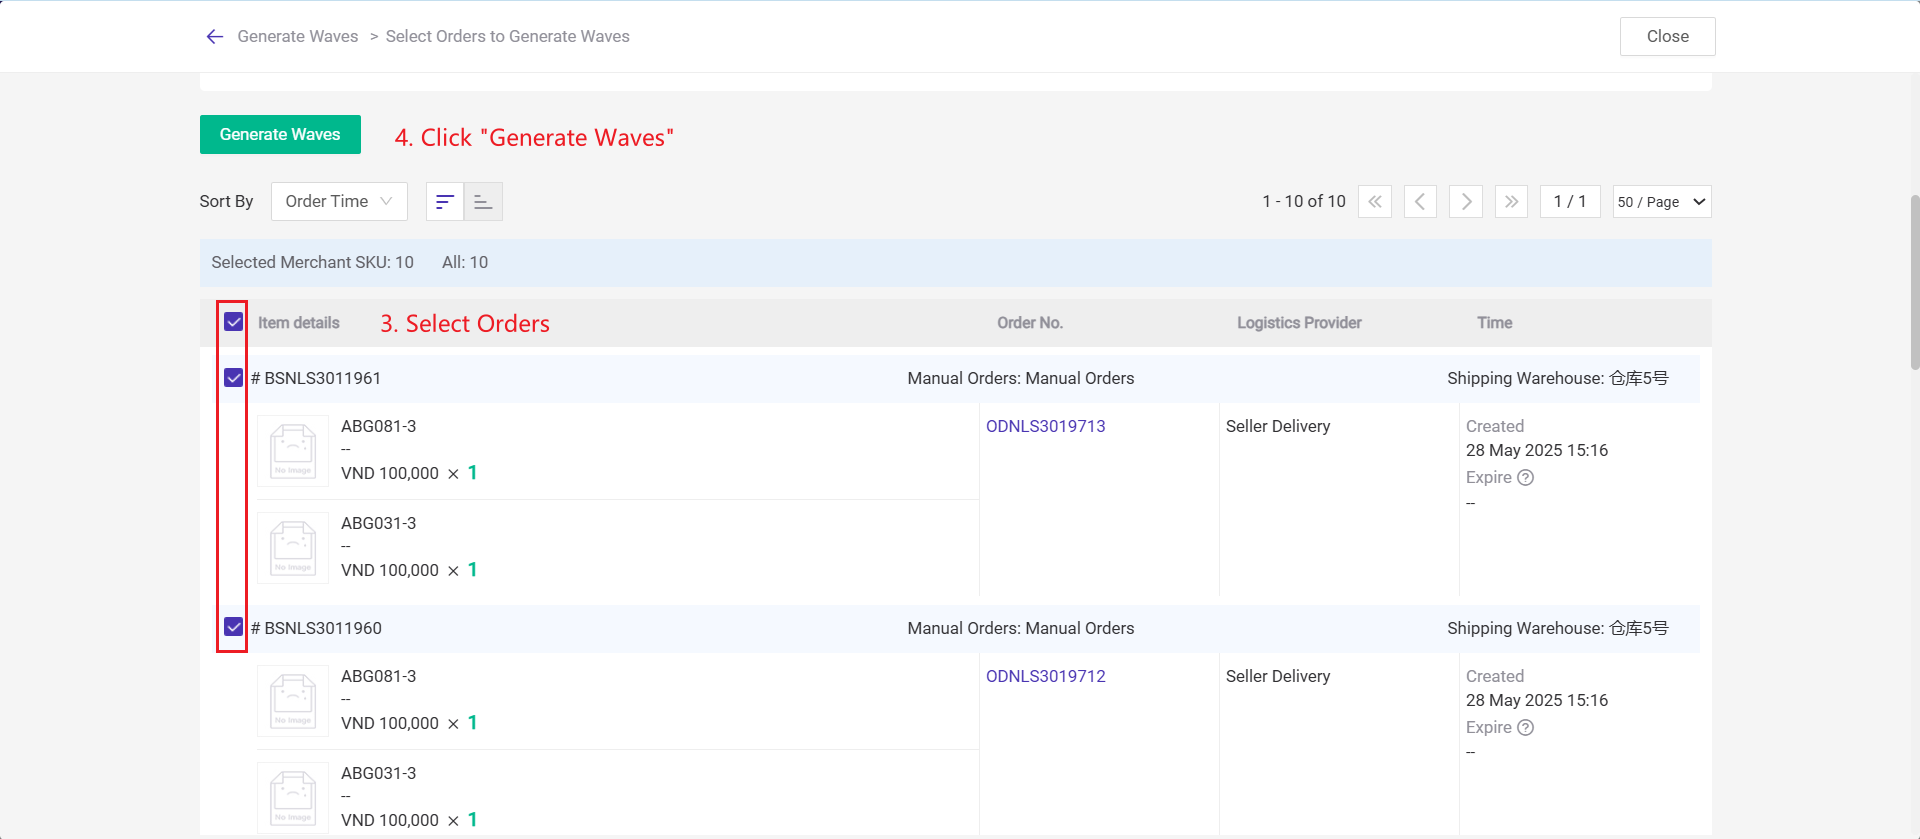
1.2 Manually Select Orders to Generate Waves
2. Wave Picking
After generating the wave, it will appear in the [Wave List] >> [To Pick] page. You can use the Pick List / Summary List or BigSeller APP (Wave Picking Feature) to perform picking.
2.1 Using Pick List or Summary List for Picking1) If you are using paper pick lists or summary lists for picking, please print the documents at this step to complete the picking process.
2) Wave shipment supports custom pick list templates.
3) If you are using the summary list for picking, please enable the "Summary List Mode" in the wave settings and complete the template setup. For how to enable this feature and applicable scenarios, please refer to Section 4.2 of the Wave Settings. Enable Print Summary List Mode.
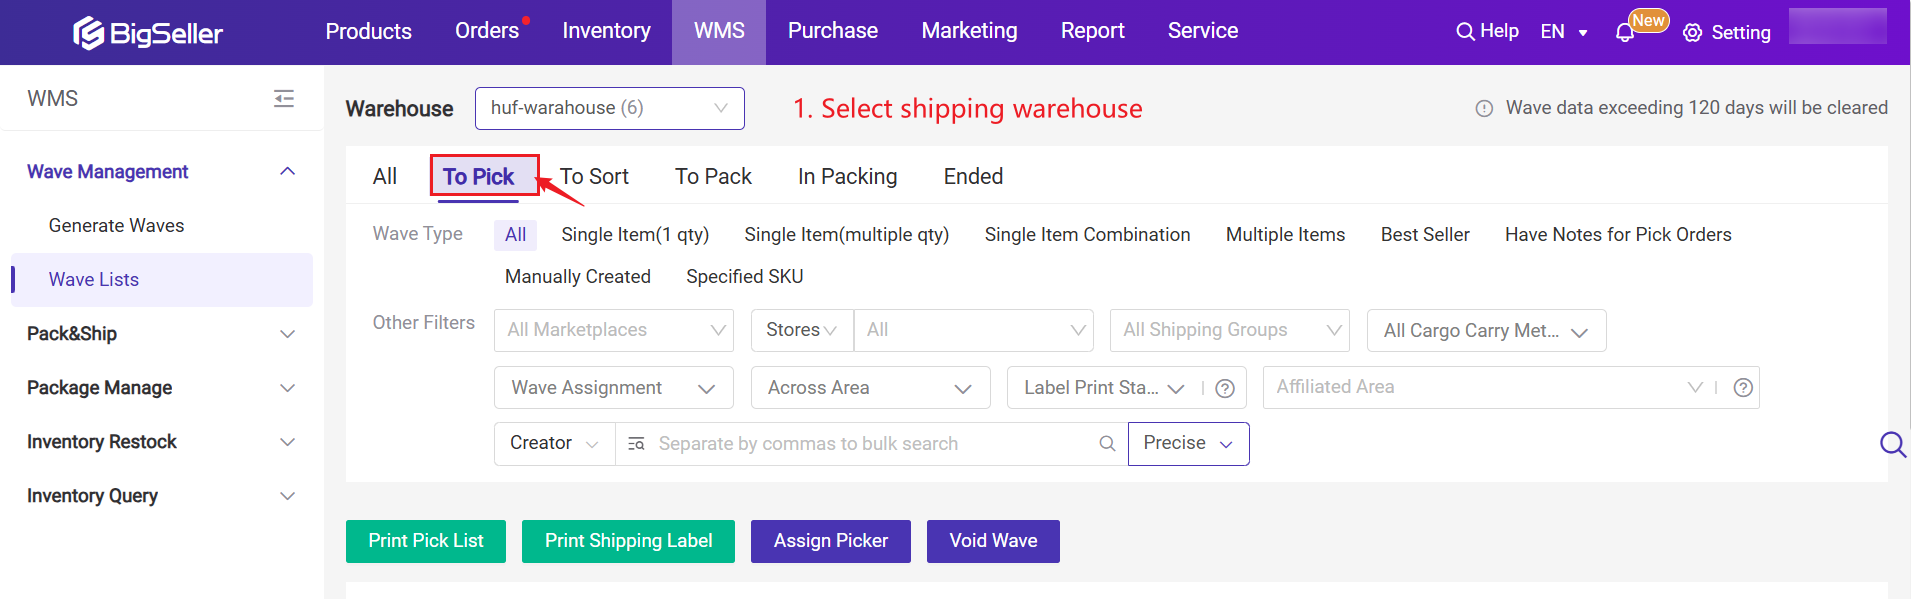
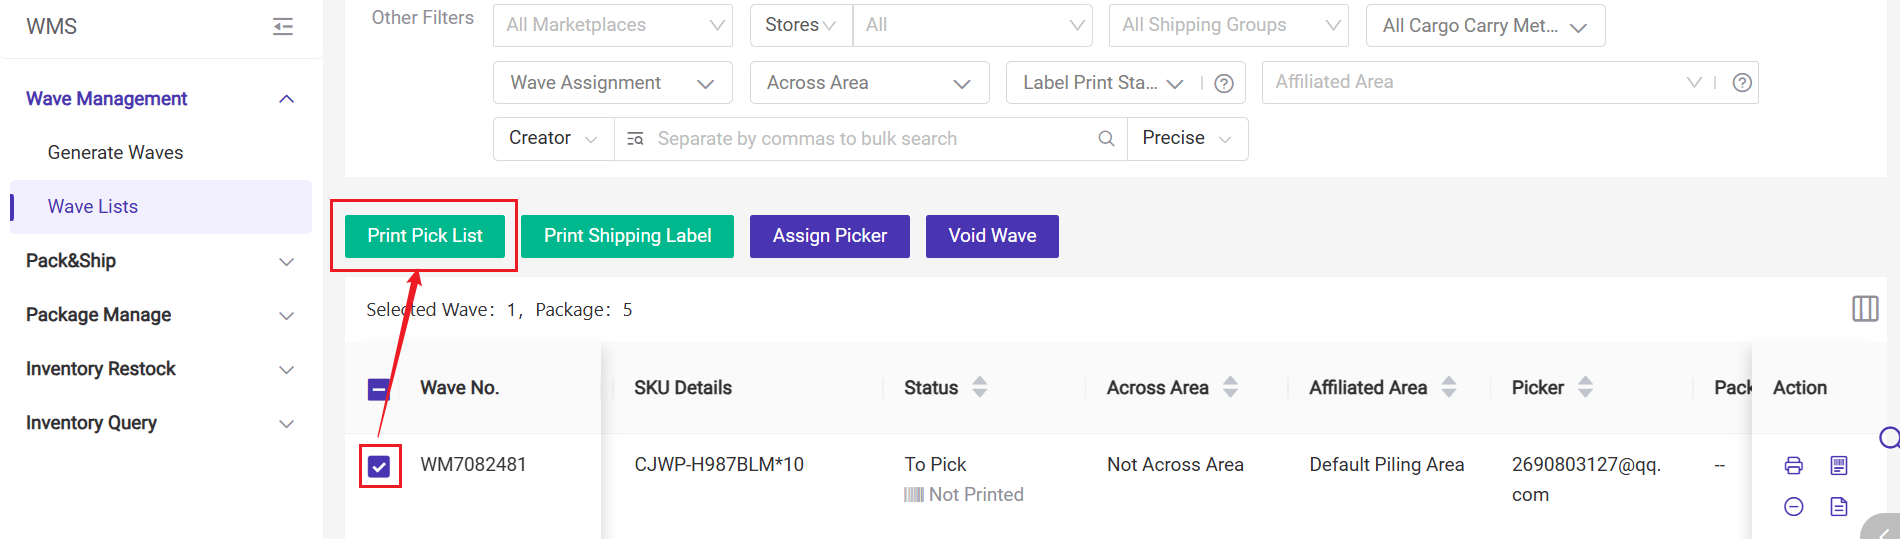
Step 1: After generating the wave, go to the [Wave List] page and select the shipping warehouse. All waves generated for that warehouse will appear in the To Pick list.
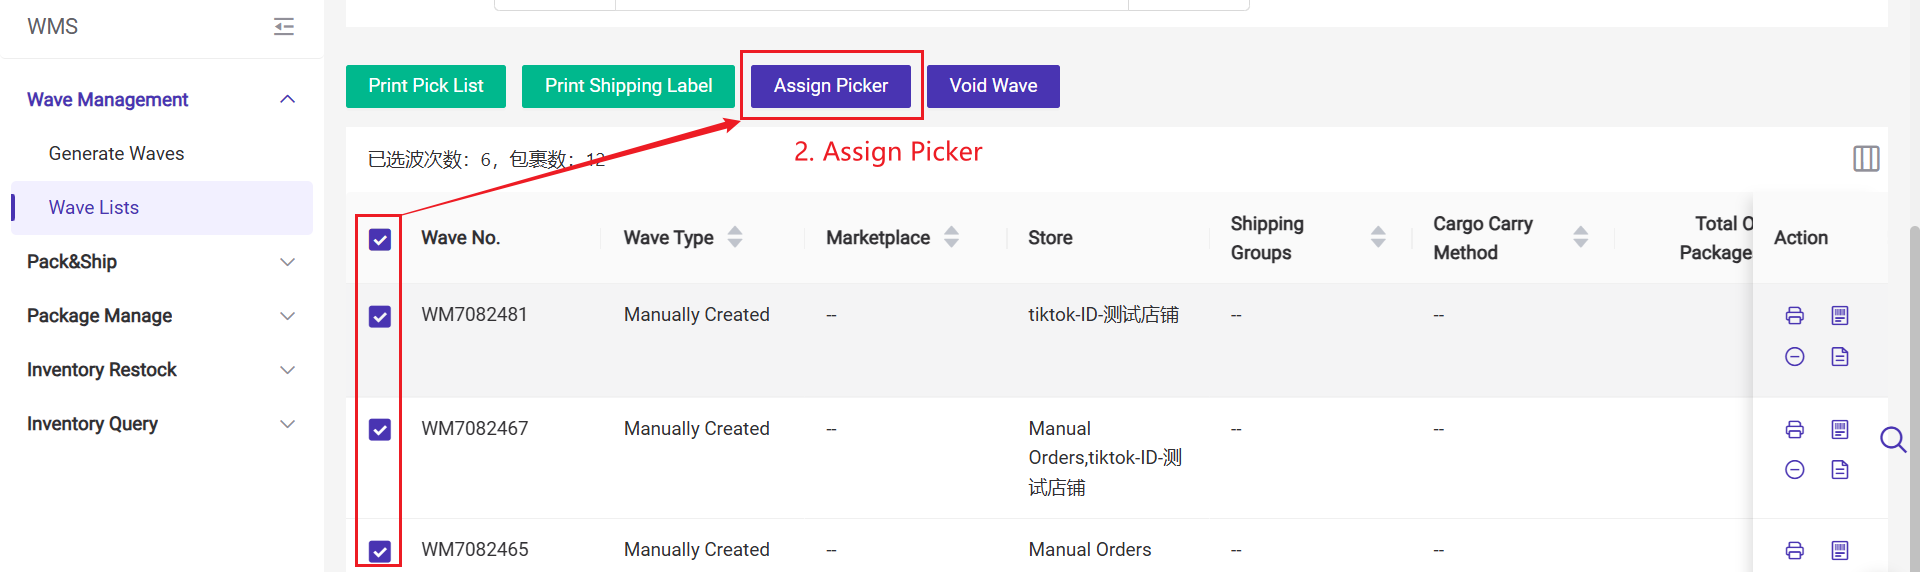
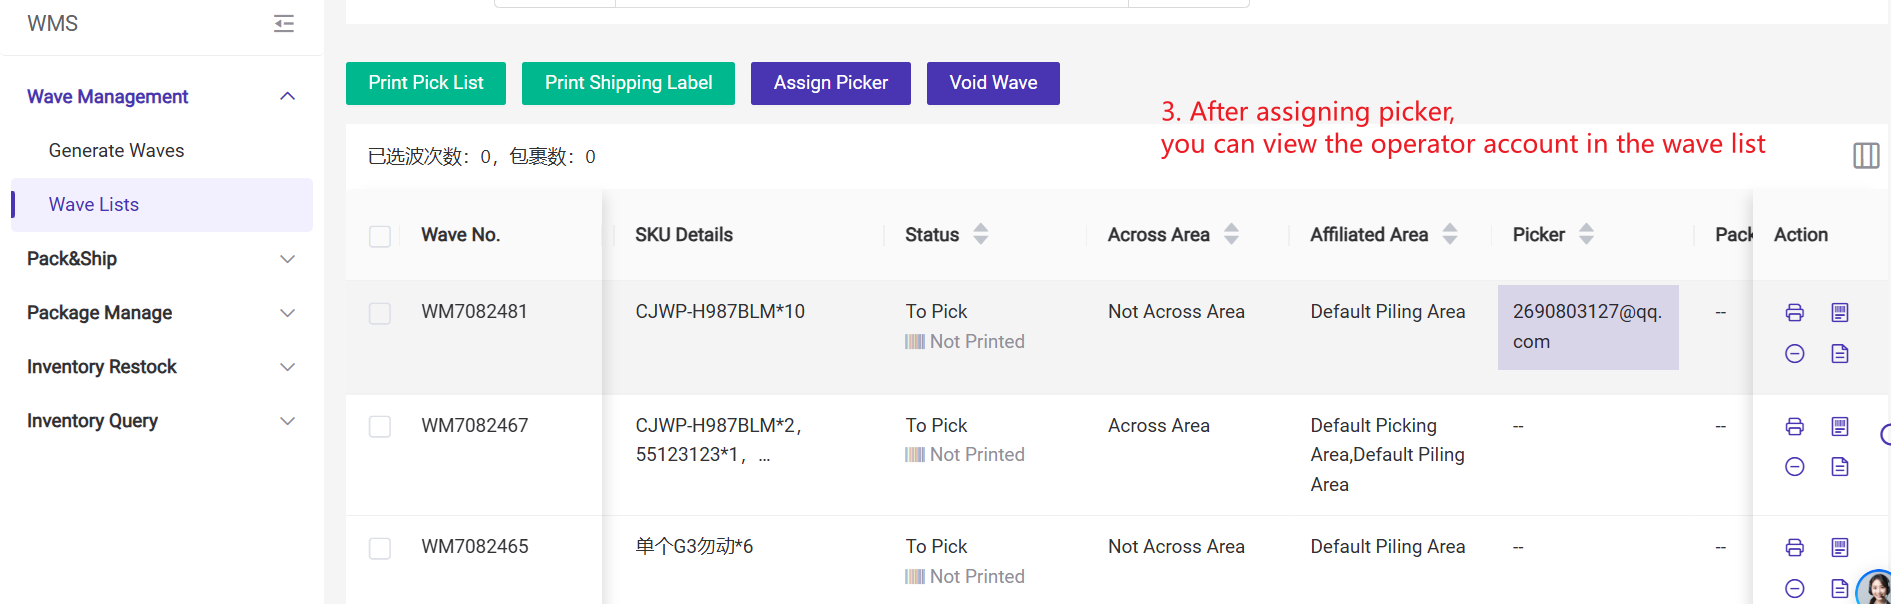
Step 2: Select the wave and assign a picker. You can choose a specific operator.
If you are using a sub-account and don't see the option to assign, please contact the main account to enable this permission.
Step 3: Select the wave and click Print Pick List
-
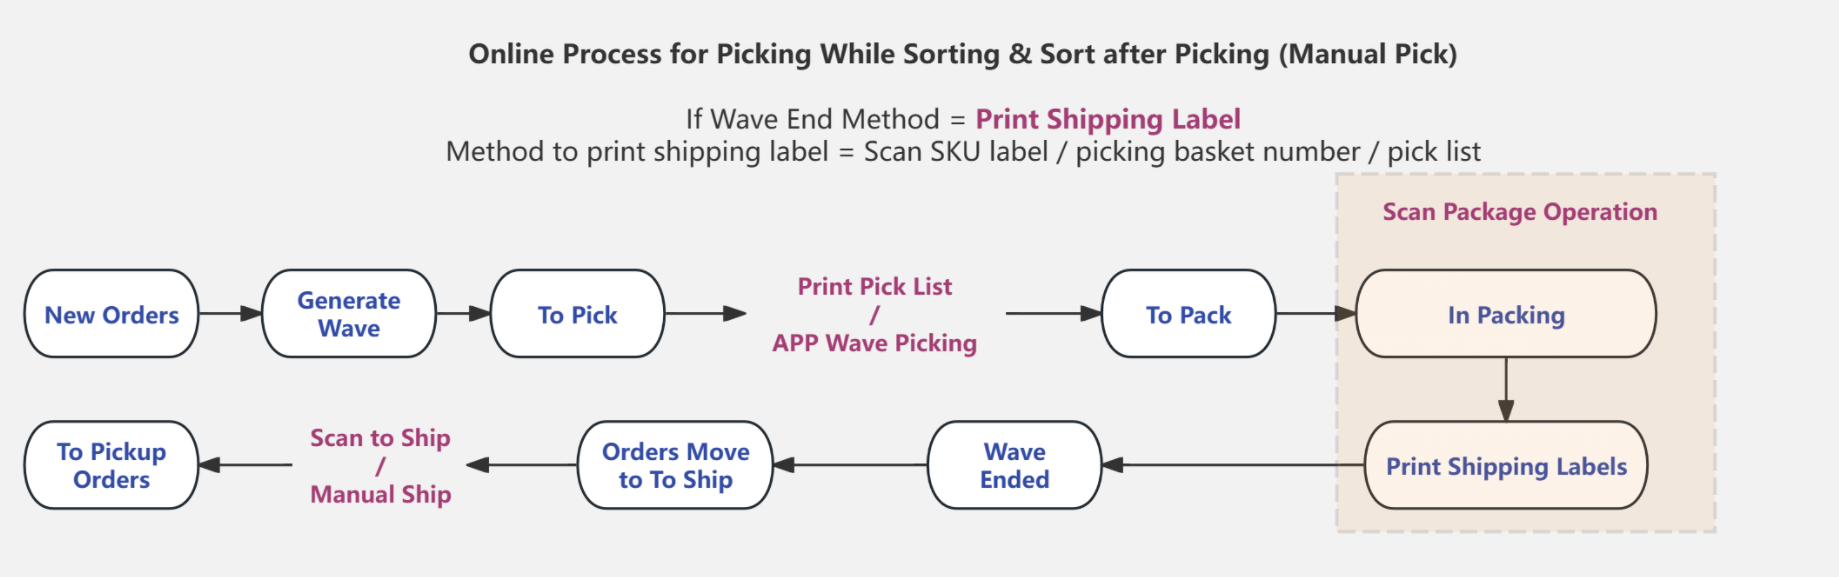
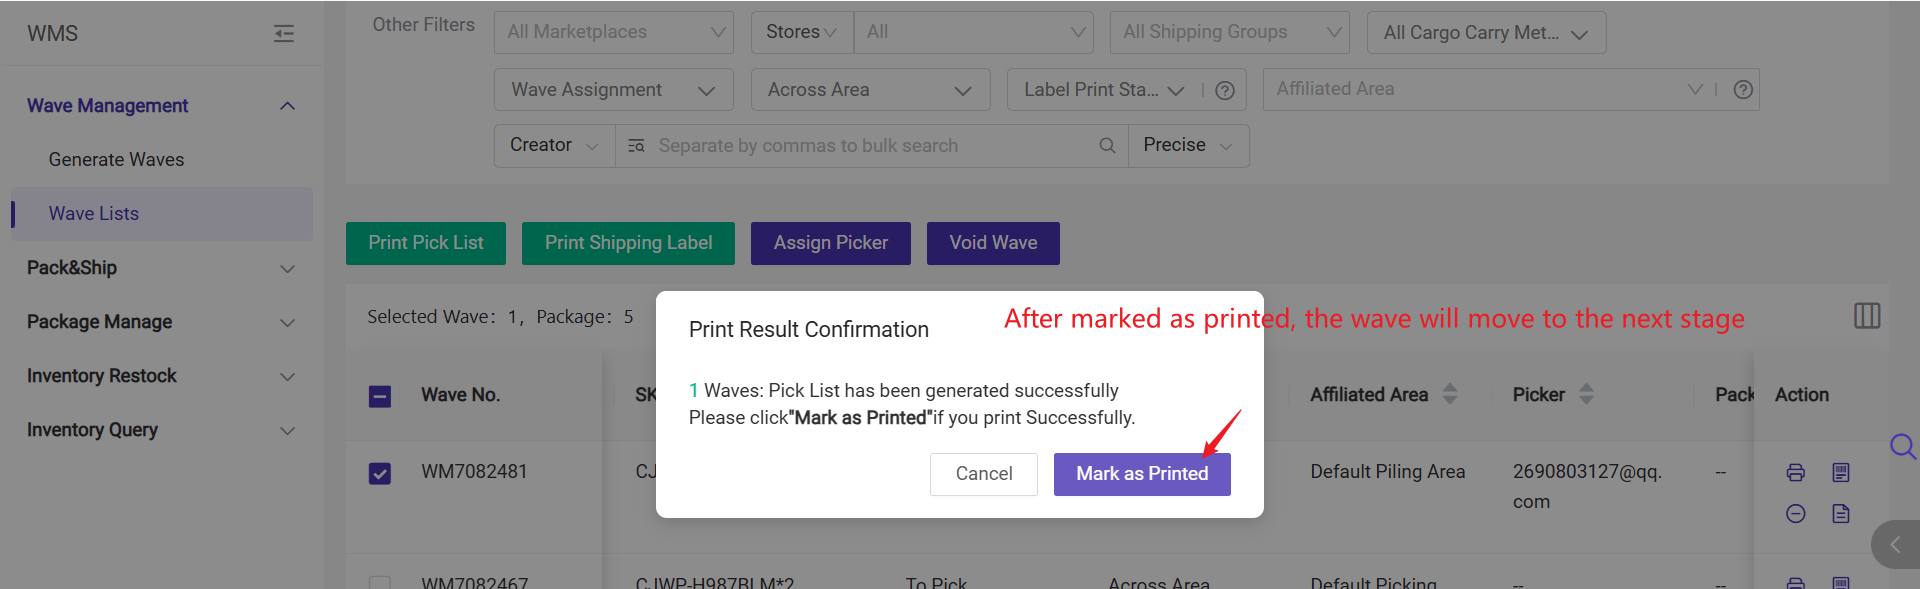
If the picking method is Picking While Sorting or Sort after Picking (Manual Pick):
After clicking "Mark as Printed", the wave will move directly from the To Pick list to the To Pack list. You will need to complete the packing process on the Scan Package page. -
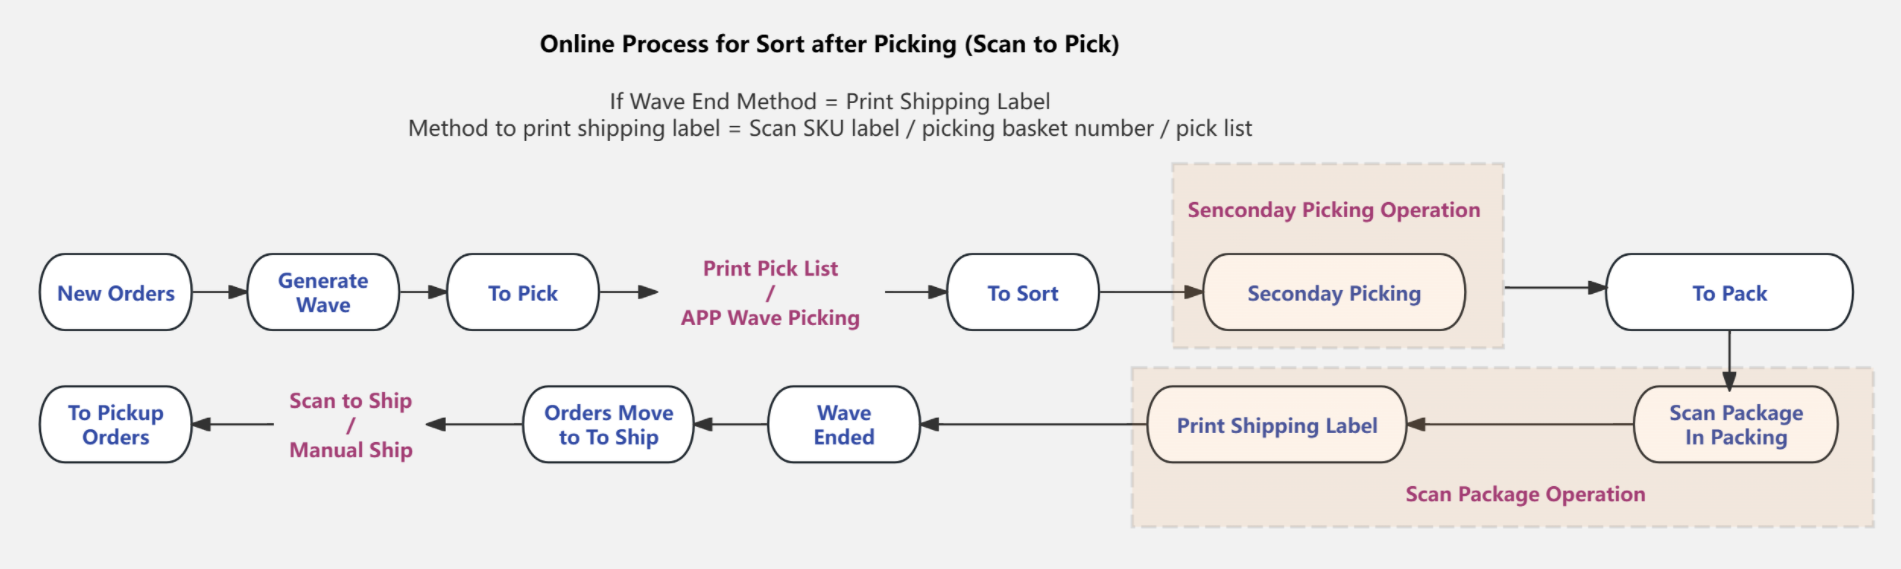
If the picking method is Sort after Picking (Scan to Pick):
After clicking "Mark as Printed", the wave will move directly from the To Pick list to the To Sort list. You will need to complete the sorting process on the Secondary Picking page.
2.2 Using the App for Wave Picking
With BigSeller APP, pickers can directly claim waves and perform picking. Both Picking While Sorting and Sort after Picking methods are supported. For more information, please refer to: How to Use the App for Wave Picking3. Secondary Picking
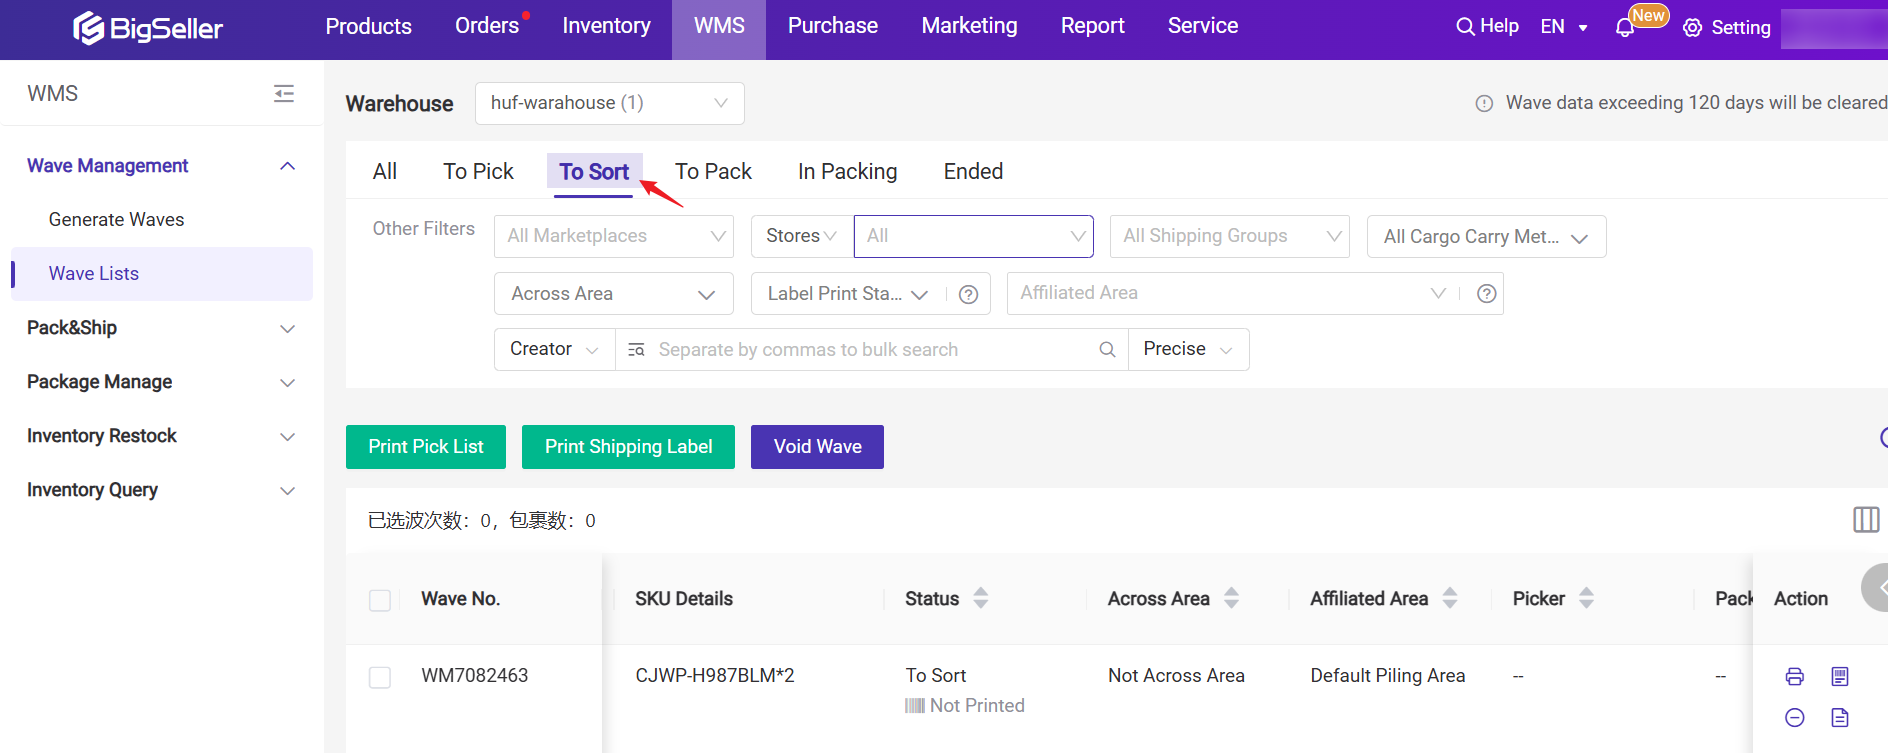
- If the picking method is Sort after Picking (Scan to Pick), after printing the pick list, the wave will move directly to the To Sort list.
- After picking all items in bulk based on SKU quantity.You will then need to go to the Secondary Picking page to sort the items into their respective packages.
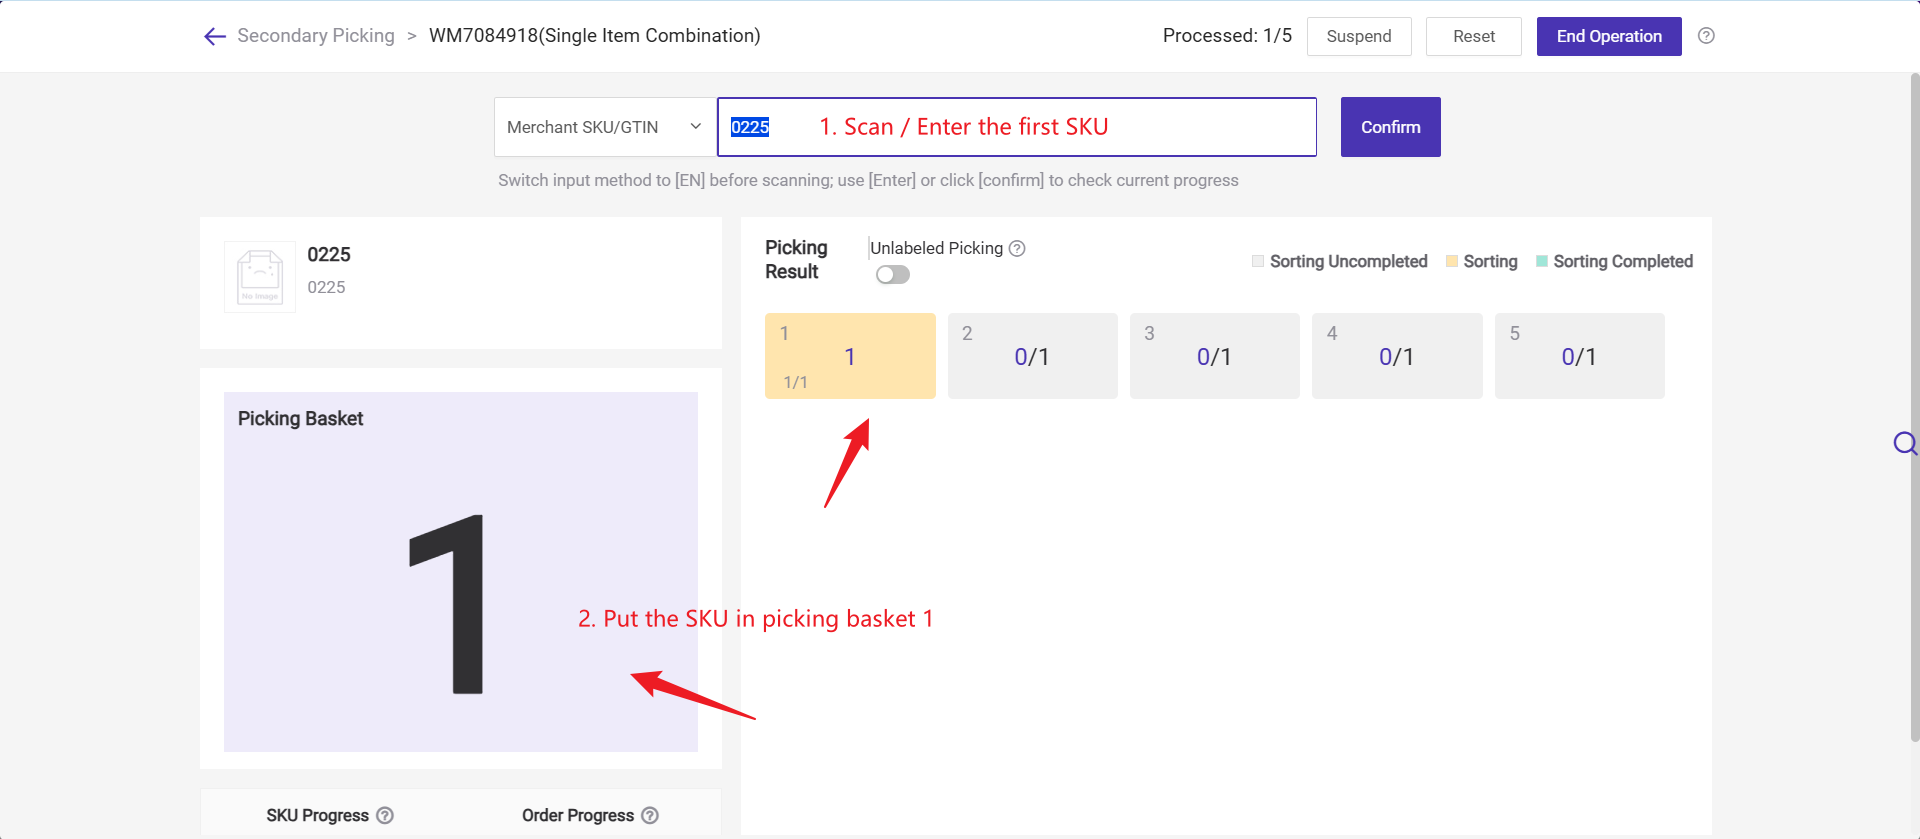
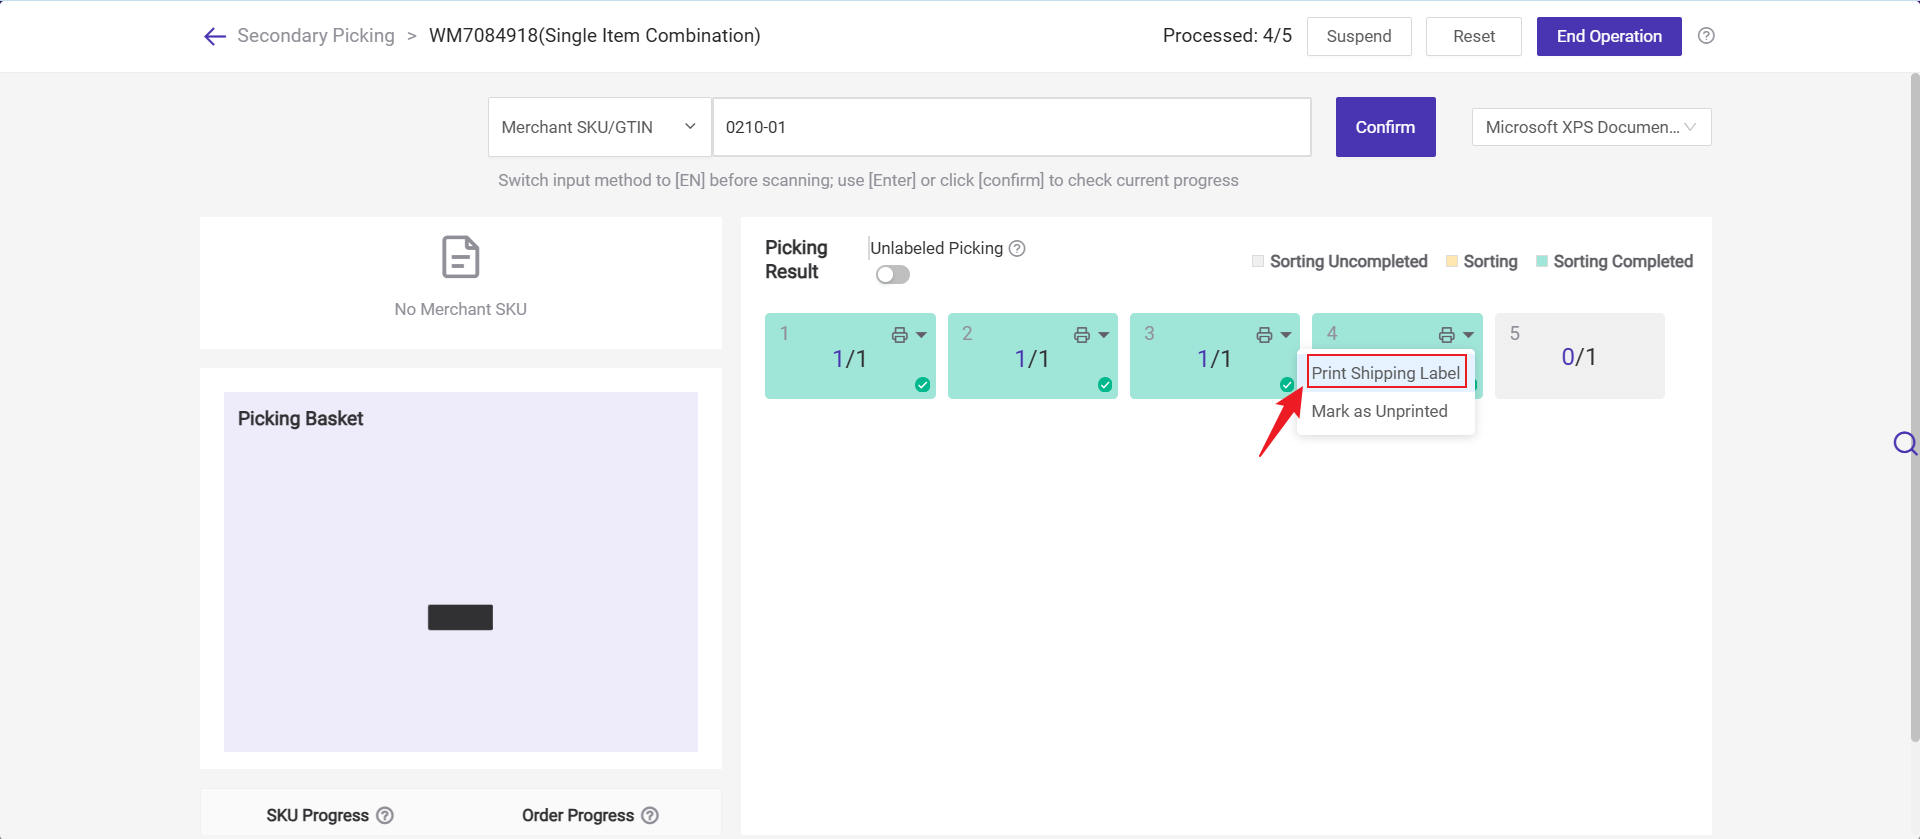
Step 1: Go to WMS > Pack&Ship > Secondary Picking page
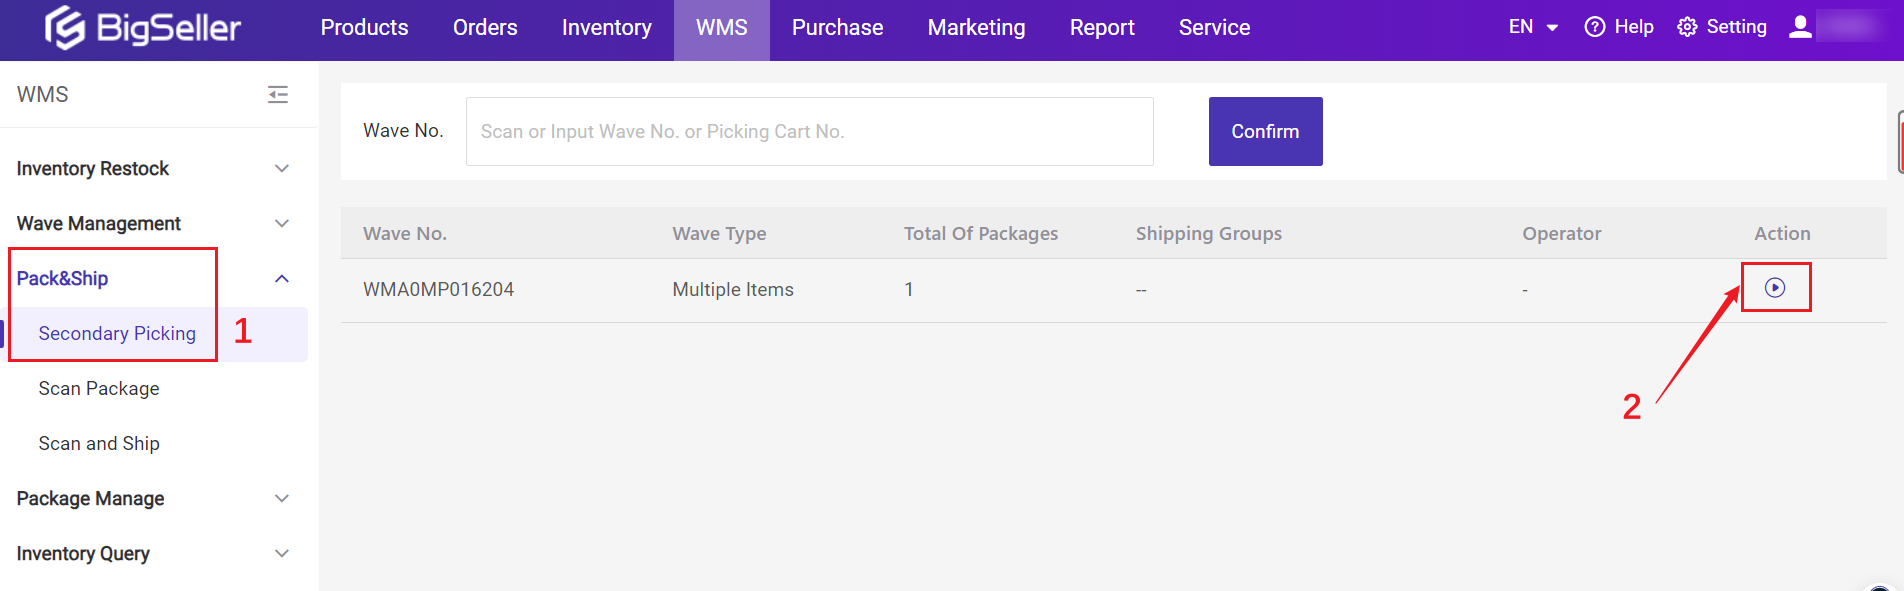
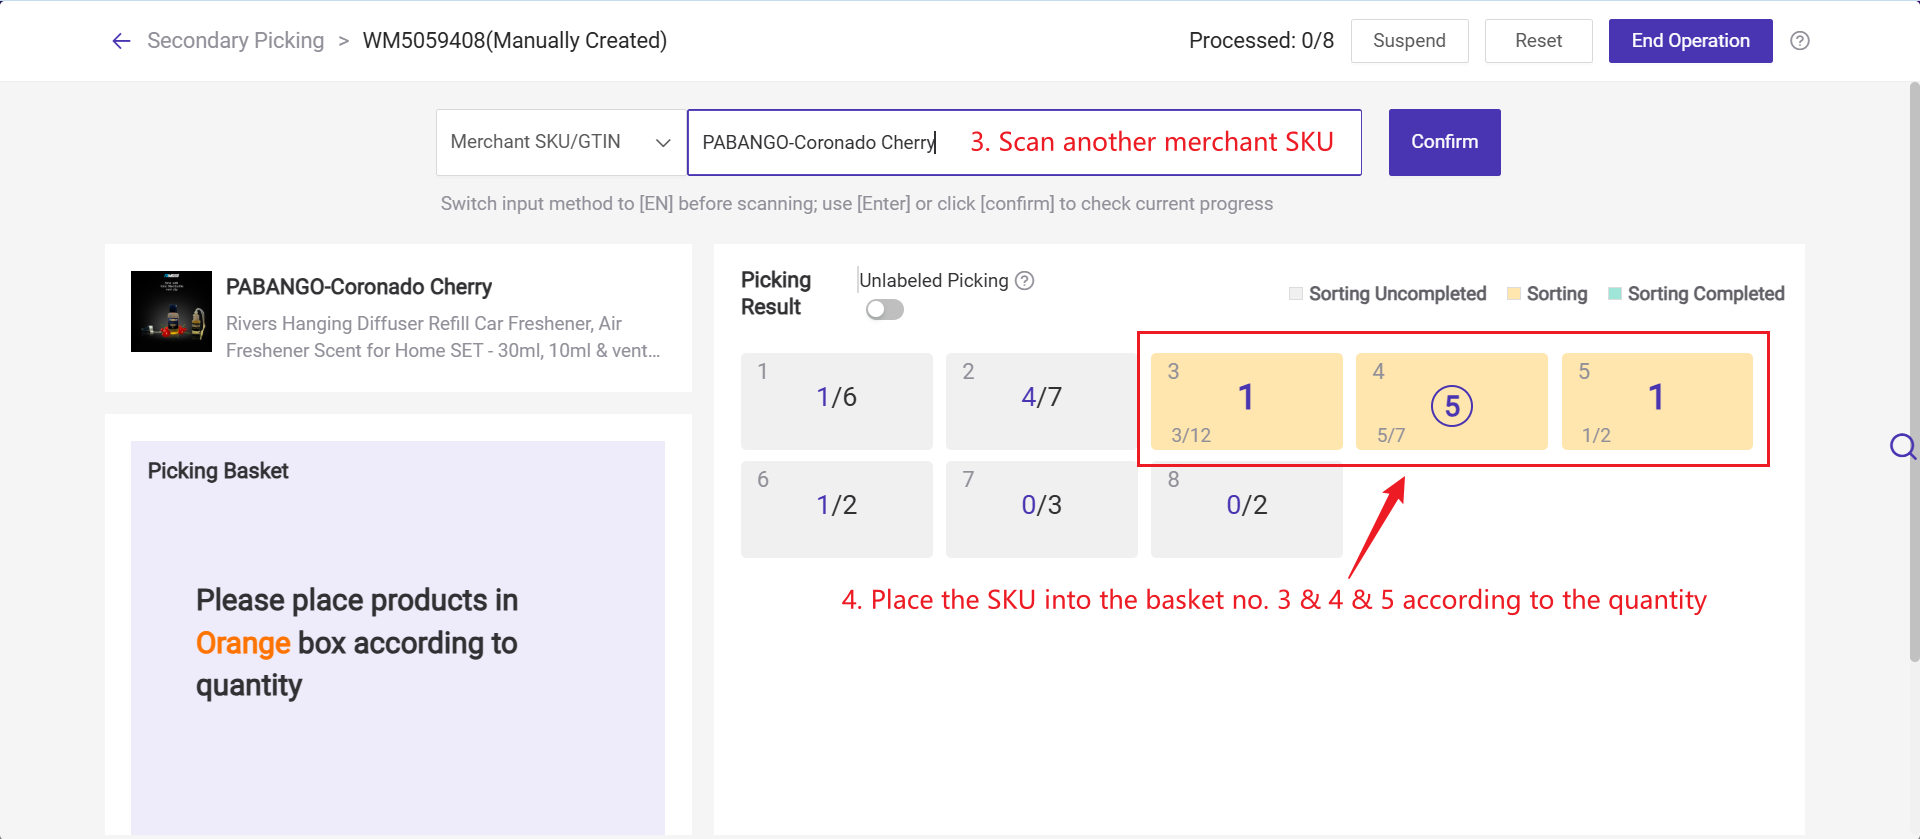
Step 2: Scan or enter the Merchant SKU/GTIN or product code > Confirm.
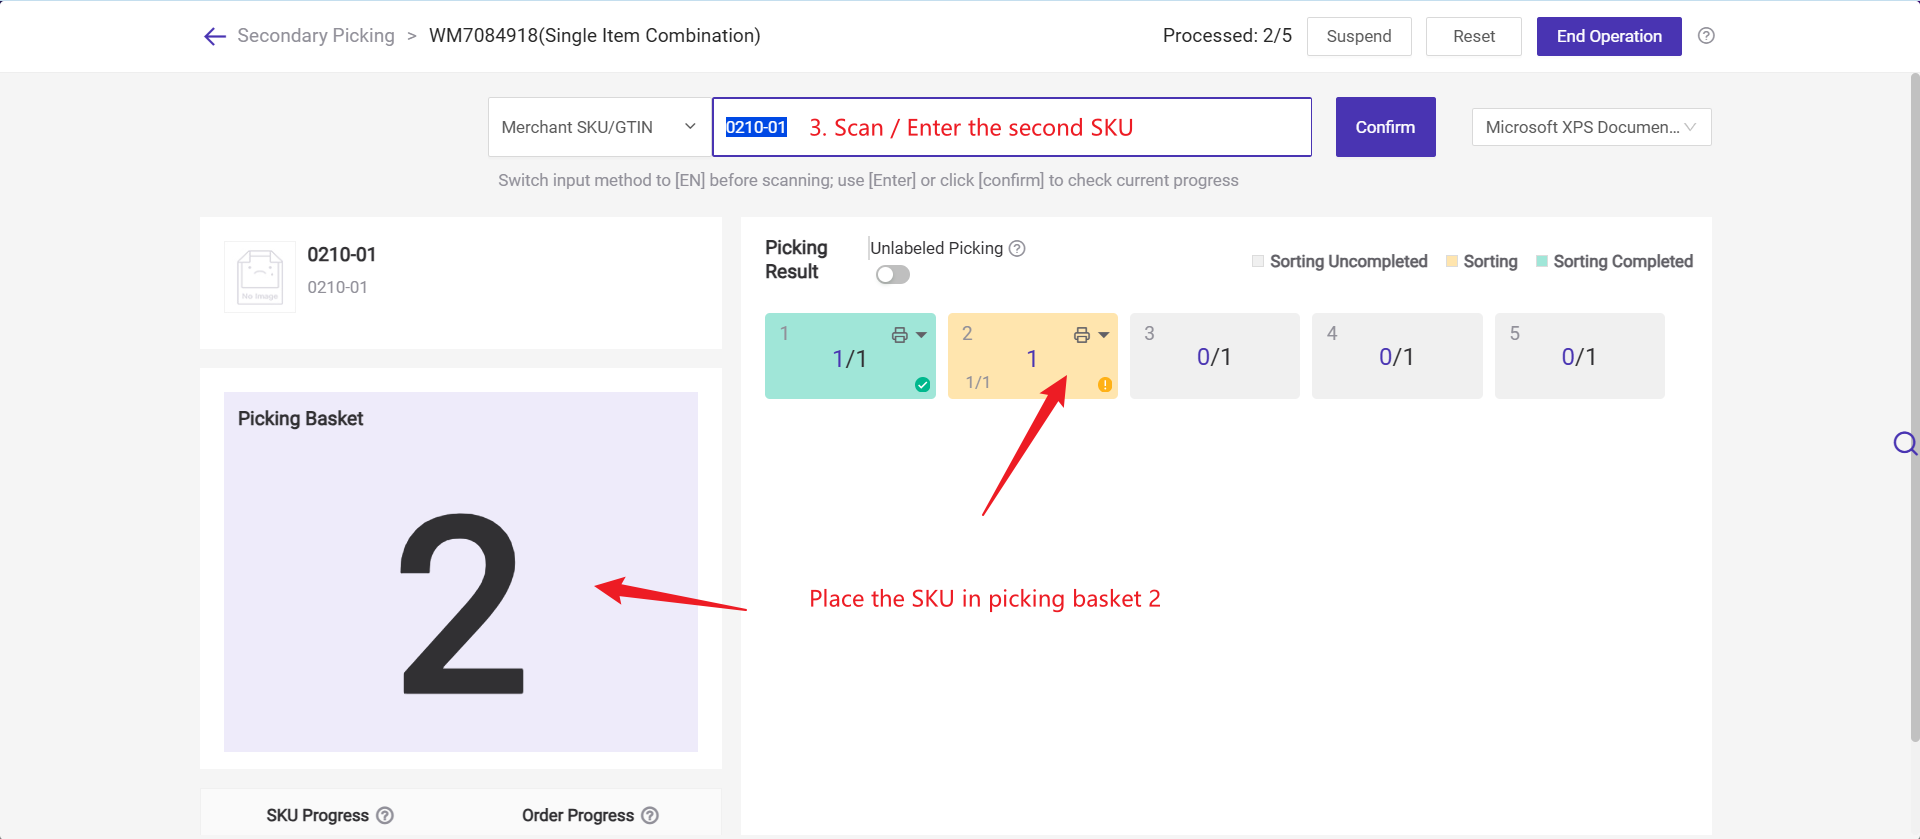
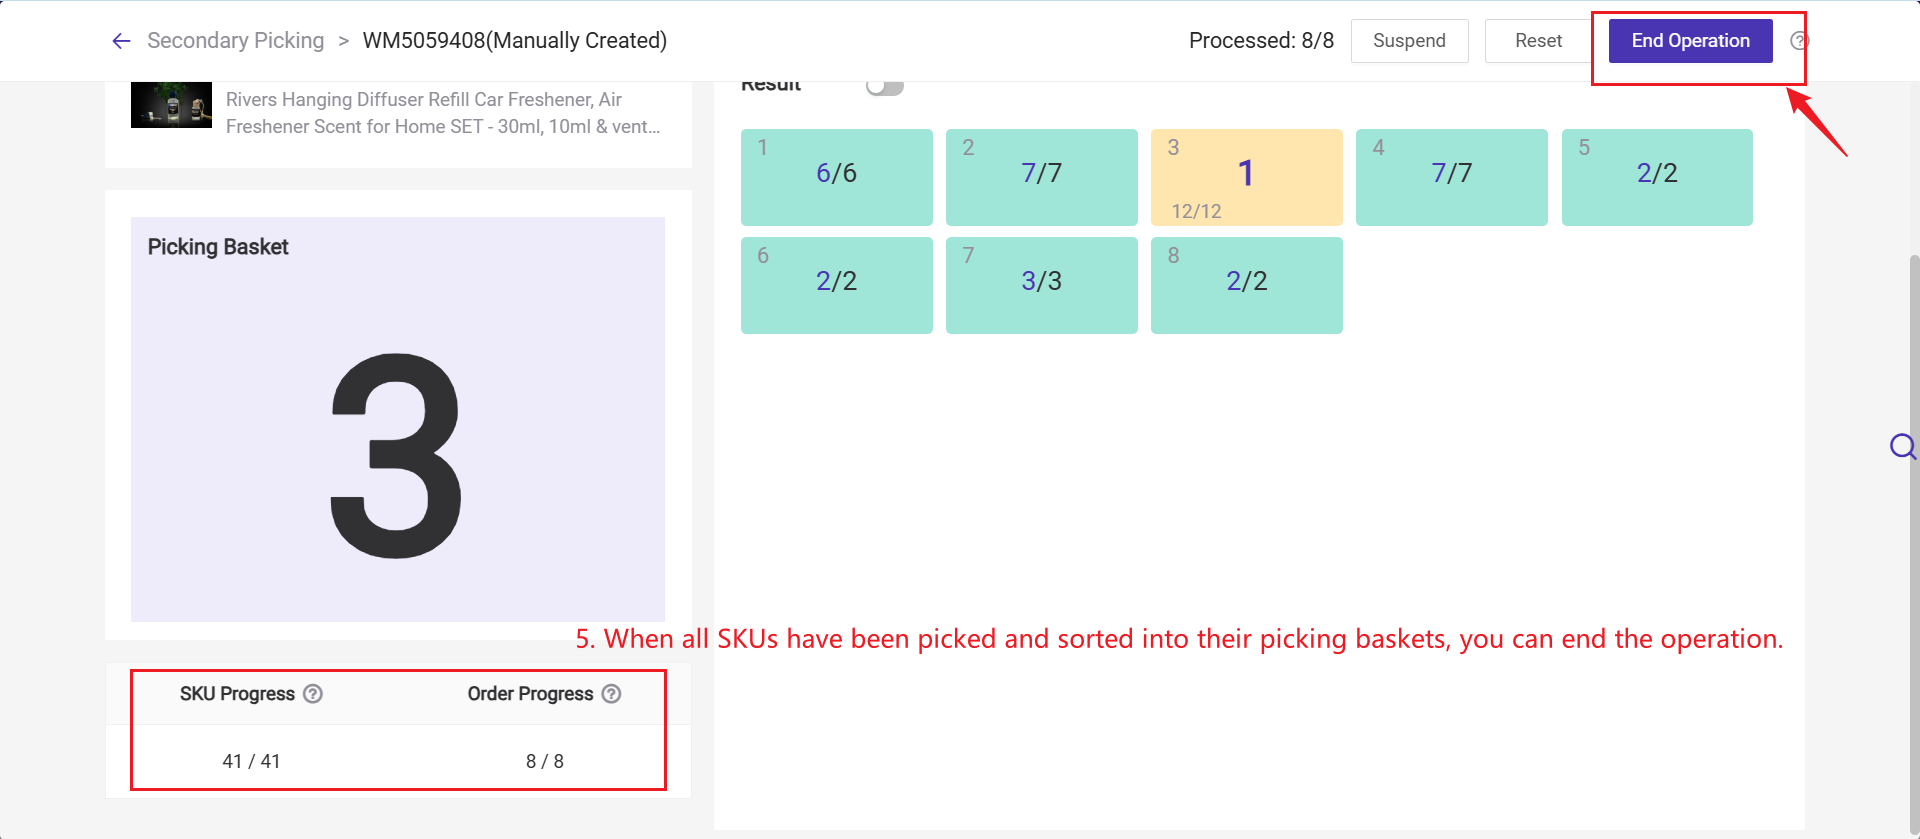
3) Continue scanning or entering the next SKU and repeat the process until all SKUs have been sorted.
💡 Notes

3) Repeat the process until all SKUs have been sorted.
💡 Notes
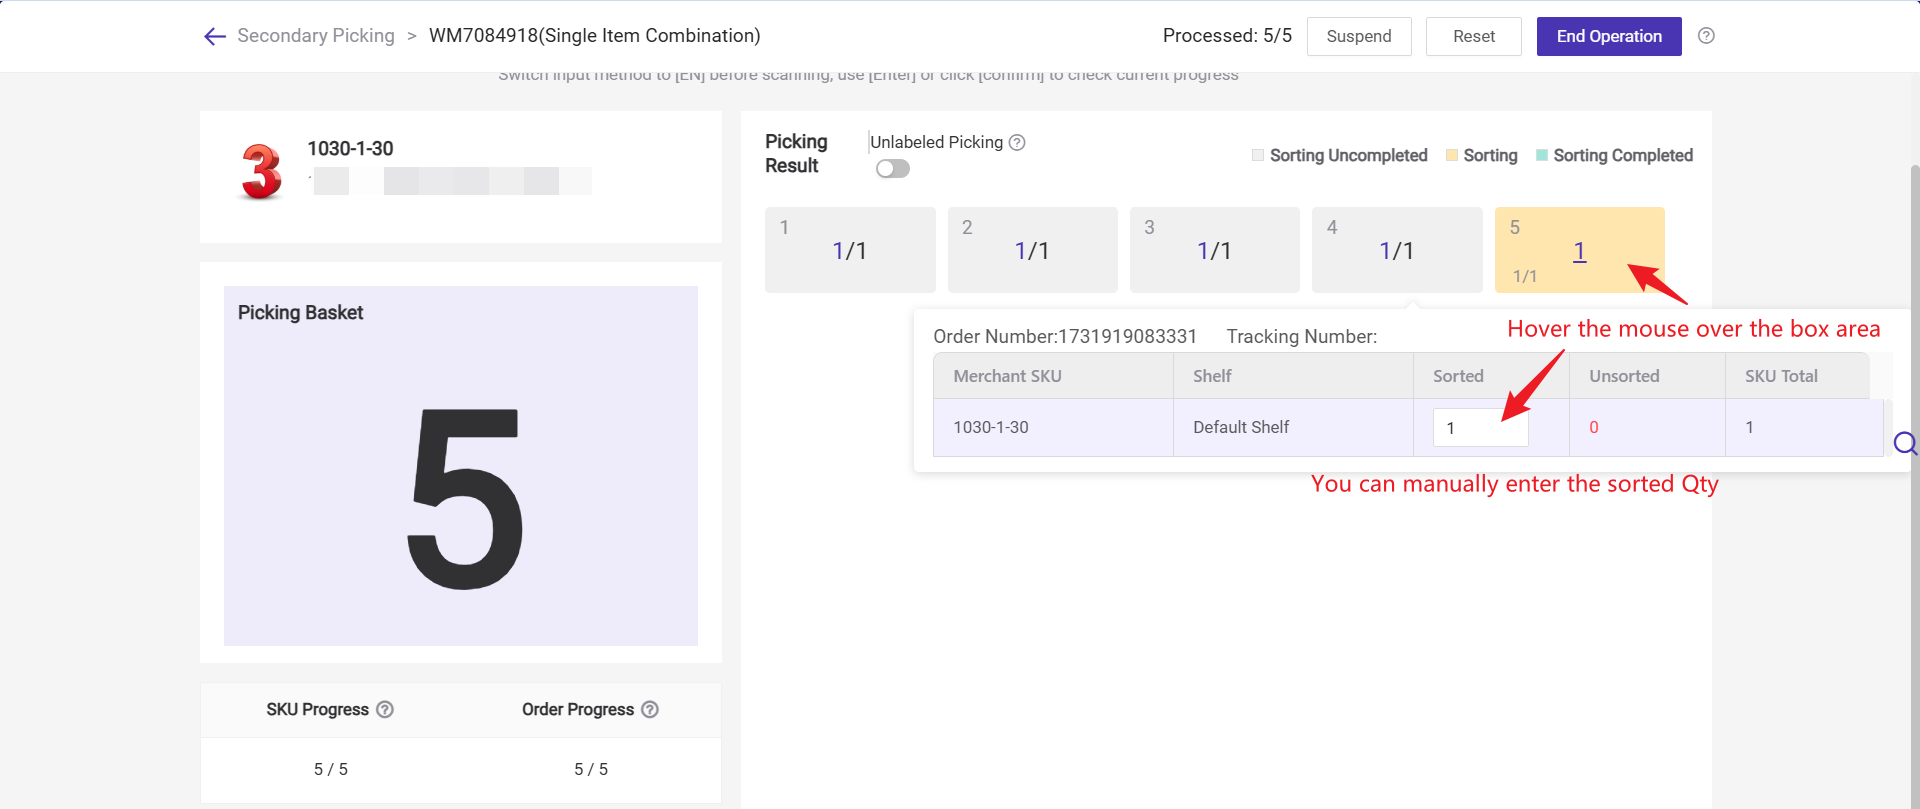
1. When hovering the mouse over the picking box, all items inside will be displayed. You can also manually enter the picked quantity.

- The Unlabeled Picking Mode is designed for scenarios where some products are labeled, and others are not.
- In secondary picking, once the labelled items have been scanned, you can turn on the unlabelled picking mode. In this mode, you can manually sort the unlabelled SKUs without the need for scanning. Simply enter the sorted quantity or just press [Enter] to complete the picking.
- Please note, once the entire wave picking process is complete, this mode cannot be enabled.

📚 Steps for using the unlabled picking feature
4. Scan Package
When the wave is in the To Pack list, you can perform Scan Package operation and complete the package label printing and packing in this process.
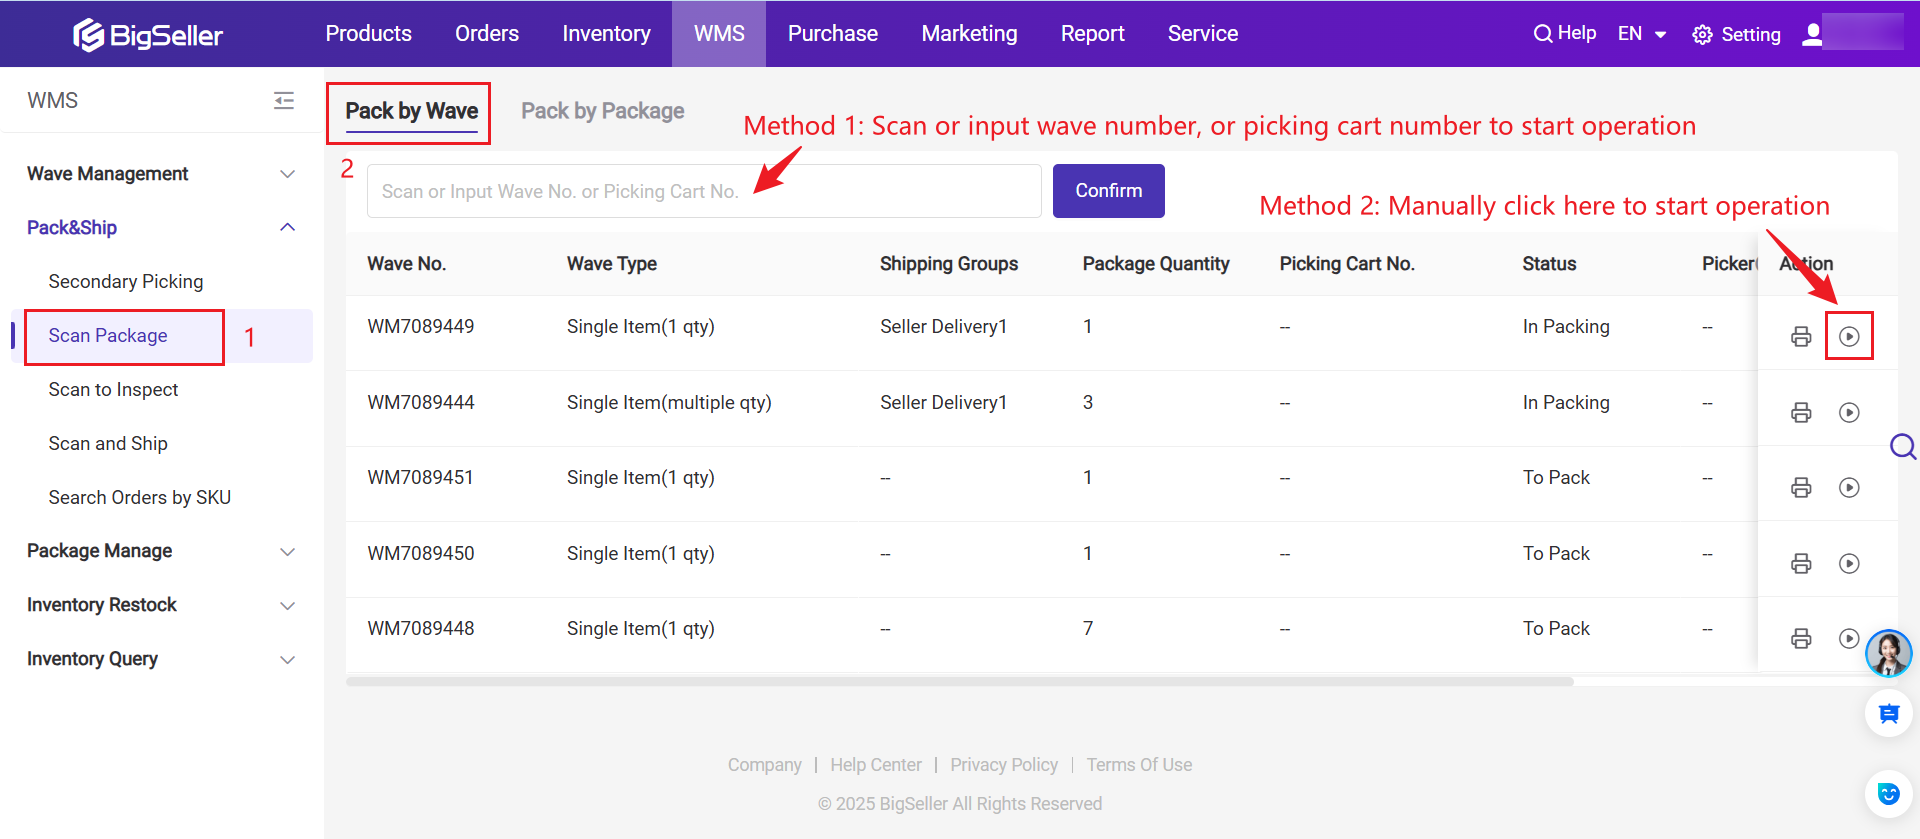
4.1 Operation process when shipping label printing method is set to Scan Pick List
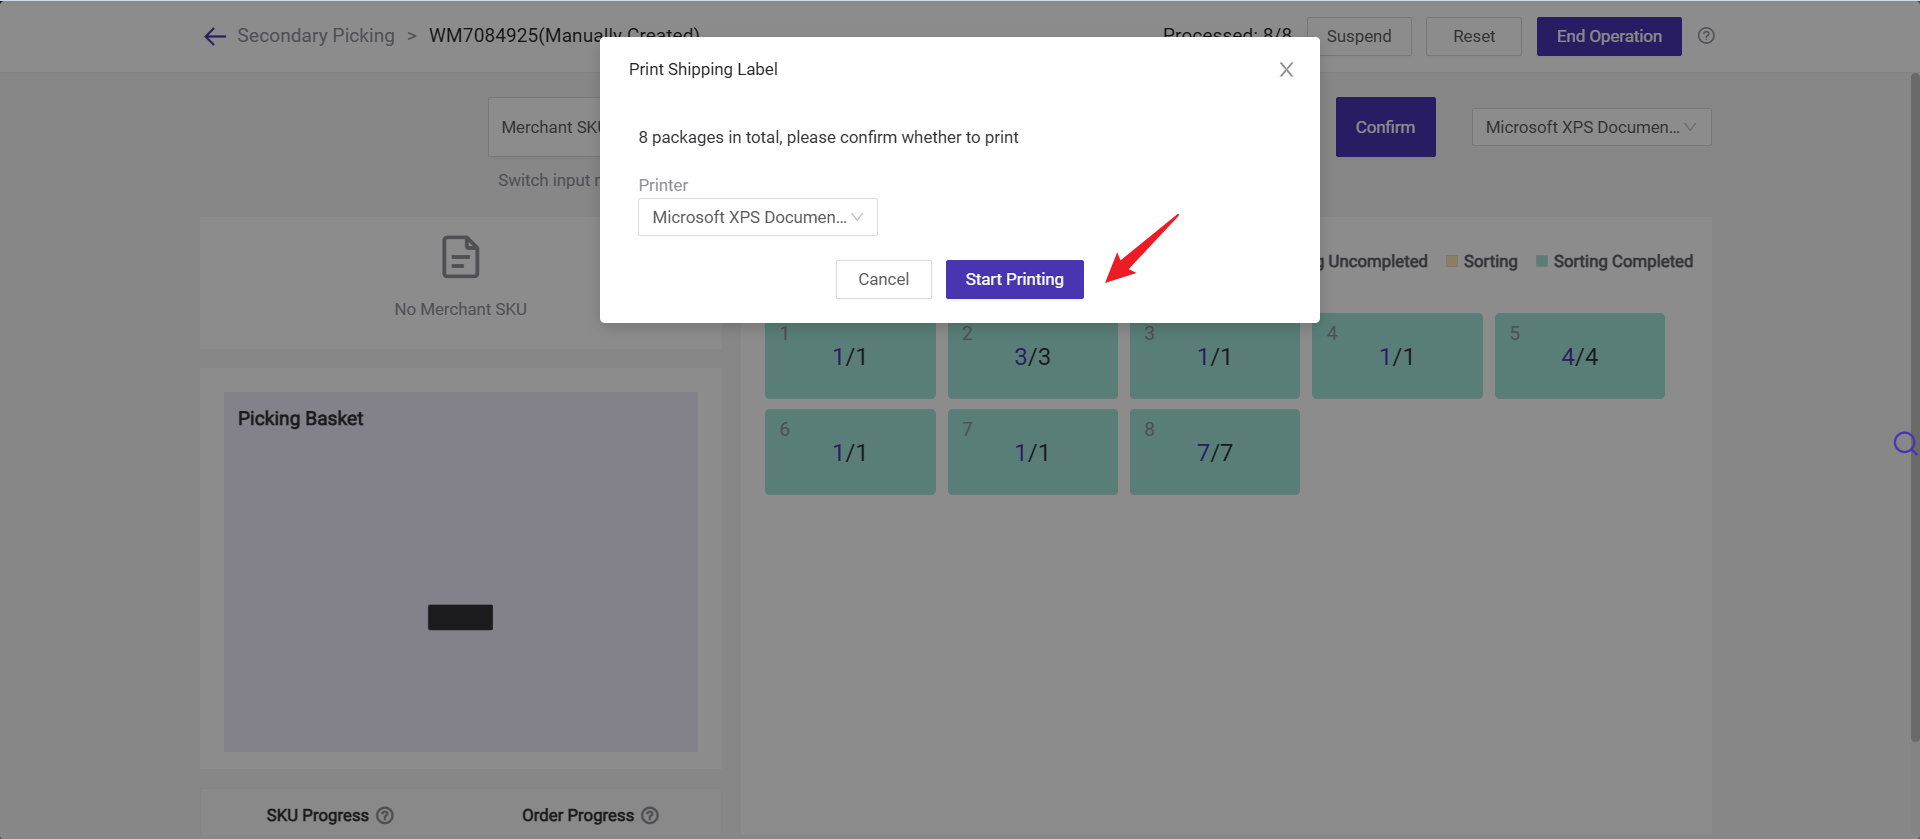
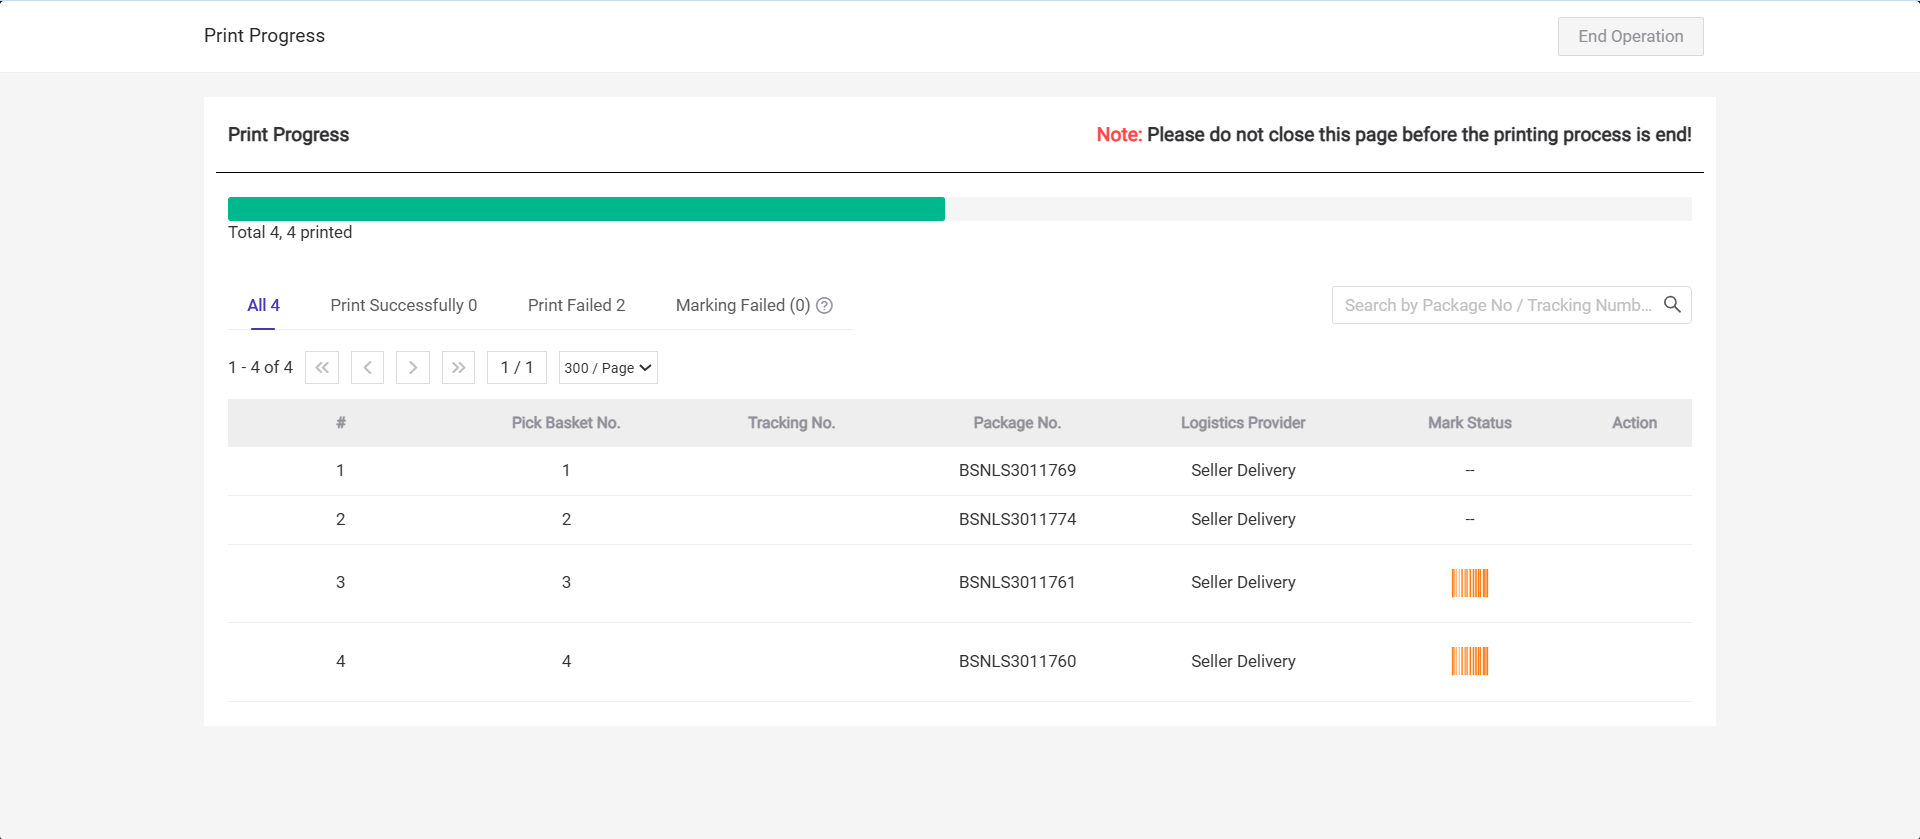
Step 1: Scan Pick List or manually click Print. All shipping labels in the currently wave will be printed collectively.

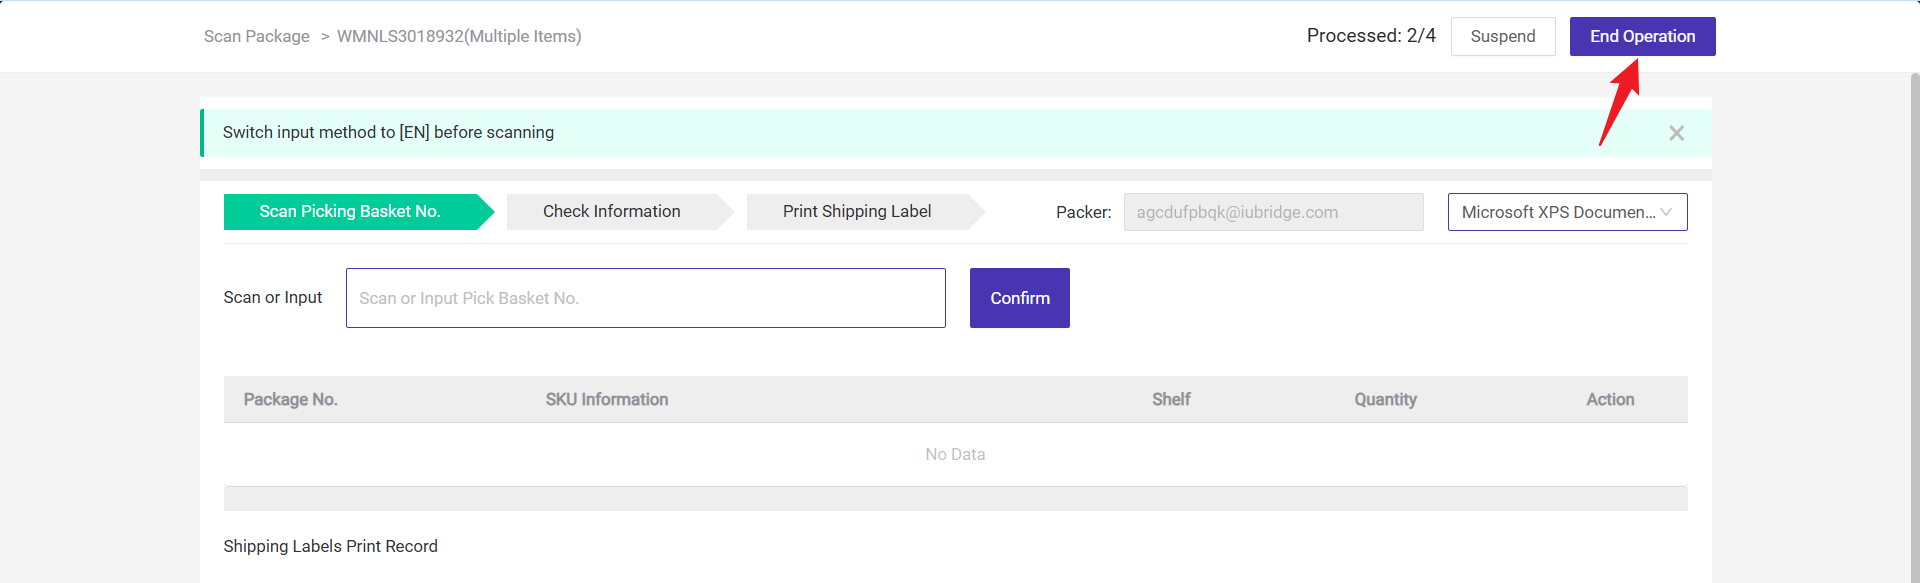
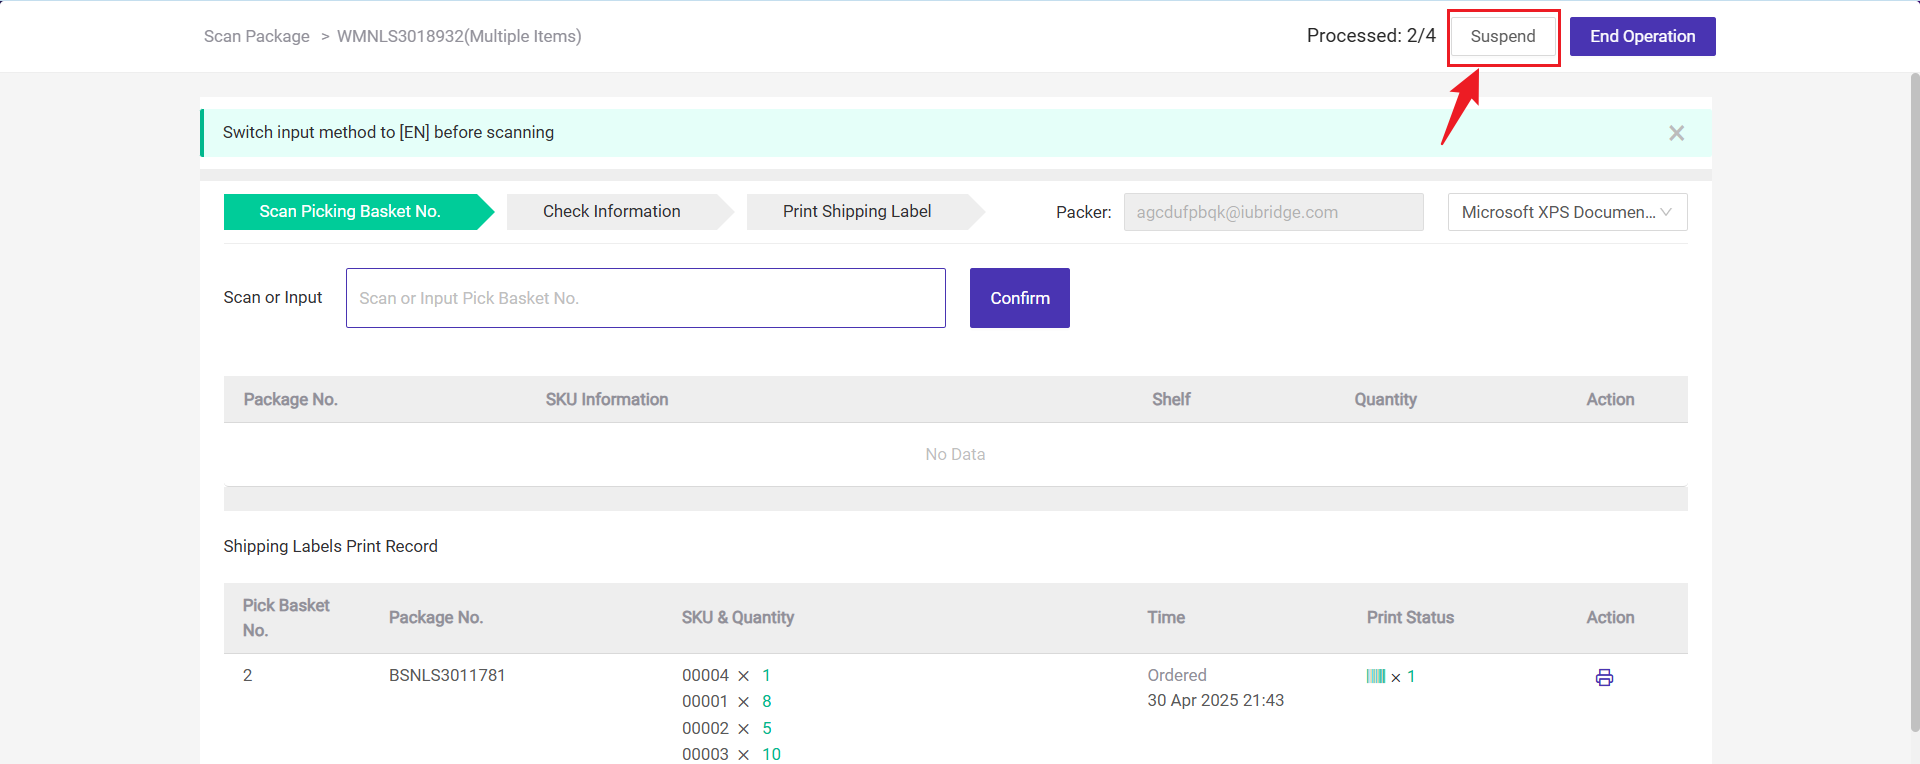
4.2 Operation process when shipping label printing method is set to Scan Picking Basket No.
Step 1: Use the scanner to scan the Picking Basket barcode, or manually enter the basket number and click "Confirm”.
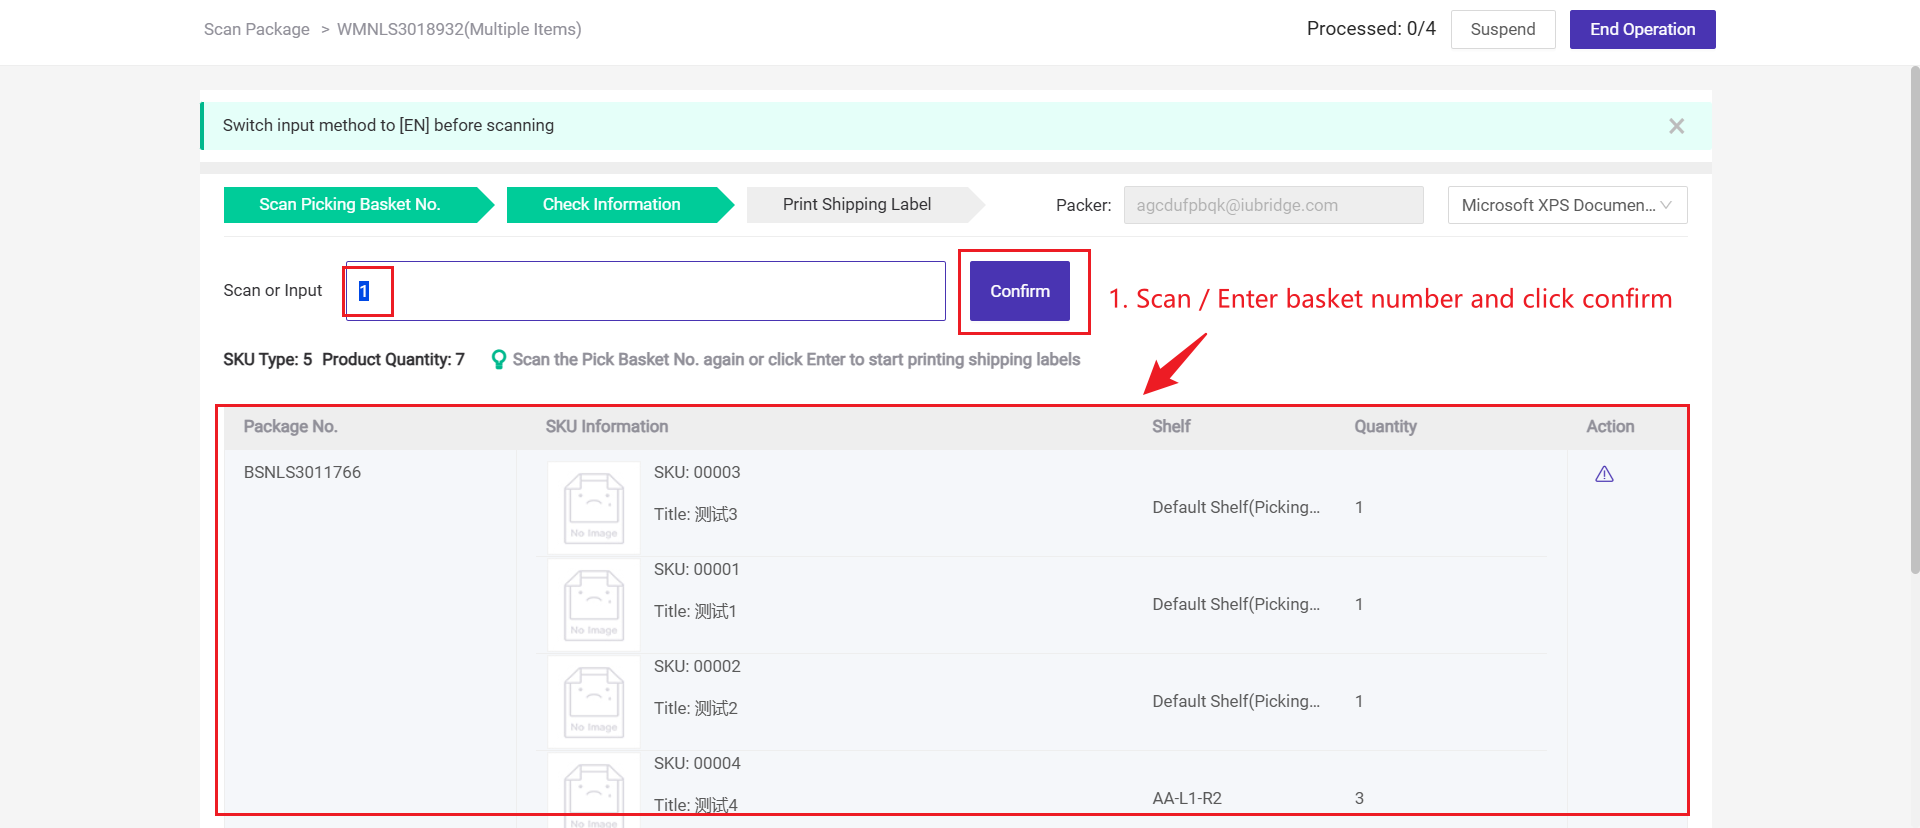
Step 2: The system will display the package information for that Picking Basket. You can double-check the product details to make sure everything is correct. If everything looks good, either scan again or click "Confirm" to print the shipping label for that package.
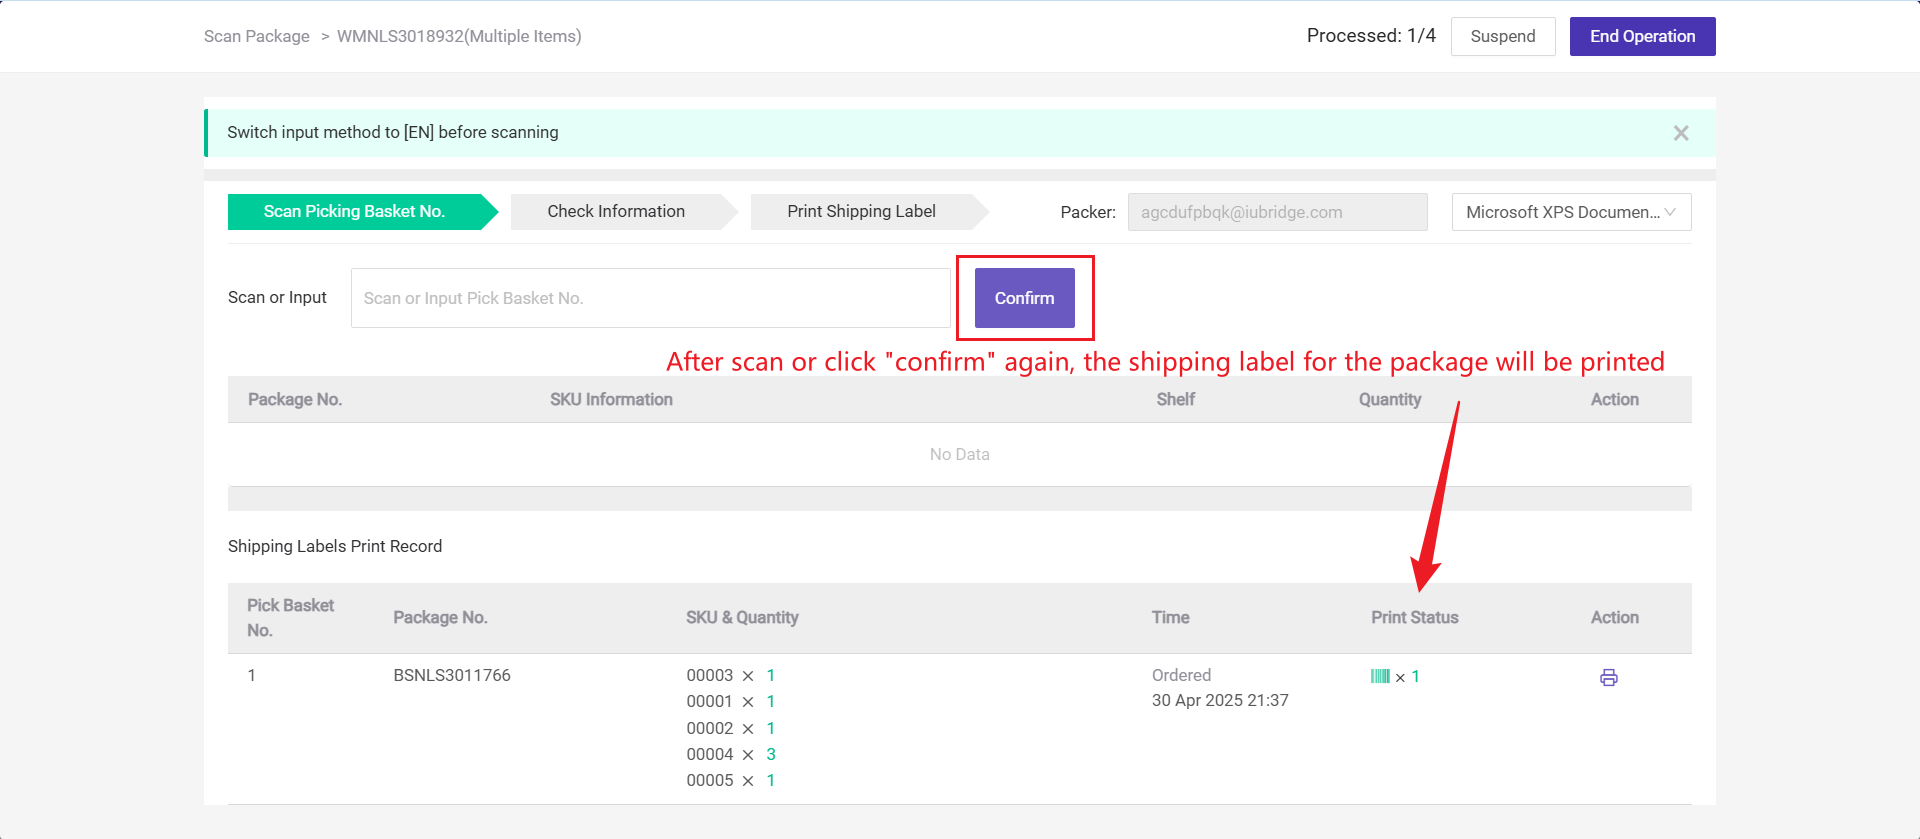
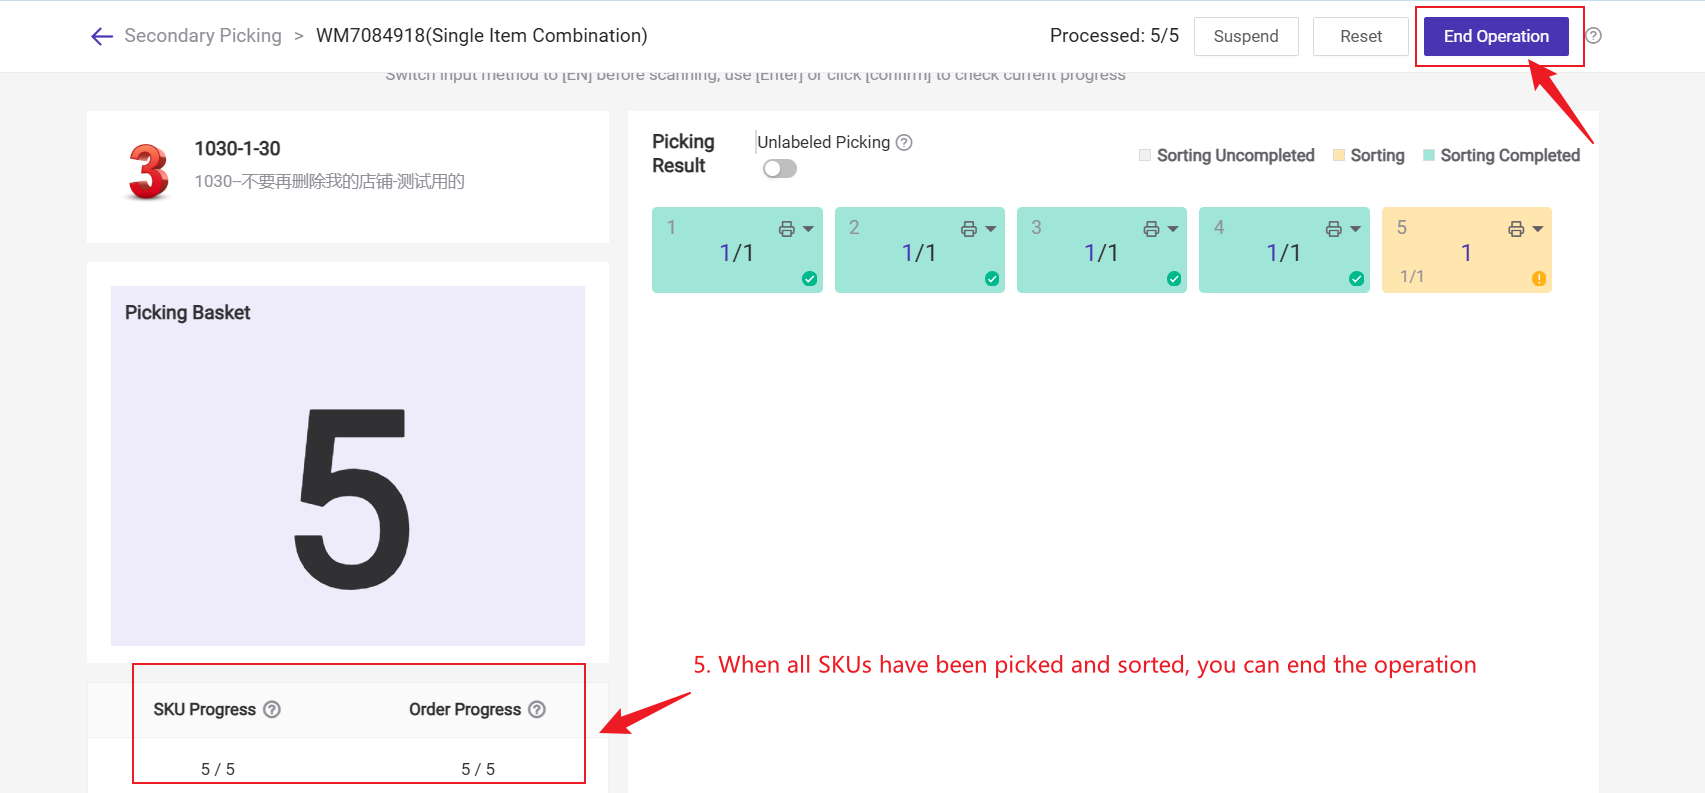
Step 3: Repeat the process untill all picking basket number has been scaned and all shipping labels have been printed >> Click End Operation
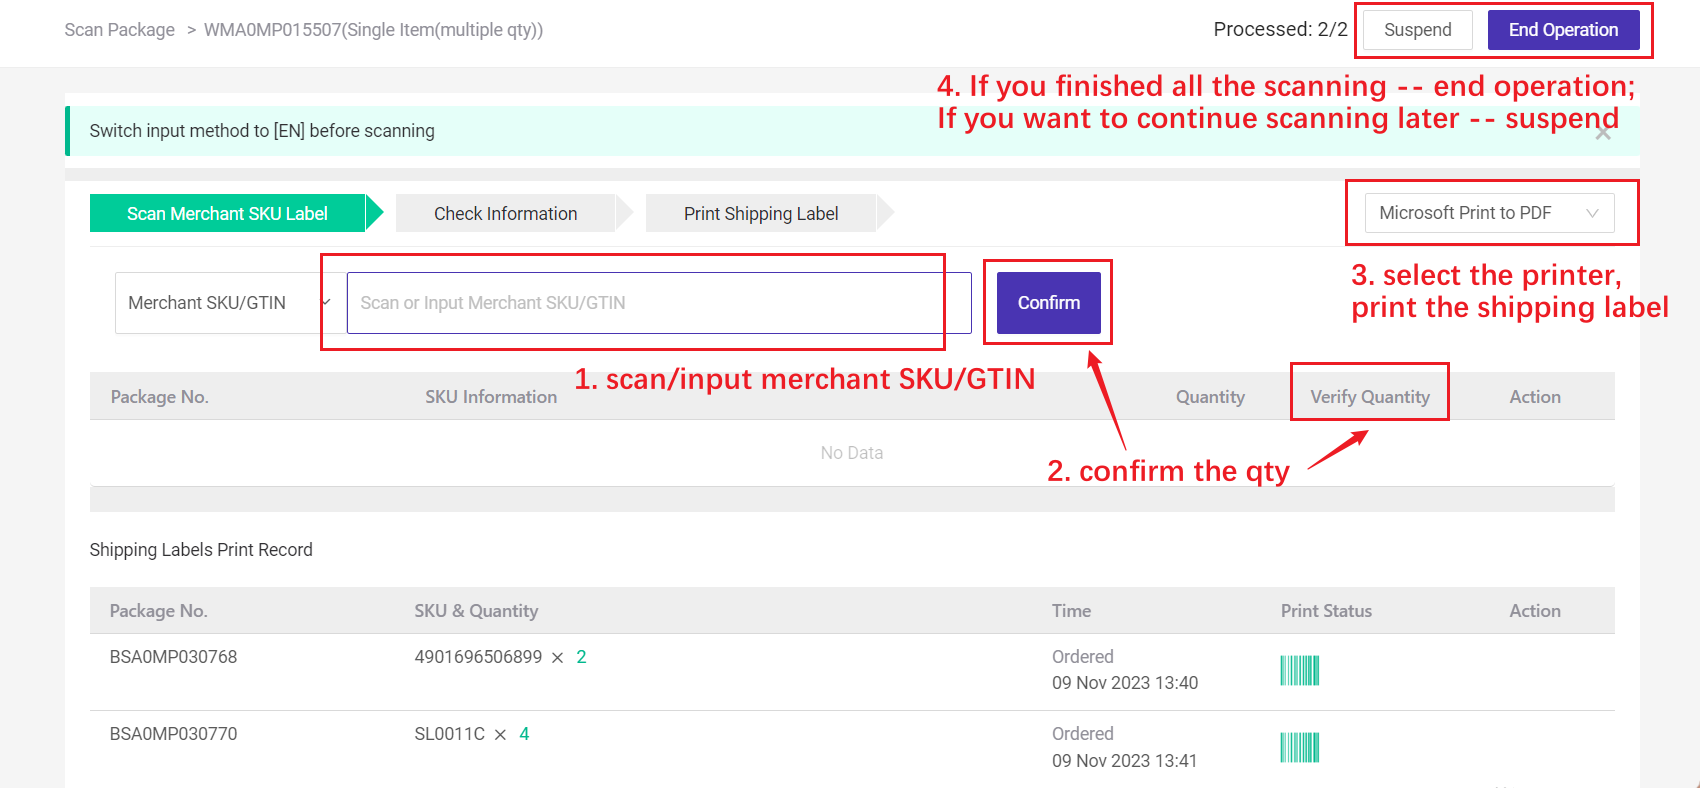
4.3 Operation process when shipping label printing method is set to Scan Merchant SKU Label
💡 Notes: If you select scanning merchant SKU label to print shipping label, there are three package match methods: Pre-Matching, Post-Matching and Sequential Matching, which can automatically match specific package information based on the SKU entered during scanning. 👉 What is Package Match Method for Wave Shipment?

5. Ship
There are four ways to ship: Scan and Ship, Ship Manually, Auto Ship (Enable Auto Tools), Auto Ship (After Scan Package)
Method 1: Scan and Ship

💡 Notes
- If you can't find your manifest on [Manifest Manage] after scanning the parcels, you may have not clicked on Generate Manifest.
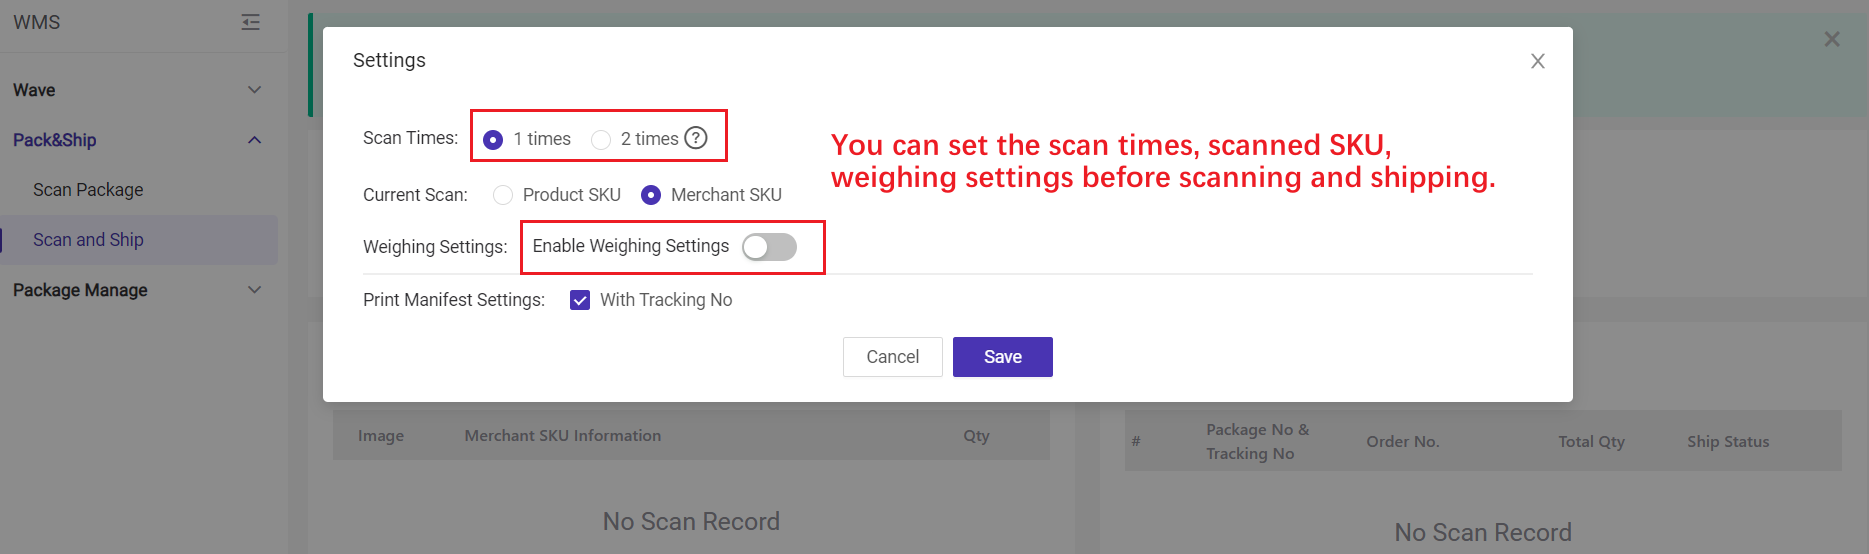
- Scan Settings
-
One Time: orders will be automatically moved to the To Pickup Orders List after one scan.
-
Two Times: the first scan is to confirm the package info. Orders will be moved to the To Pickup Orders List after the second scan.
-
Method 2: Auto Ship by Enabling Auto Tools

Method 3: Ship Manually

After completing all the Wave processes, orders will be moved to the To Pickup Orders List. Then you can wait for the courier to pick up the packages or drop them off at the express station nearby. Finally, orders will be automatically moved to the Shipped List if there is logistic information online.
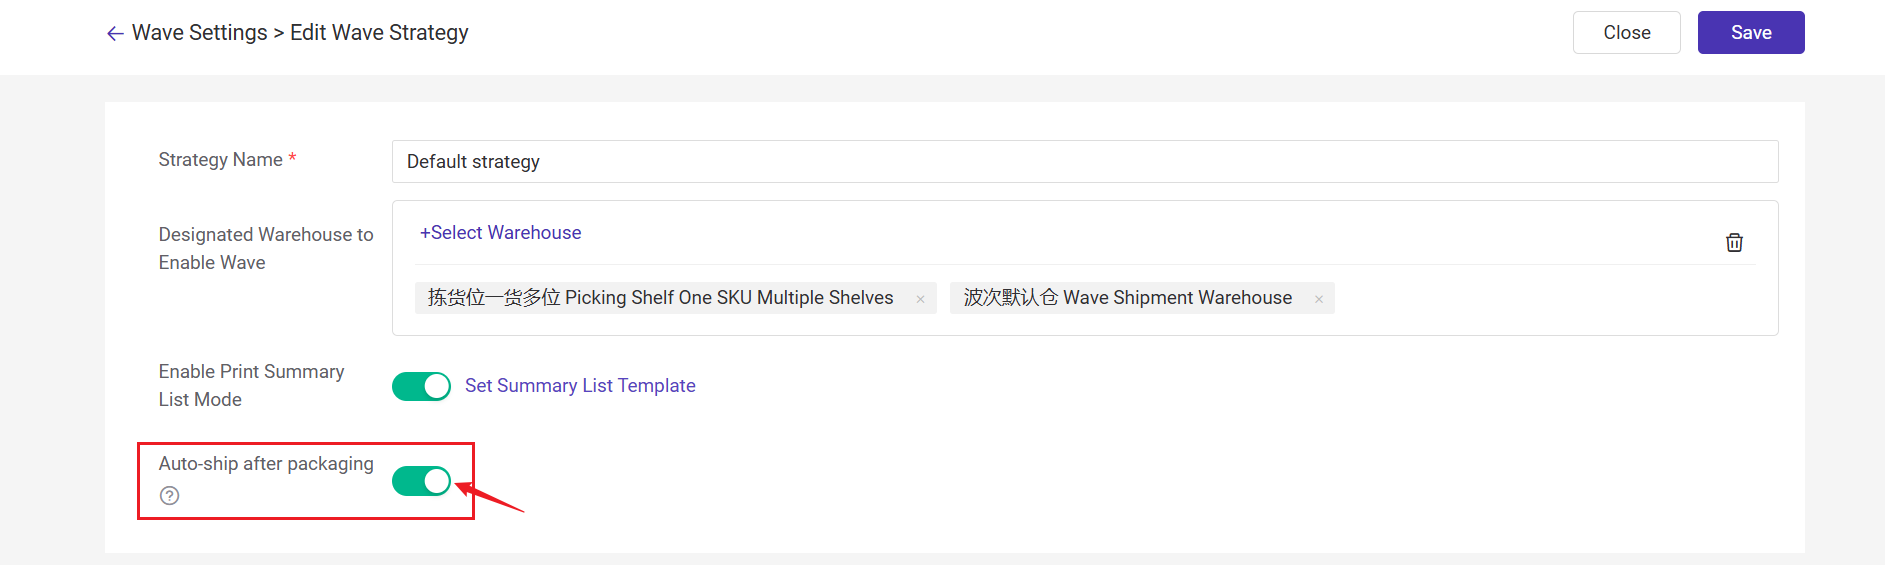
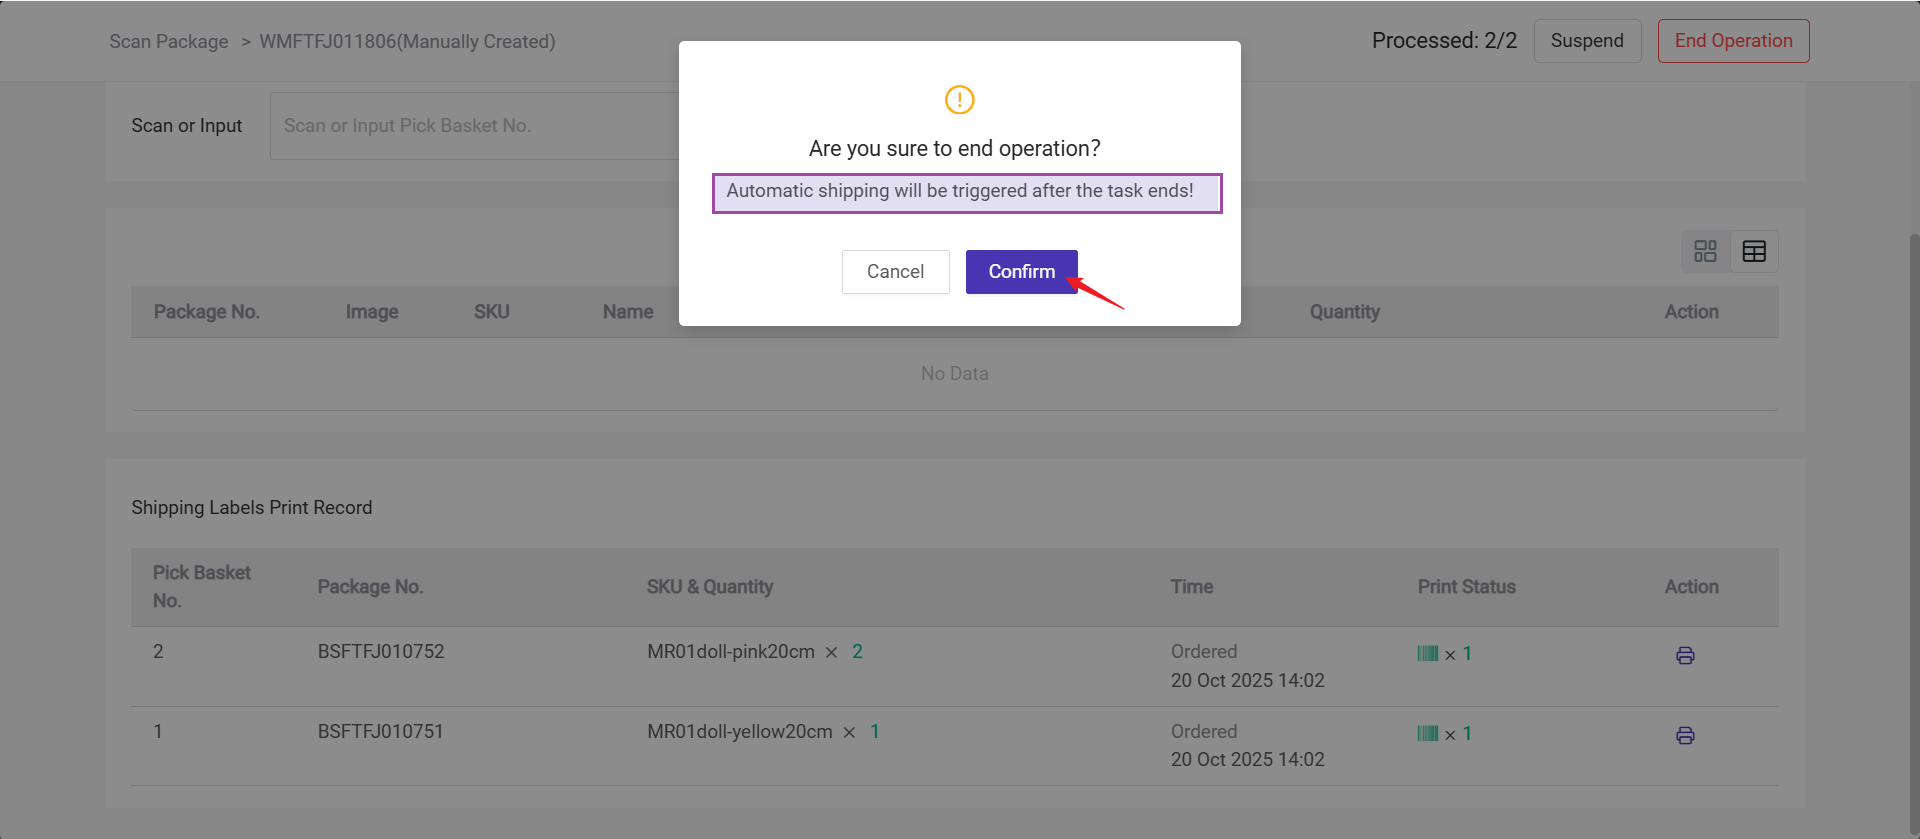
Method 4: Auto Ship After Packaging [New Feature]
When this feature is enabled, the system will automatically ship orders and deduct inventory right after the scan package operation process is completed. This eliminates repetitive steps and improves warehouse efficiency and data accuracy.
To enable: Go to Wave Setting > turn on Auto Ship After Packaging Completed.
6. Common Questions
Q1: Can I cancel the wave?
A1: When the status of the wave is [To Pick], you can void the wave.

Q2: What about the abnormal packages? Can they go back to the “To Generate Waves” List?
A2: Yes, you can manually move the abnormal packages back to the list of “Generate Waves” and restart.

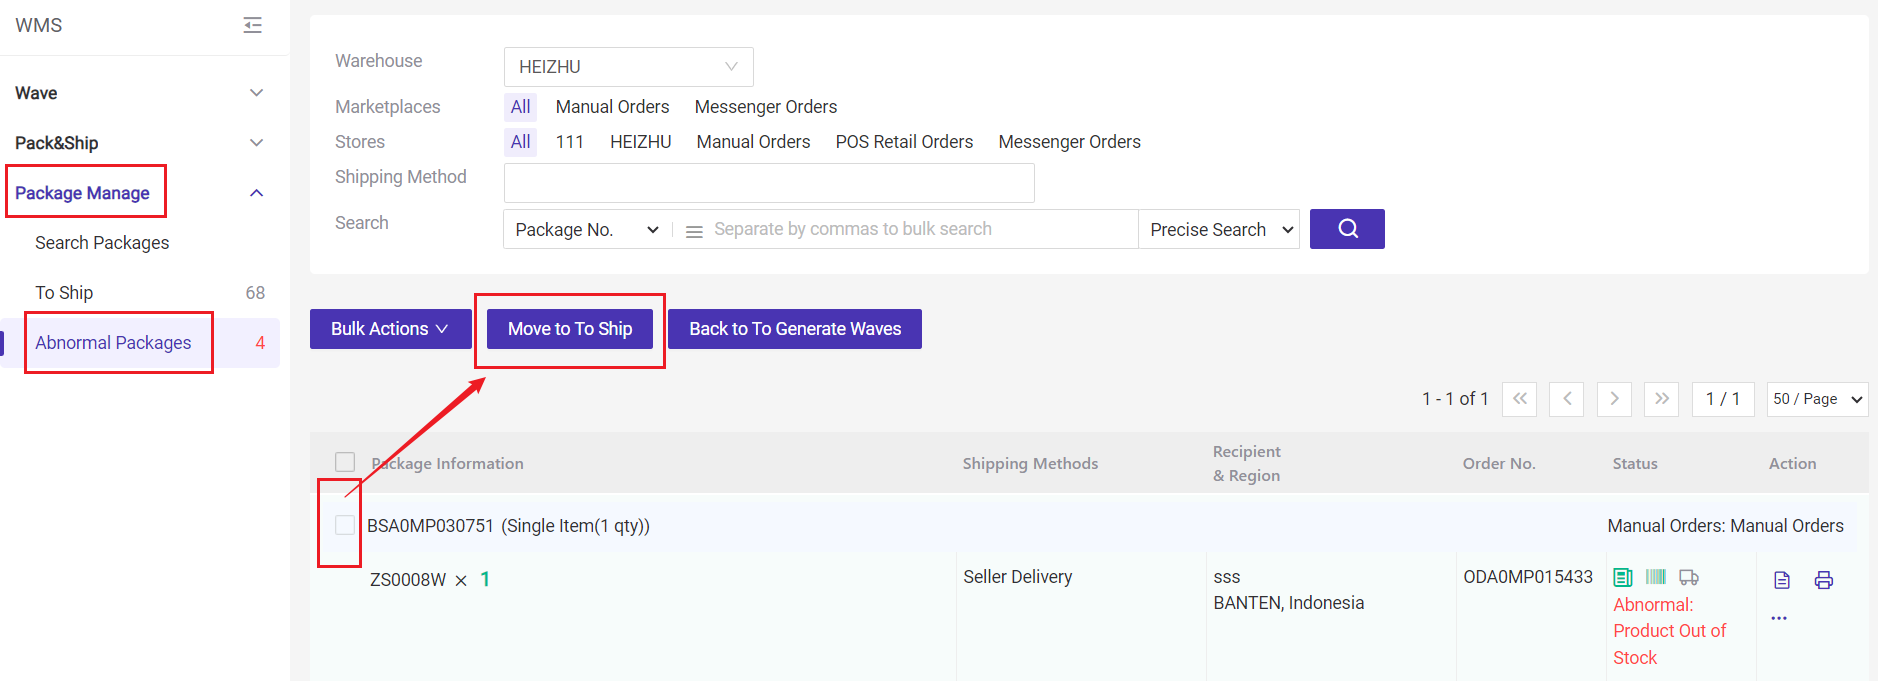
Q3: Can I move the abnormal packages to the “To Pick Up Orders” List?
A3: Yes. Go to the “Abnormal Packages” List> Select orders > Click “Move to To Ship” > Go to the “To Ship” List > Click “Ship”

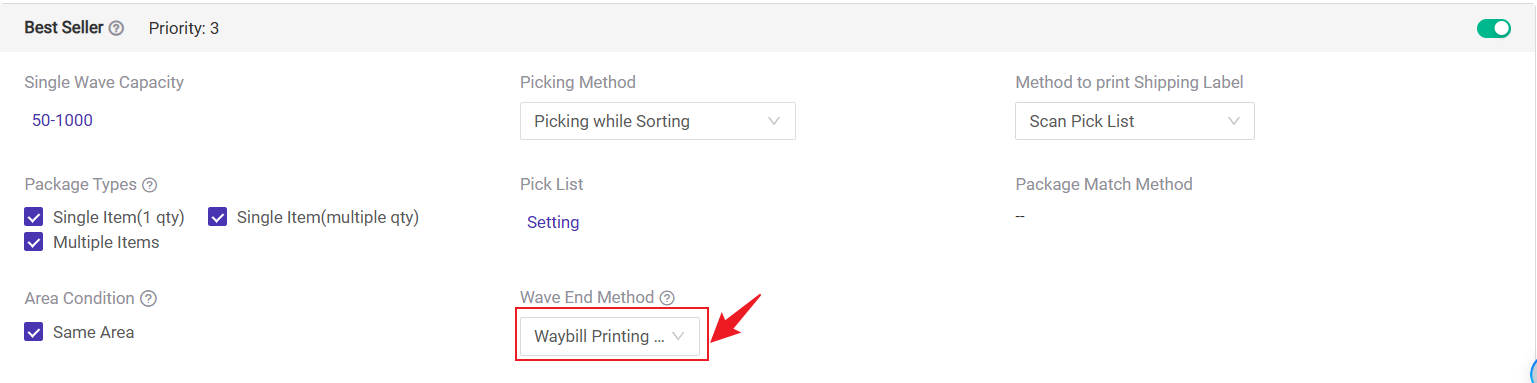
Q4: Do I have to go through the entire process when using a wave?
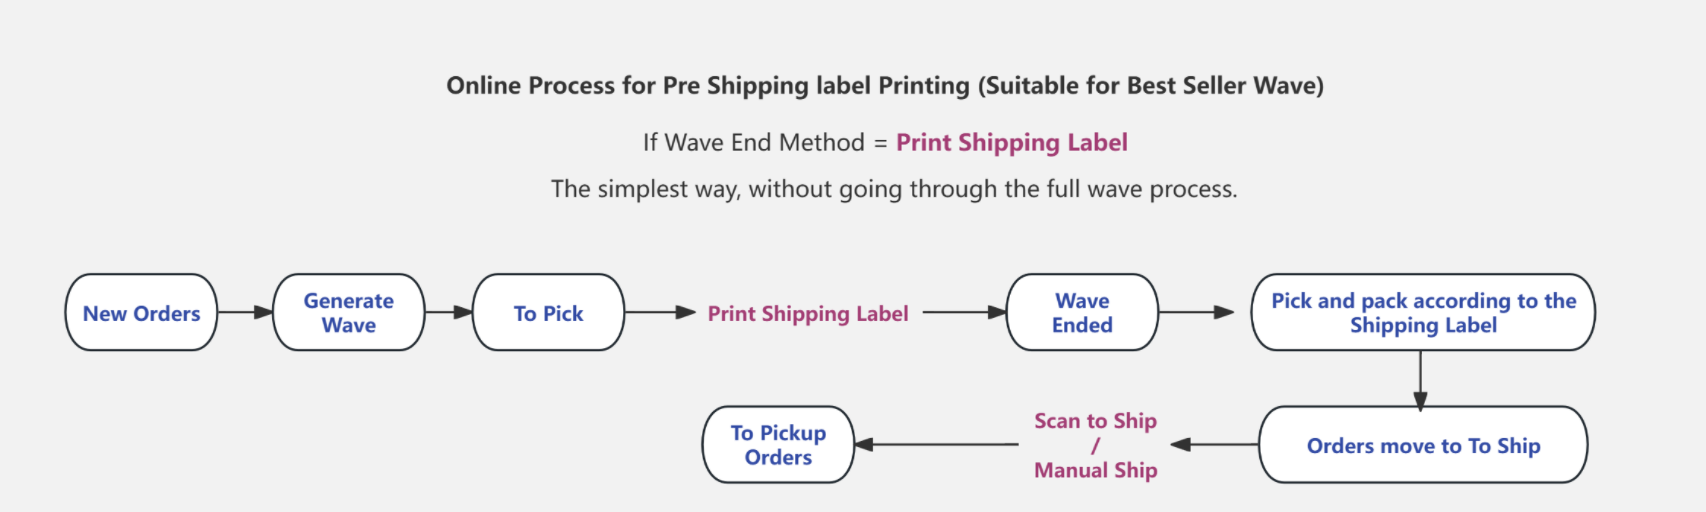
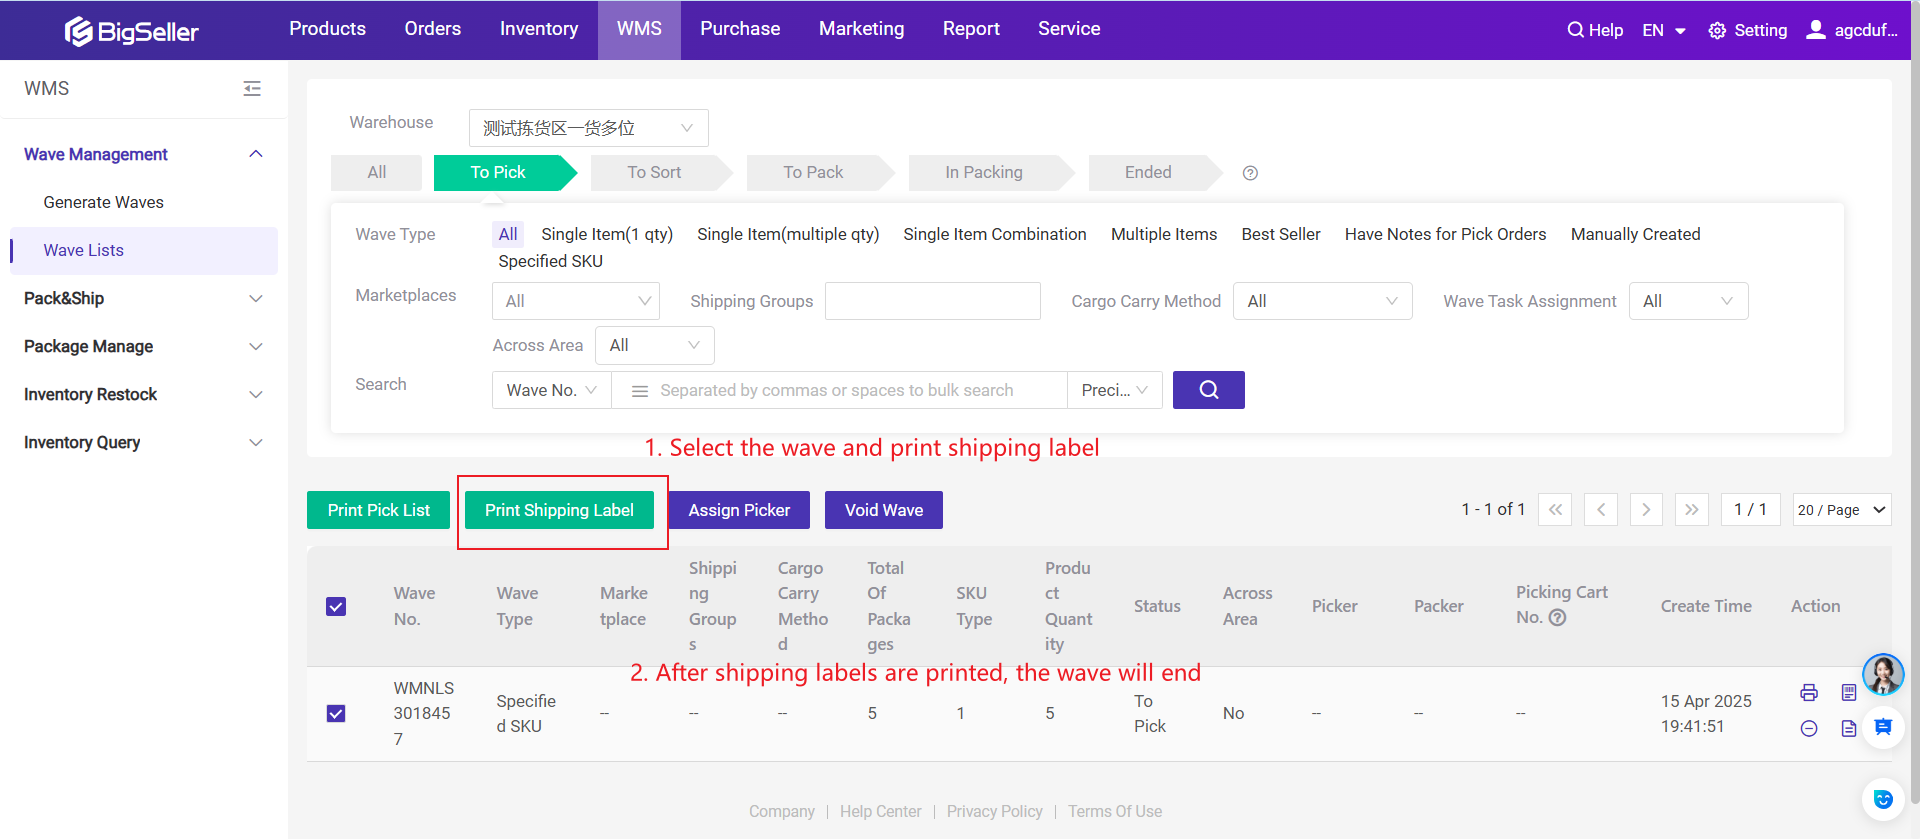
A4: Not necessarily. For wave types like Best Seller, since every package in the wave is identical, it's not necessary to go through the entire process. After generating the wave, you can directly print the shipping labels from the wave list, then use those labels to proceed with picking.
👉 Best Seller Wave Process Recommendations
Is this content helpful?
Thank you for your feedback. It drives us to provide better service.
Please contact us if the document can't answer your questions