Introduction to Purchase Feature
Update Time: 22 Sep 2025 05:11
1. Add Purchase Order
You can create a purchase order through the following two ways: single add, import to add.1.1 Add Single Purchase Order
Step 1: Go to Purchase > Draft > Add Purchase Order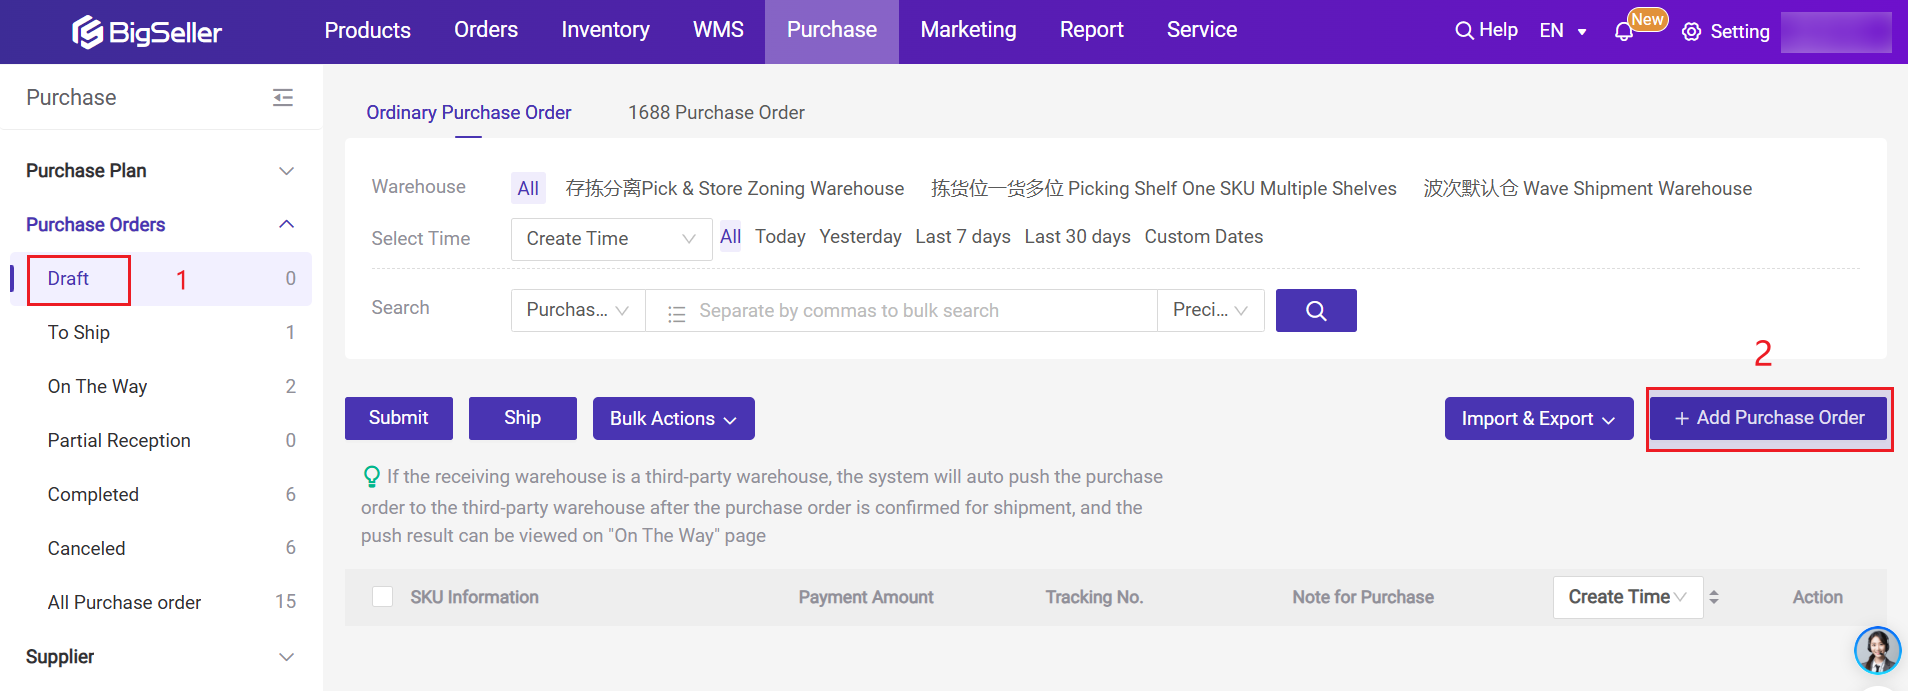
Step 2: fill in the information

Step 3: Select or input the merchant SKUs you want to purchase.
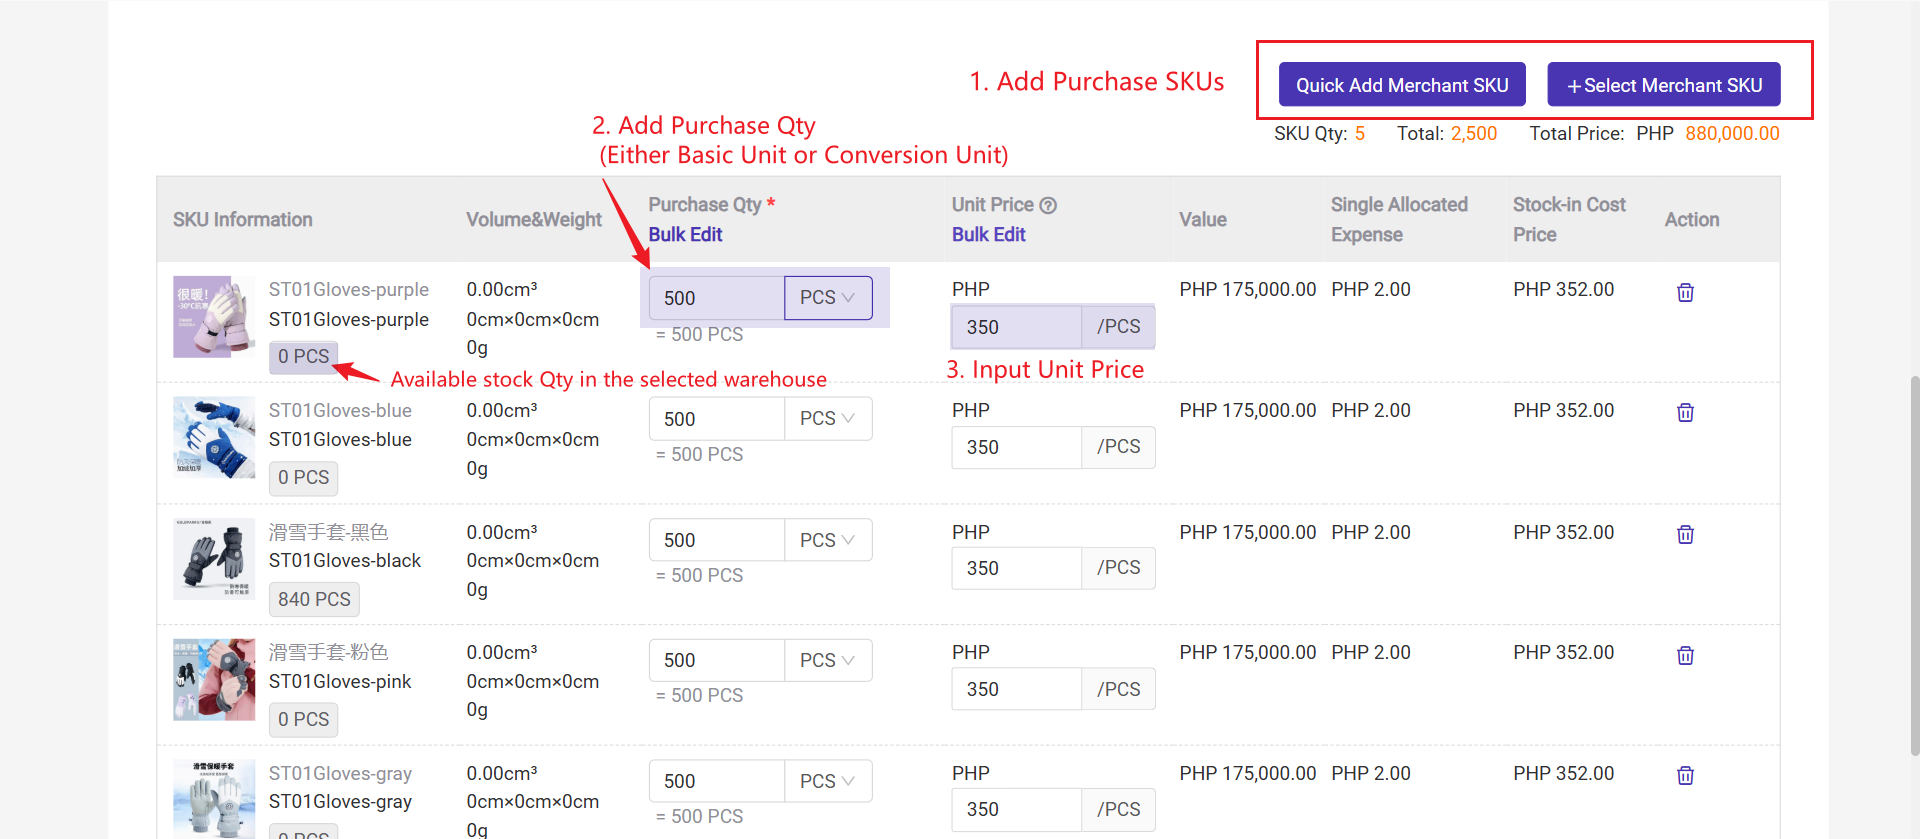
For conversion unit settings, please click here to learn more: Inventory Multi-Unit Management
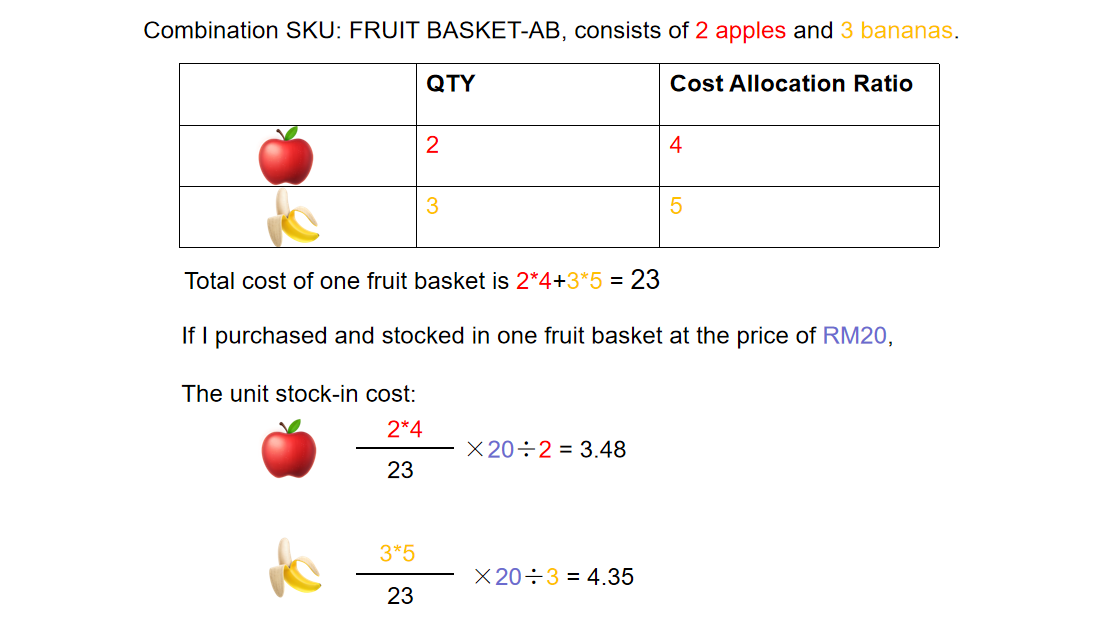
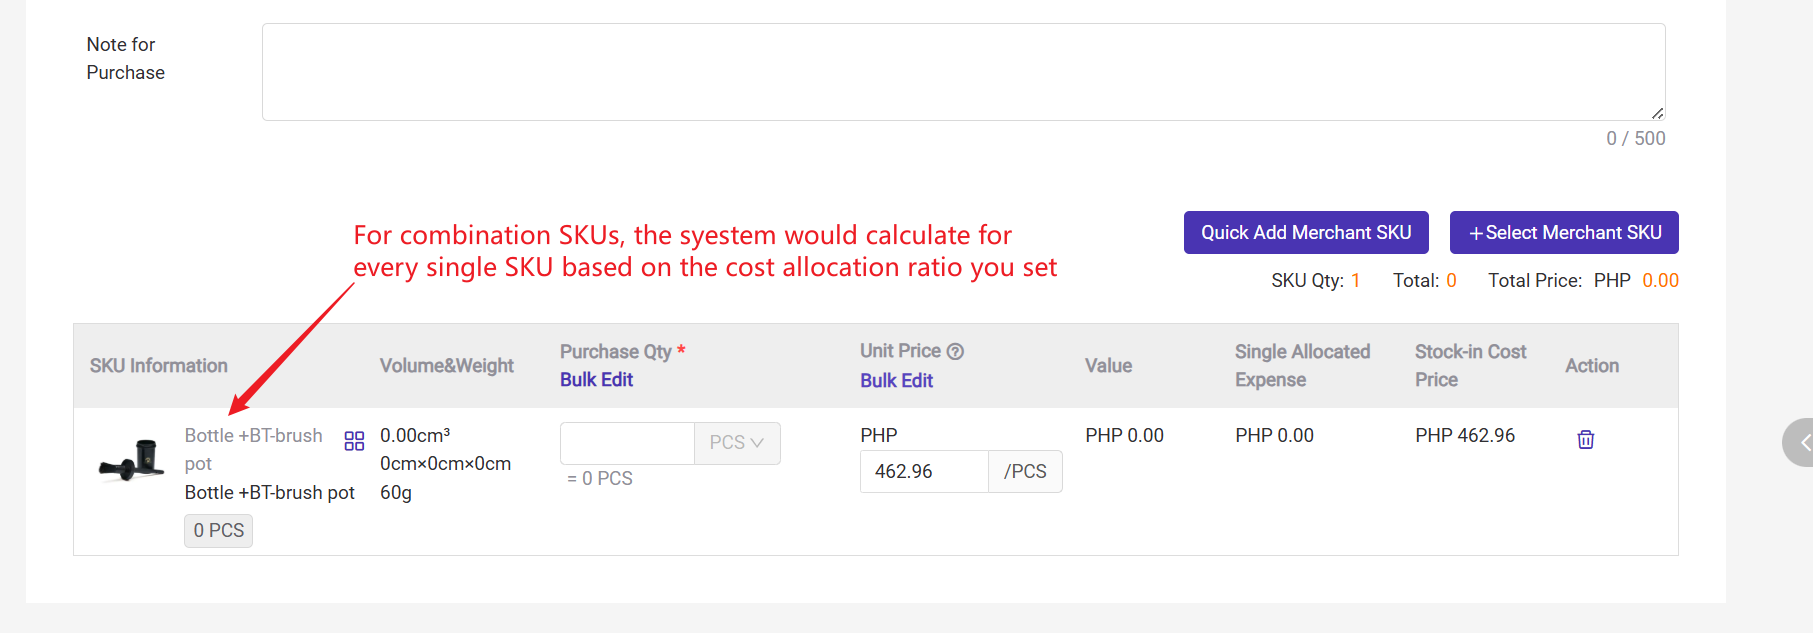
Note: 🔖 If you select a combination SKU, system will split it into single SKUs and calculate the unit price based on the cost allocation ratio you set when you create this combination SKU. For example:
1.2 Import to Add
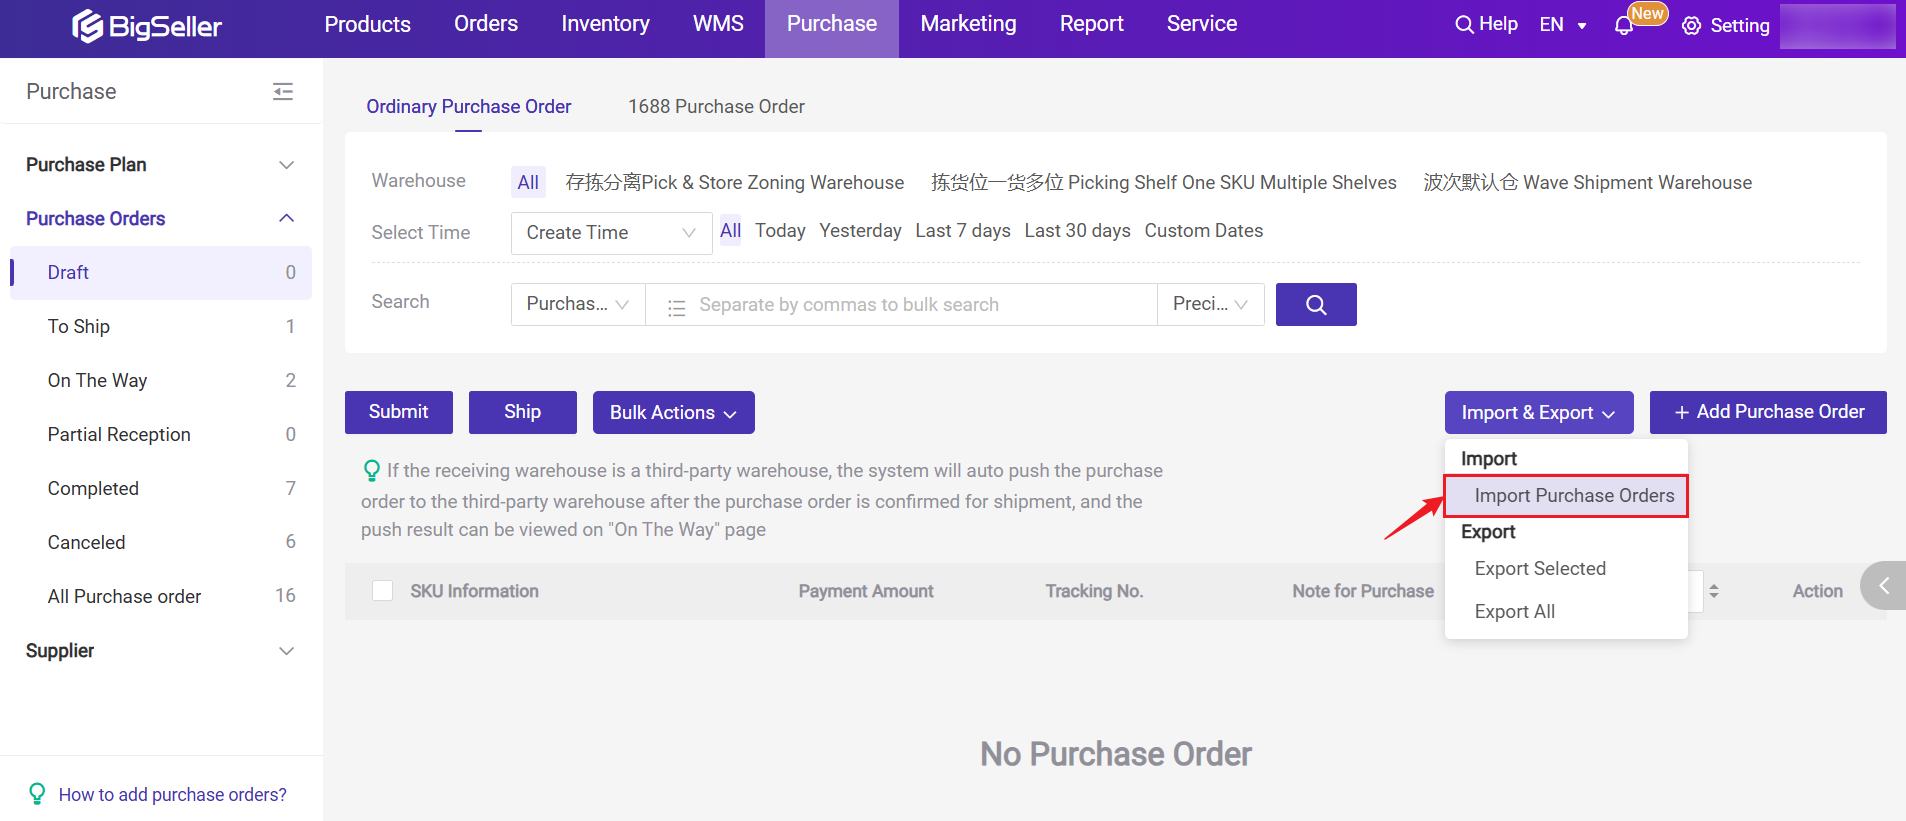
Step 1: Go to Purchase > Draft > Import & Export > Import Purchase Orders
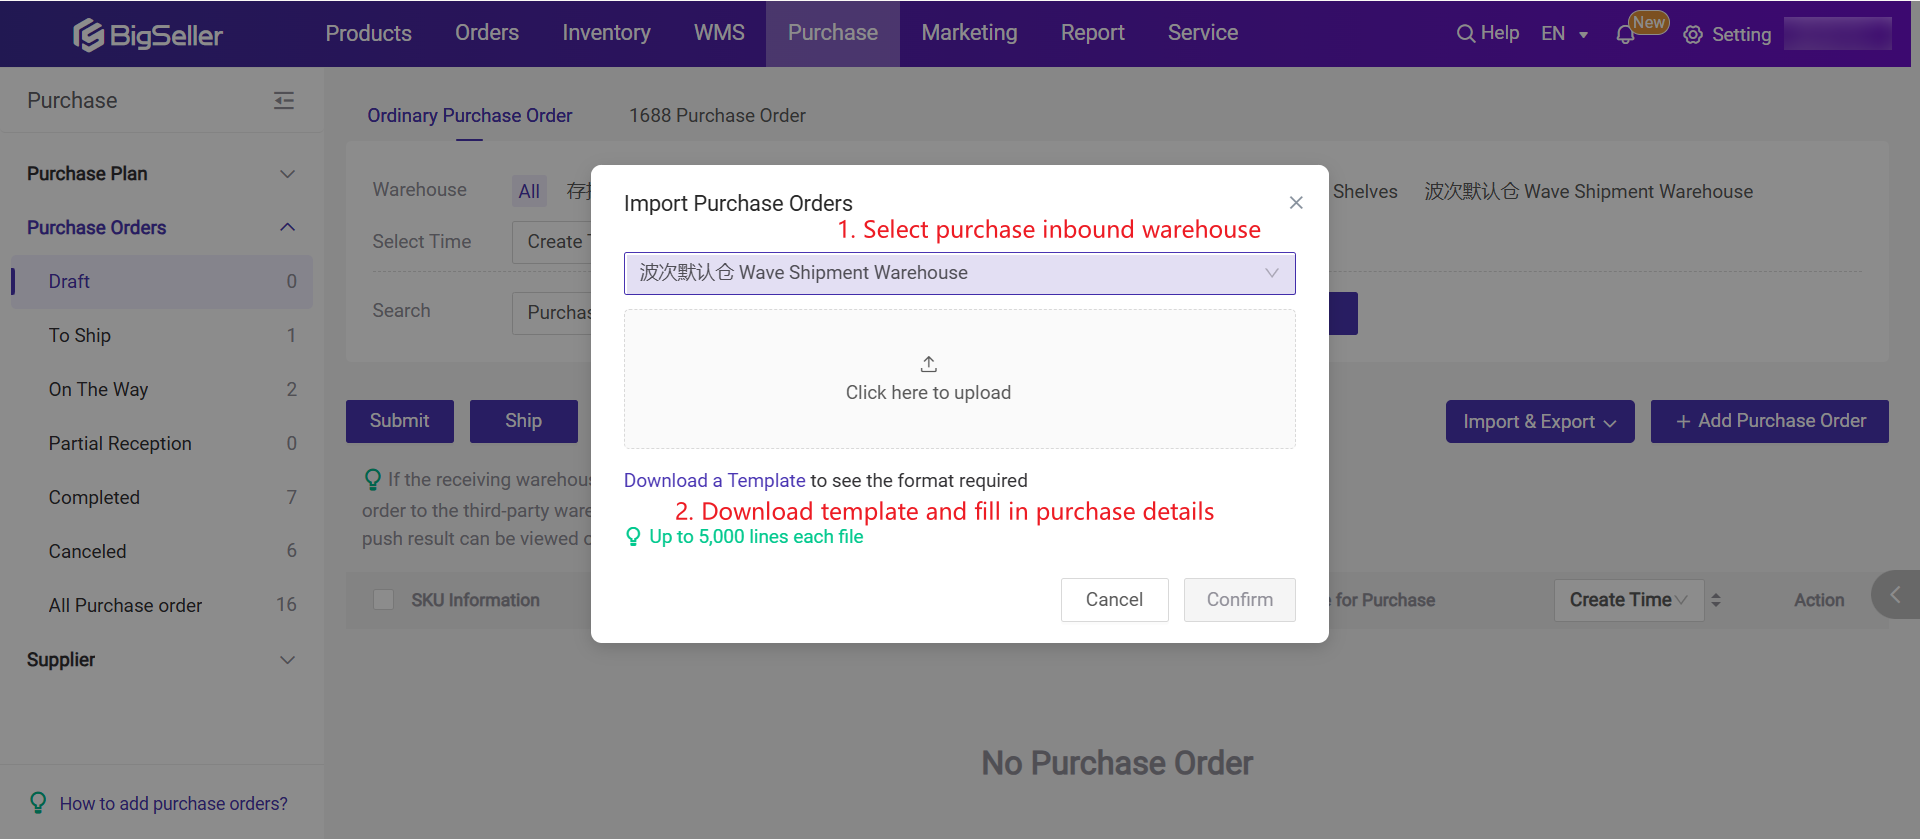
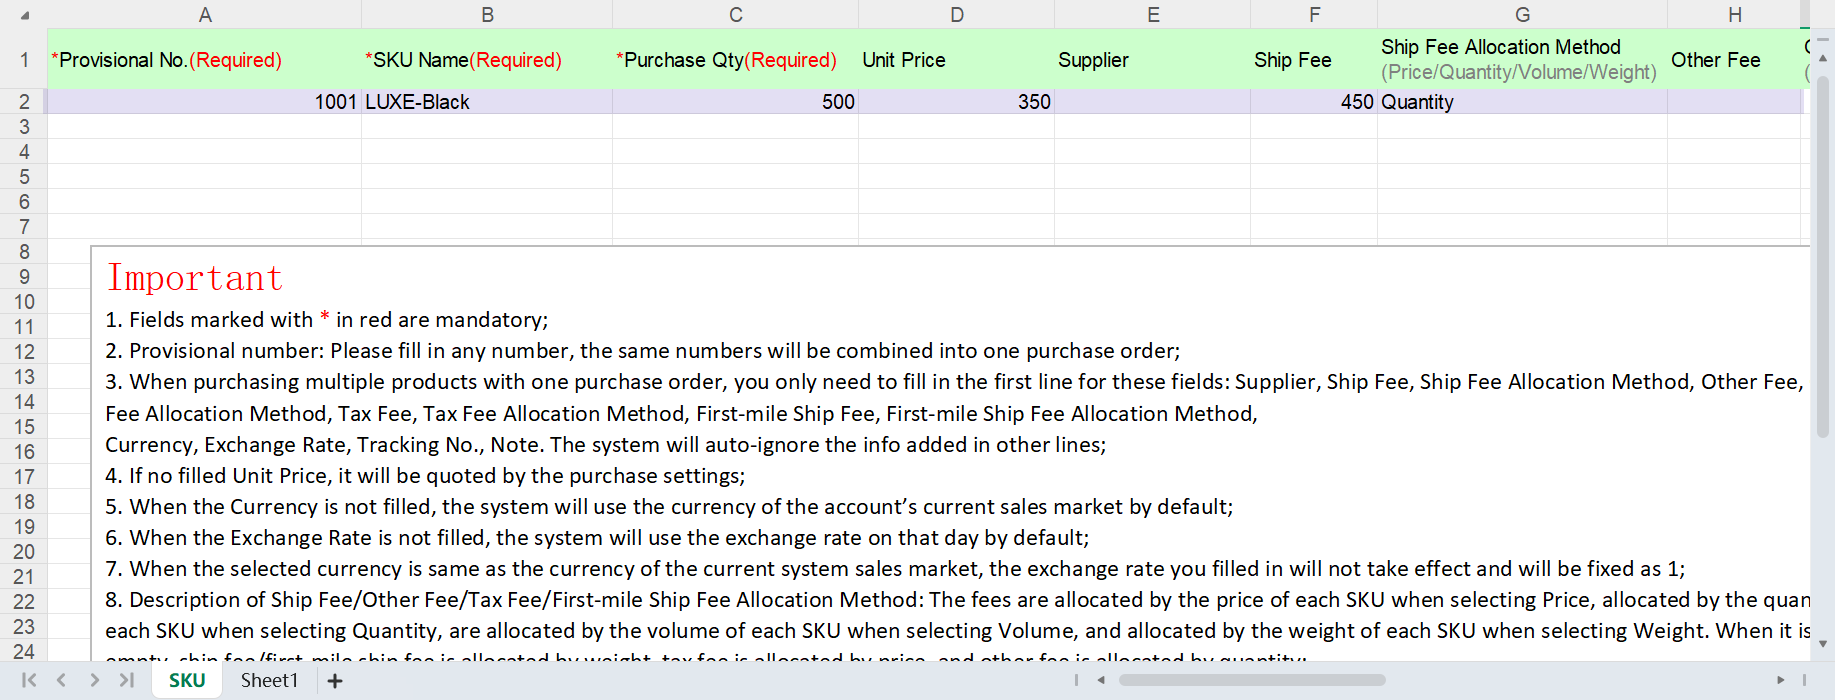
Step 2: download the template and fill in information > select the receiving warehouse > upload the file > click Confirm

1.3 Term Explanation
1) Basic Info
-
Receiving Warehouse: The warehouse where these purchased items will arrive.
-
Supplier: Where you purchase these items. You can also select 'No Supplier'. You can go to Supplier List to add and manage your suppliers.
-
Tracking No: The tracking number is provided by your supplier. You can enter the tracking number after your supplier ships the package.
-
Estimated Arrival Time: The approximate time for this batch of goods to be shipped to your warehouse
2) Fee Details
-
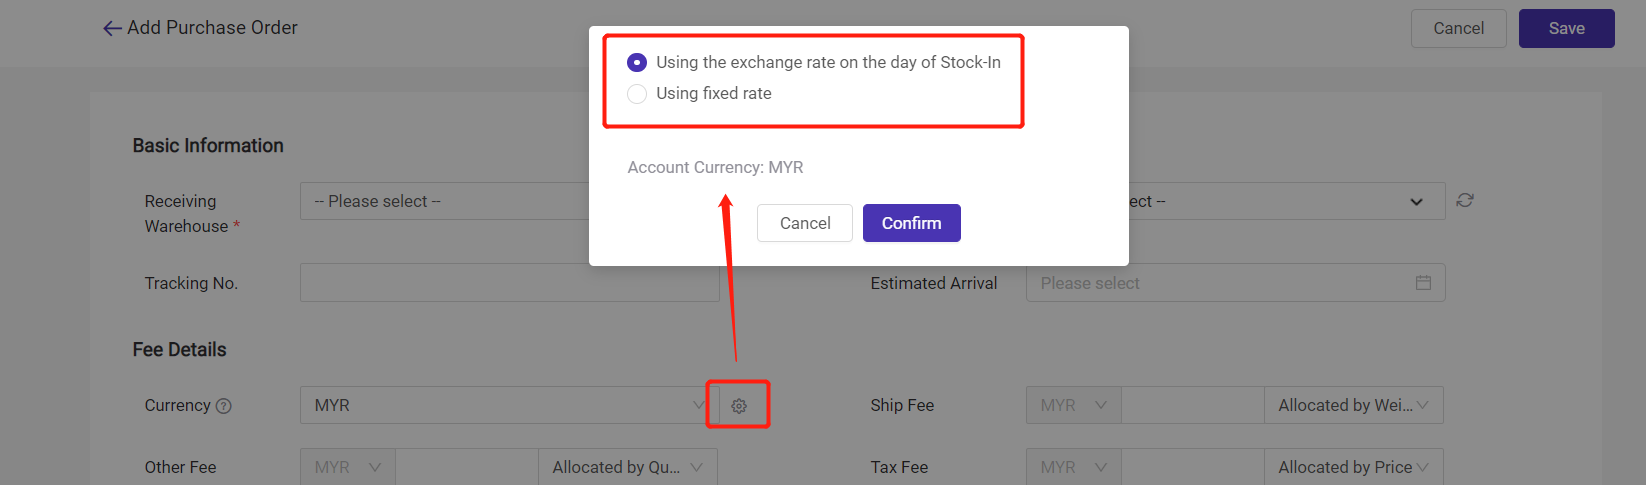
Currency: The currency you use to purchase items from your supplier. The cost calculated finally will be auto-converted to the value based on your account currency. You can use the exchange rate set by system or manually set a fixed one.
-
Ship Fee: The shipping fee you've paid to your supplier.
-
Other Fee: Other fees when you purchase items from your supplier, e.g. purchase fee.
-
Tax Fee
-
First-mile Ship Fee
-
Allocated by Price: Allocated expense = Unit Price / Total Price * {x}.
-
Allocated by Quantity: Allocated expense = {x} / Purchase qty
-
Allocated by Volume: Allocated expense = Unit Volume / Total Volume * {x}
-
Allocated by Weight: Allocated expense = Unit Weight / Total Weight * {x}
- Not Allocated
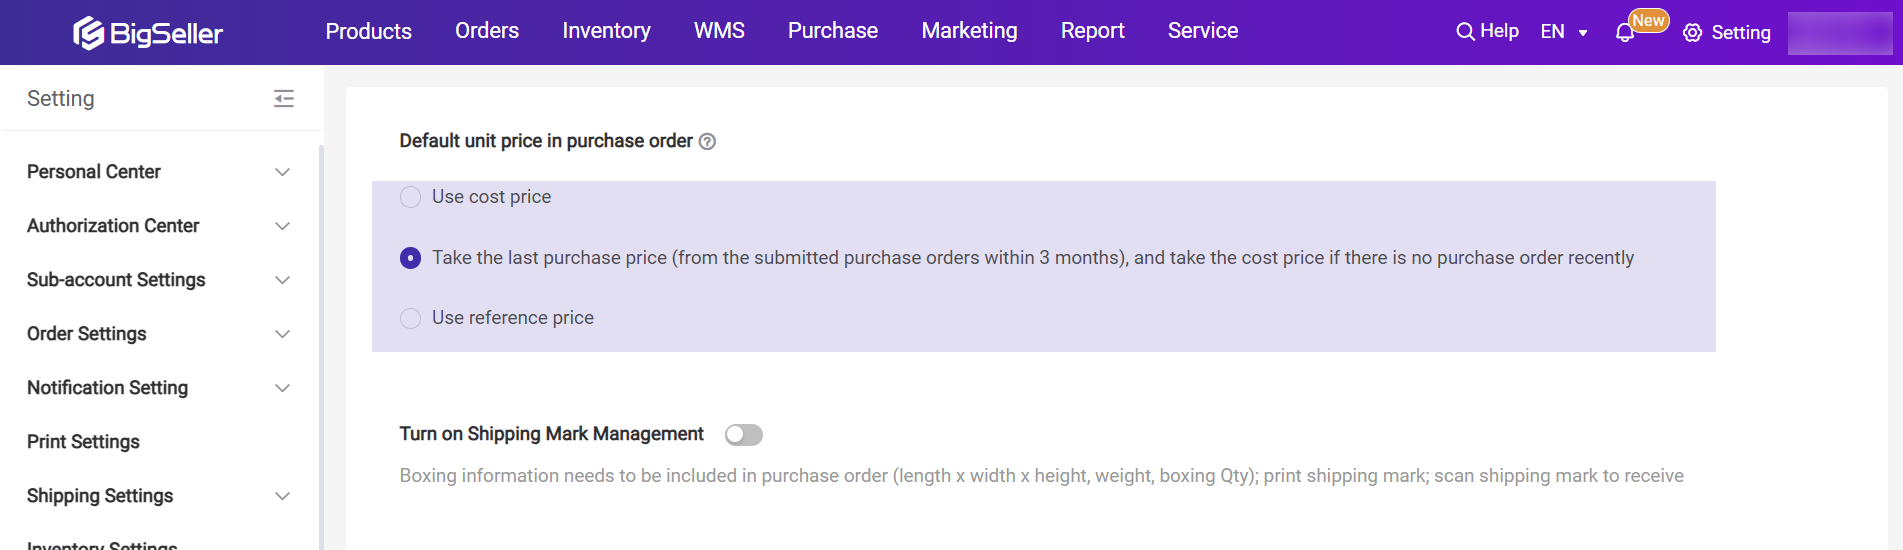
3) Unit Price
Use the unit price according to purchase settings.
If the purchase price of your goods is relatively fixed, you don’t need to manually enter the unit price each time you create a purchase order. You can go to the purchase settings and set the logic for how the unit price is determined (as shown in the figure below).
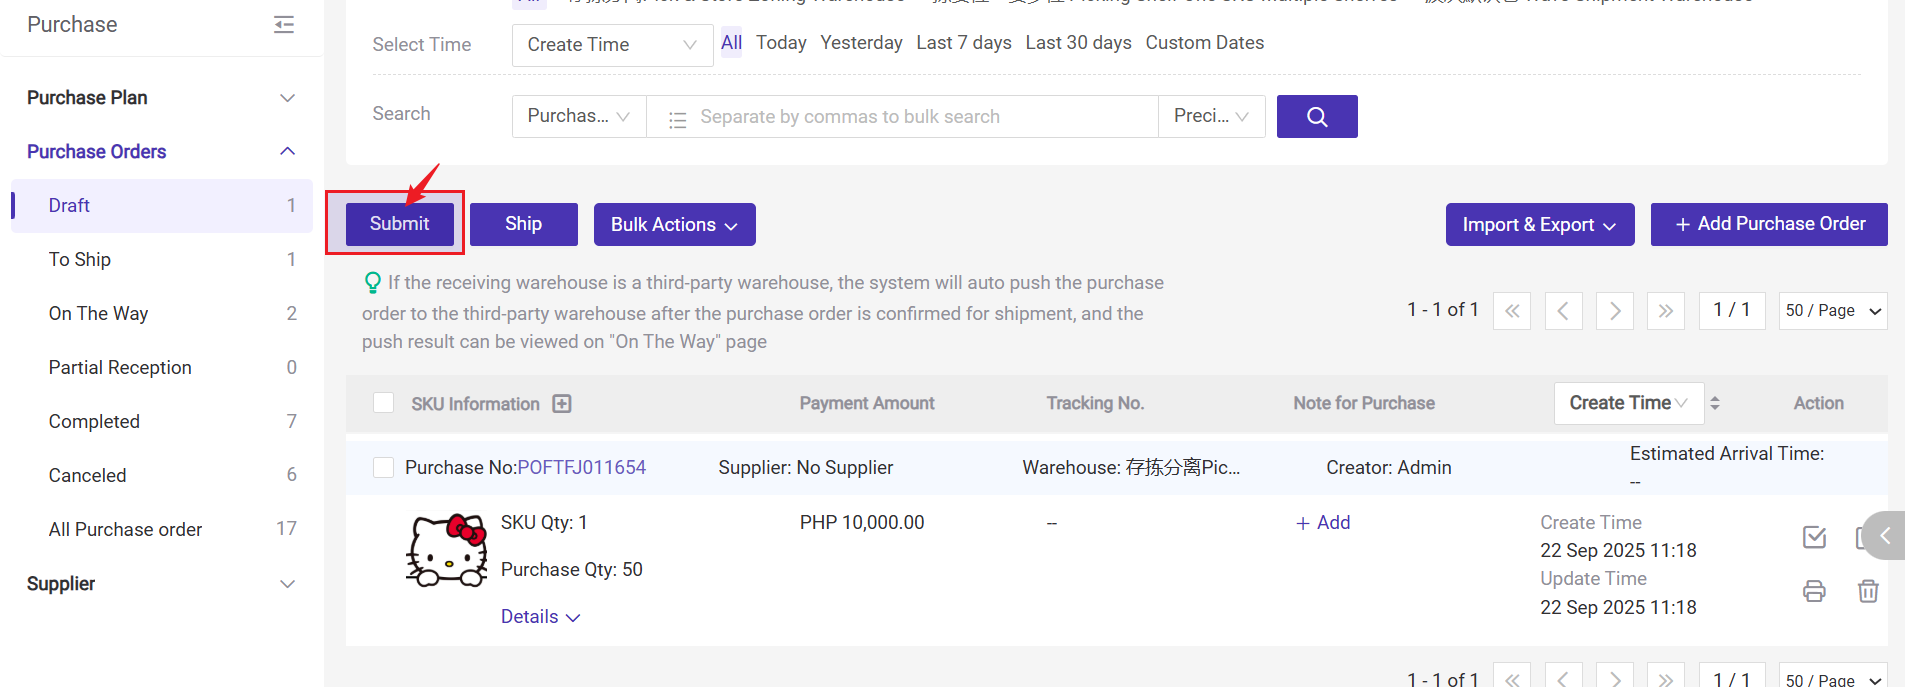
2. Submit Purchase Order
Actions available on [Draft] page
1) Submit
-
Supports single submission / batch submission
-
Submitted purchase orders will move to [To Ship] status
-
In [To Ship], you need to confirm again and click Ship before they move to the next stage
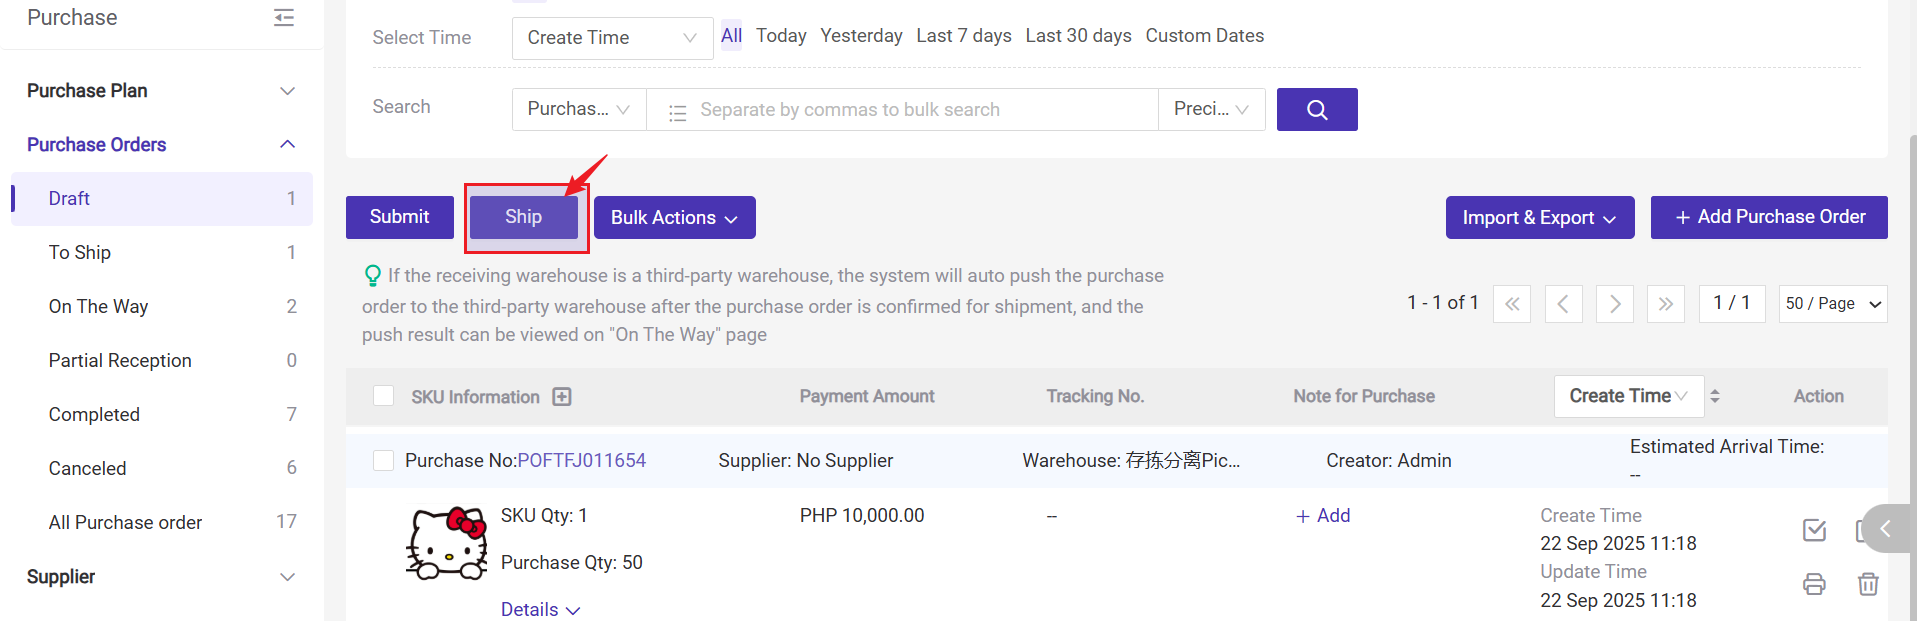
2) Ship
-
Supports single shipment / batch shipment
-
The purchase order will move directly to [On the Way] status
-
At the same time, it will appear in [Inventory > Receiving > Purchase Receiving], waiting to be received
-
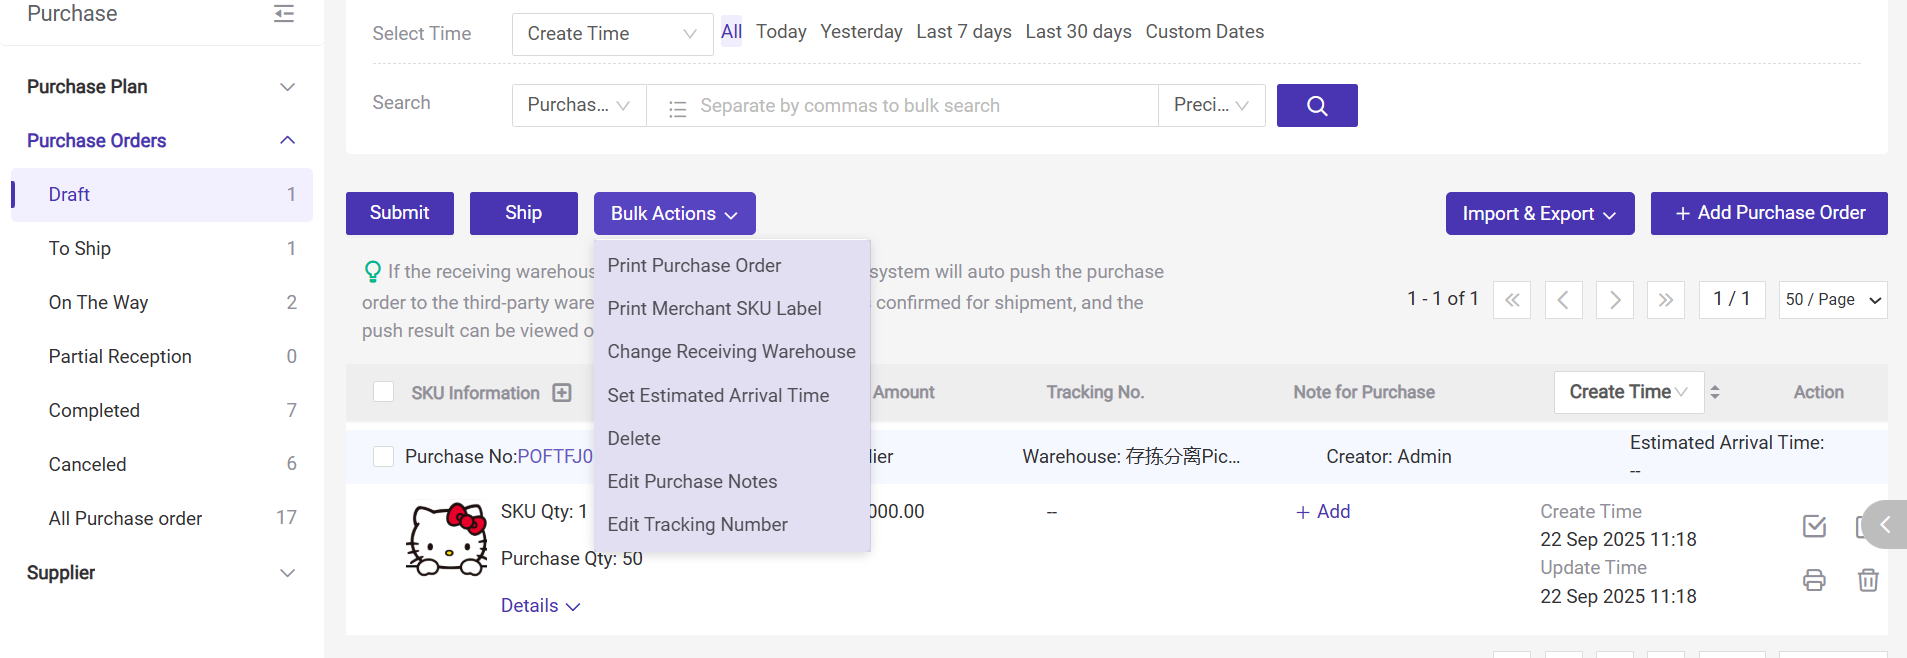
Batch print purchase orders
-
Batch print SKU Labels
-
Modify tracking numbers
-
Modify shipping warehouse
-
Modify Estimated Arrival Time
-
Modify purchase notes and other information
3. Purchase Receiving
3.1 Single Receive
Go to Purchase > On The Way > Purchase Receiving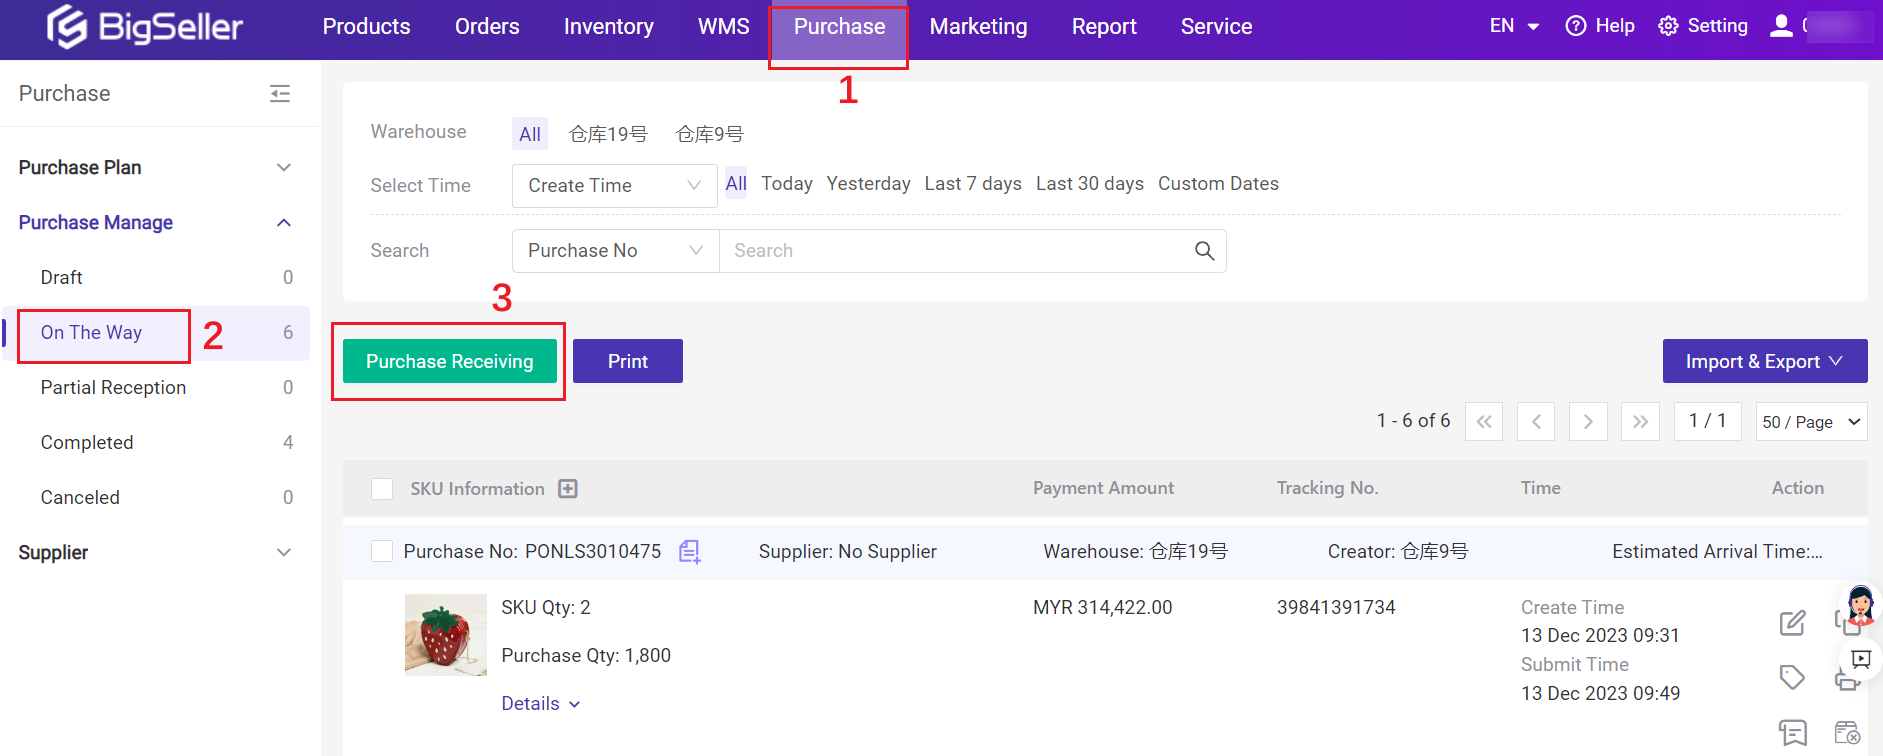
Click the Confirm Receiving icon.

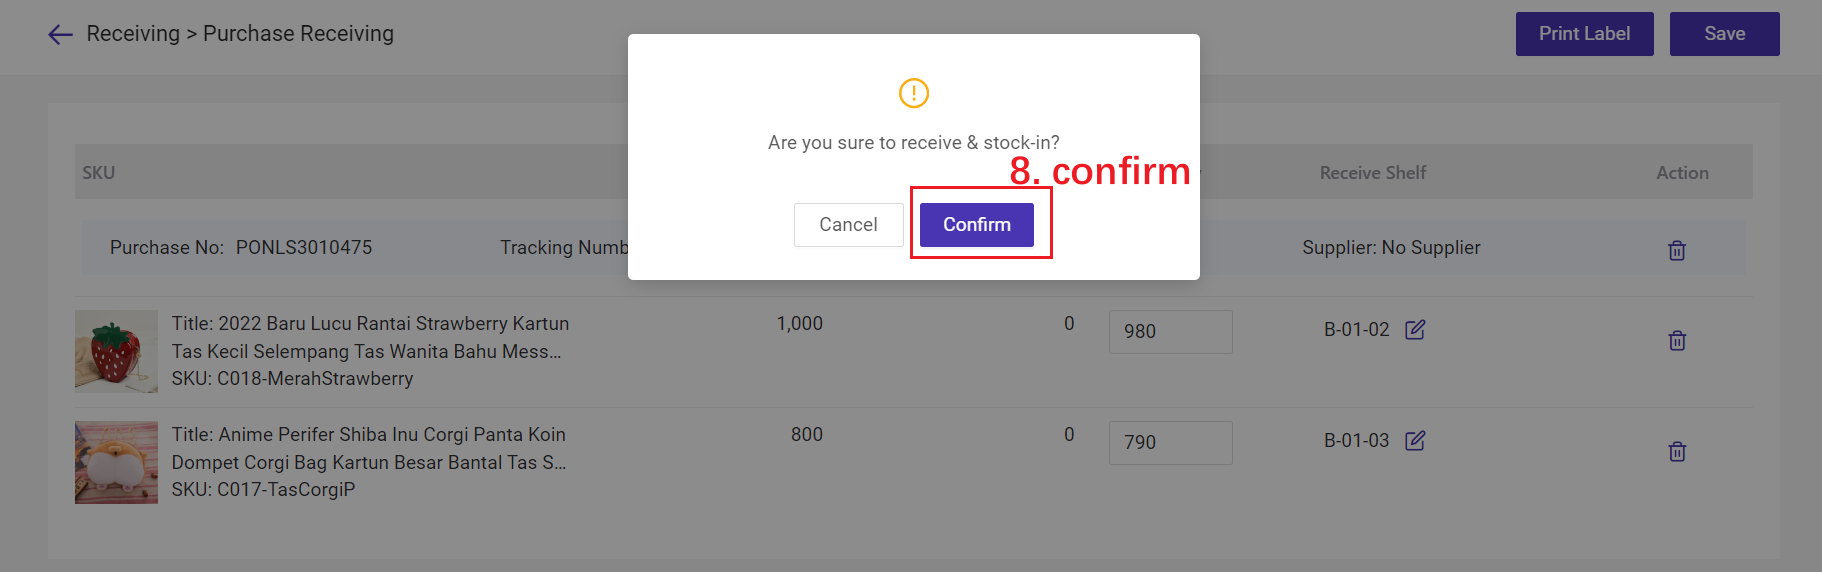
Enter the Receive Quantity > Set Shelf > Save
💡Note: For receive Qty, the system will default to filling in the quantity to be received, which you can manually modify.
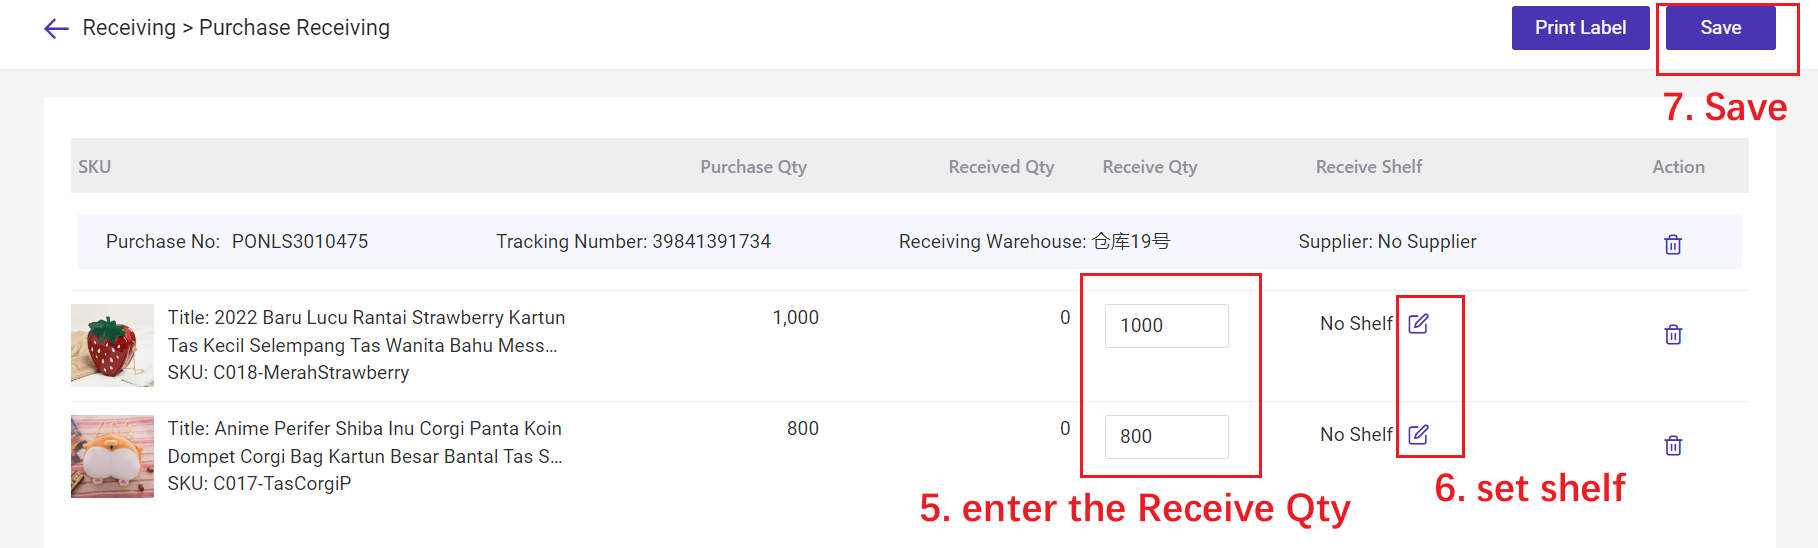
- Receive Qty = Purchase Qty The purchase order will move to Received list.
- Receive Qty > Purchase Qty The system will display a reminder, but it is allowed.
- Receive Qty < Purchase Qty This purchase order would move to Partial Reception list after saving. You can enter the receiving page again.
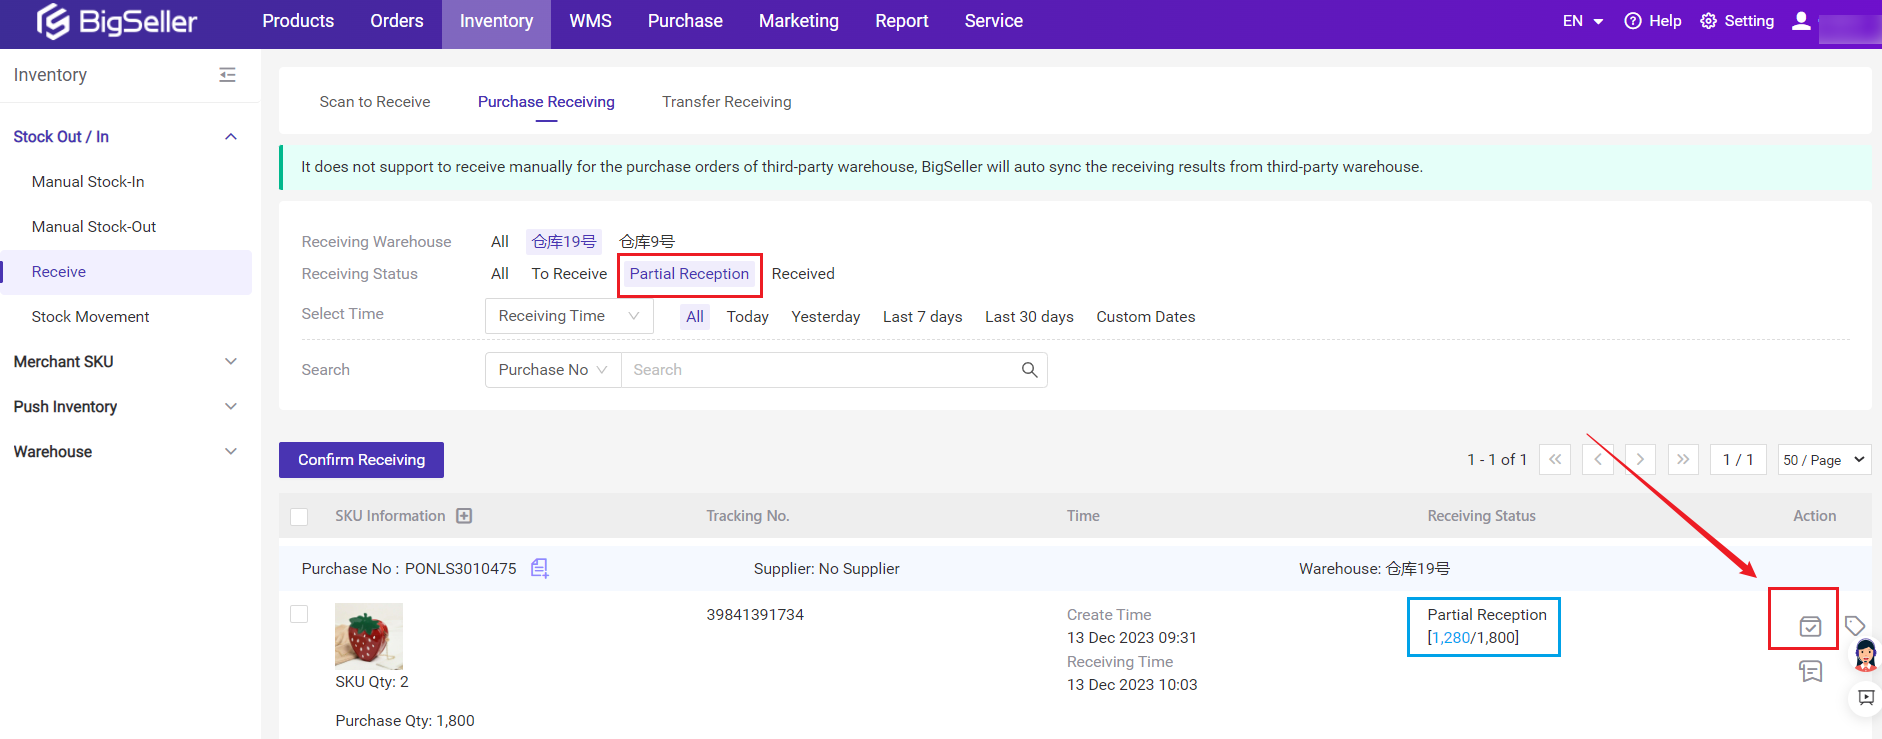
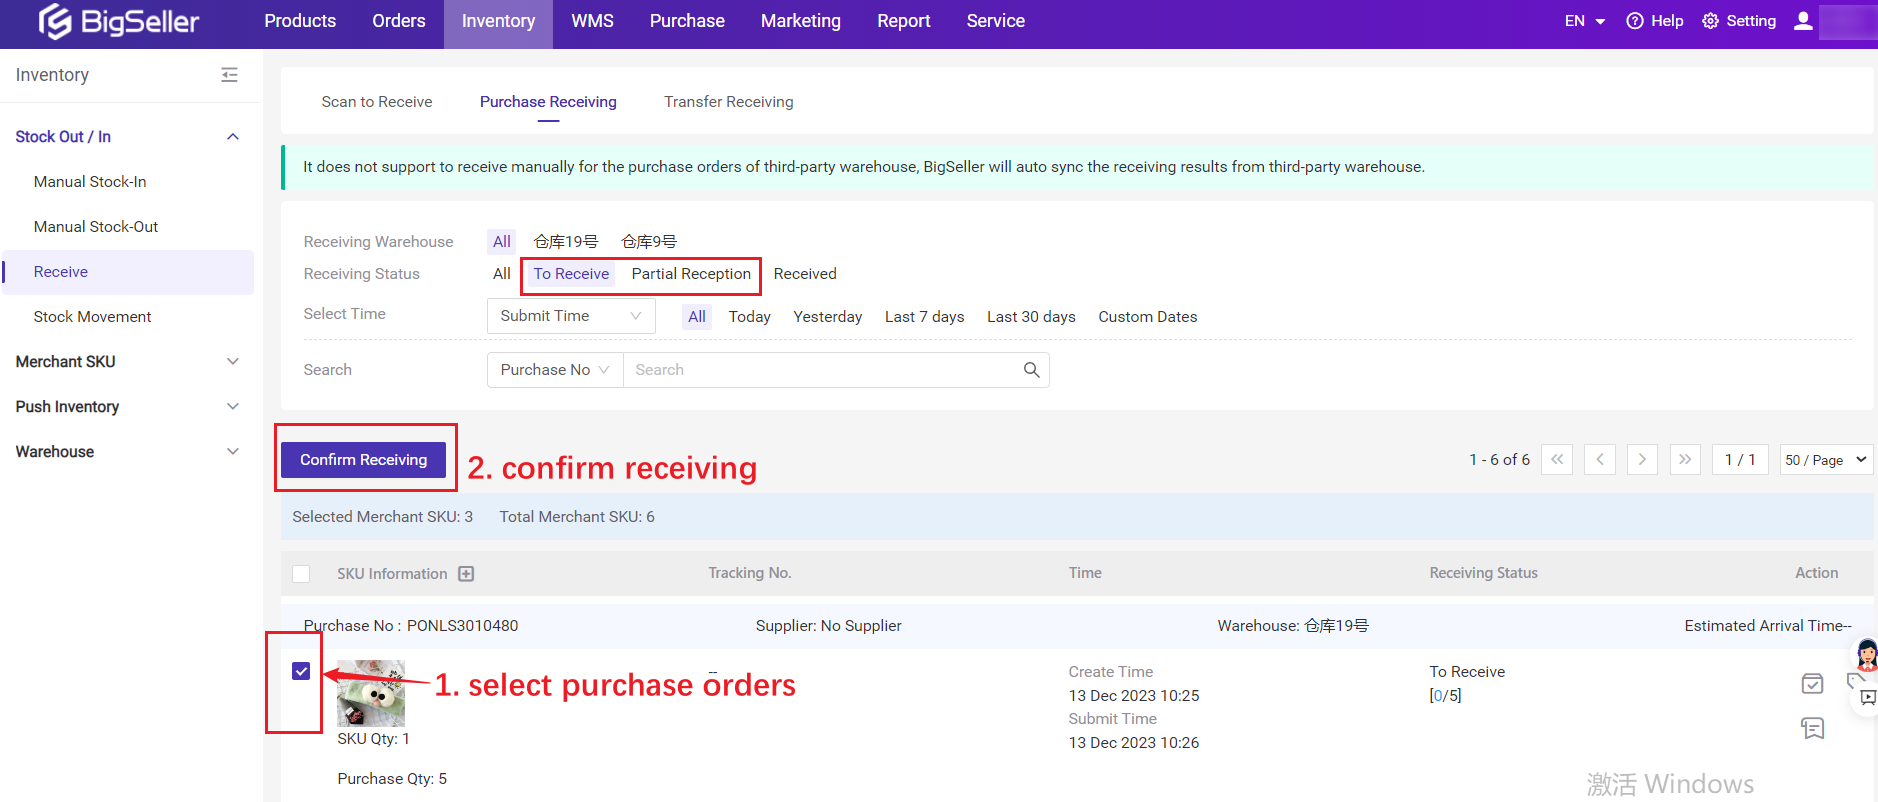
3.2 Bulk Receive
Purchase orders from multiple warehouses can also be received in bulk.💡Note: This method is applicable to purchase orders that have completed the quantity counting of goods and can be received with one click.
Go to Inventory > Receive > Purchase Receiving > select purchase orders > Confirm Receiving

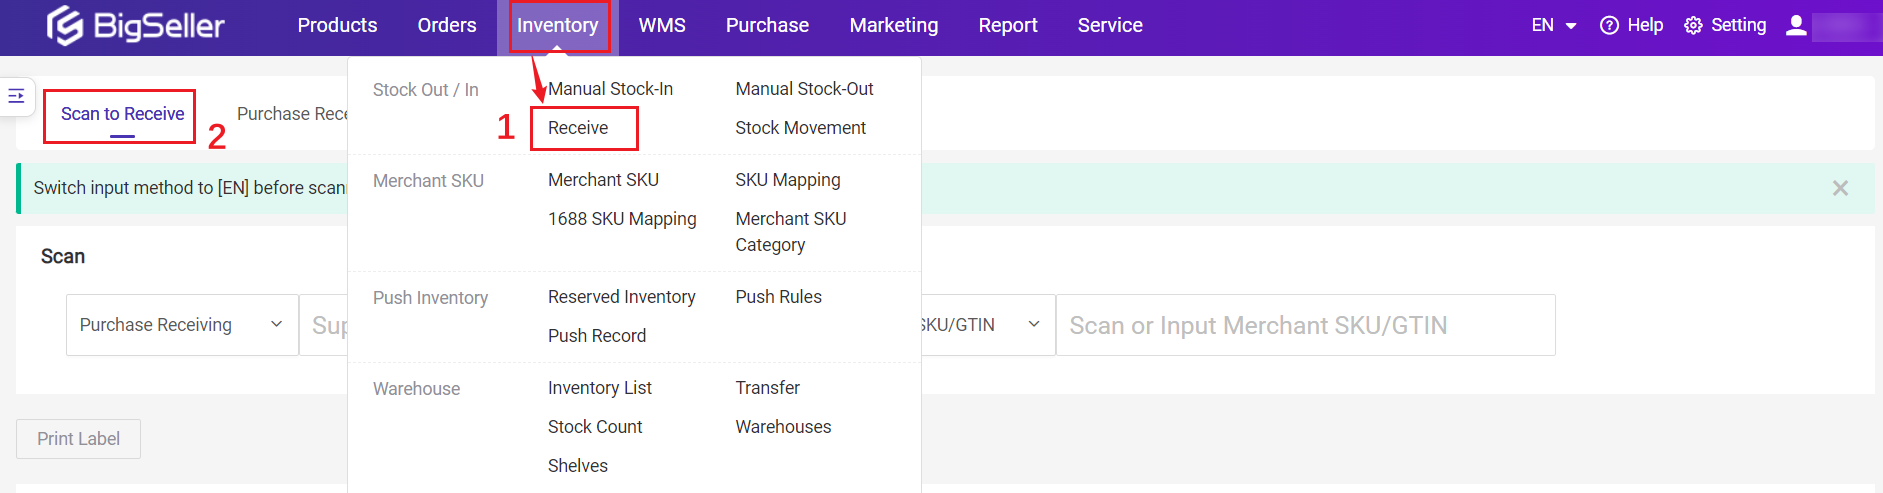
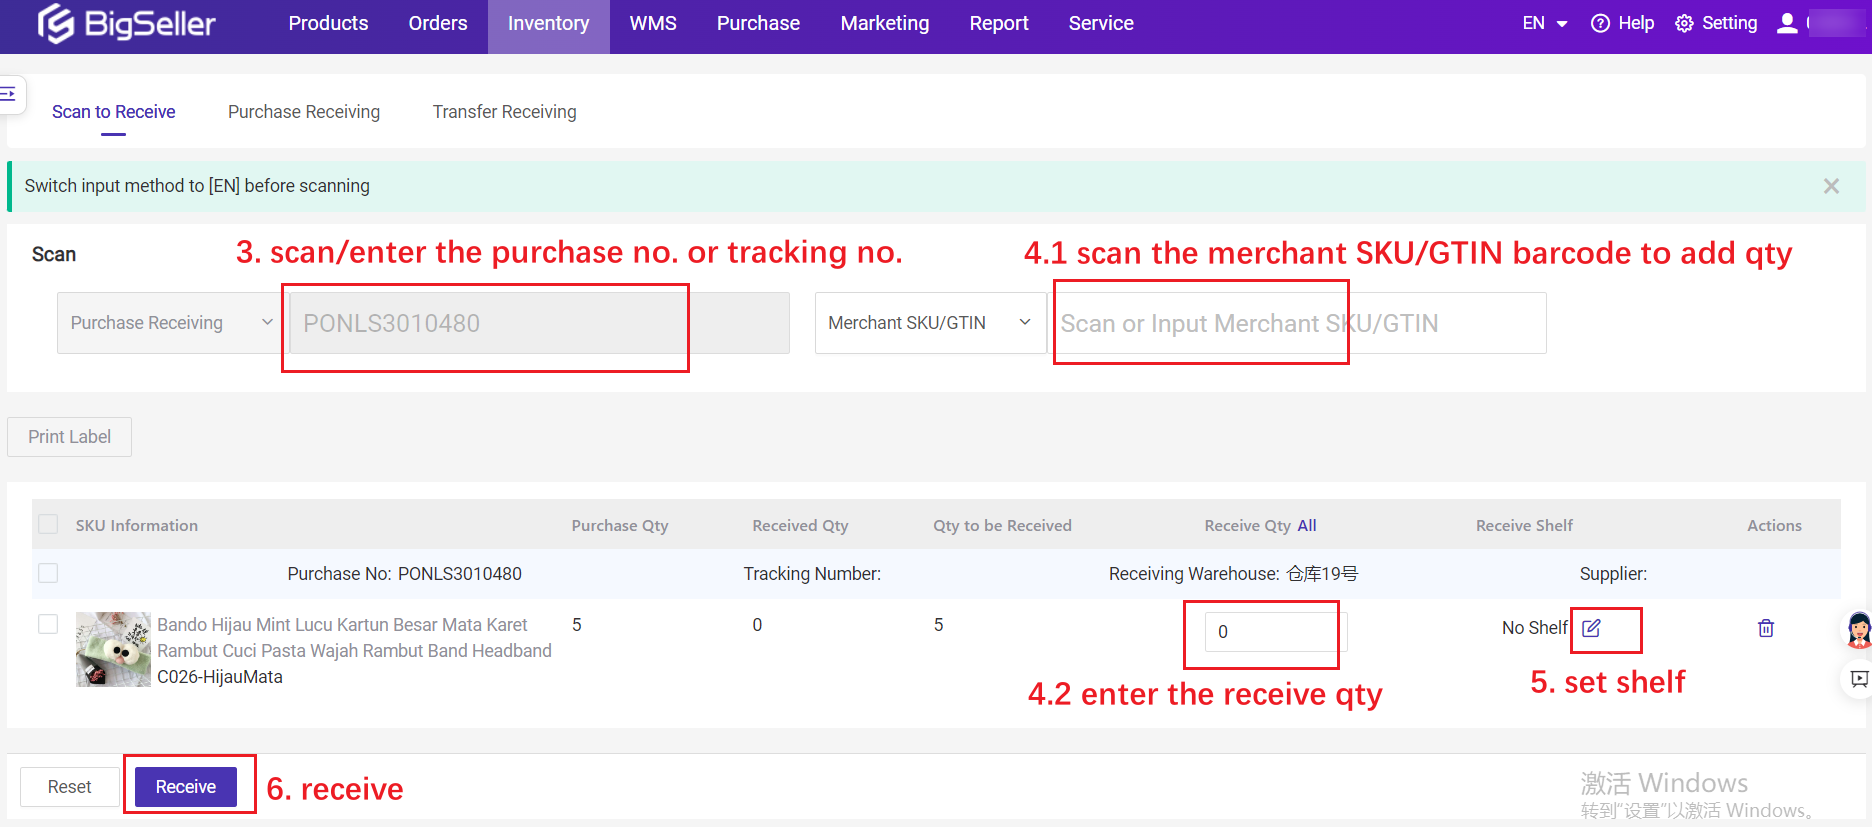
3.3 Scan to Receive
Support scanning purchase order numbers/ tracking numbers for receiving goods, and can scan product label barcodes to inspect them, reducing incorrect reception.Go to Inventory > Receive > Scan to Receive
Enter/Scan the purchase number or tracking number > Scan/enter the merchant SKU/GTIN to add stock (can also manually enter the receive qty) > Set Shelf > Receive
4. FAQs
Q1. Can the actual received quantity be greater than the purchase quantity?A1. Yes, the receive quantity of SKU can be greater than the purchase quantity.
- Receive Qty = Purchase Qty The purchase order will move to Received list.
- Receive Qty > Purchase Qty The system will display a reminder, but it is allowed.
- Receive Qty < Purchase Qty This purchase order would move to Partial Reception list after saving. You can enter the receiving page again.
Q2. Can the received quantity be filled in as 0?
A2. Yes.
Is this content helpful?
Thank you for your feedback. It drives us to provide better service.
Please contact us if the document can't answer your questions