How to Create a Sales Invoice in QNE with BigSeller
Copy link & title
Update Time: 05 Nov 2026 01:31
According to Philippine Bureau of Internal Revenue (BIR) requirements, e-commerce sellers must use BIR-certified accounting or invoicing software by December 31, 2026, to issue electronic invoices to buyers and make them available to the BIR upon request. Non-compliance may result in penalties.
Integrating QNE with BigSeller helps you:
For detailed instructions, please refer to this guide. Here's a quick guide:
Register your QNE account
Authorize QNE in BigSeller
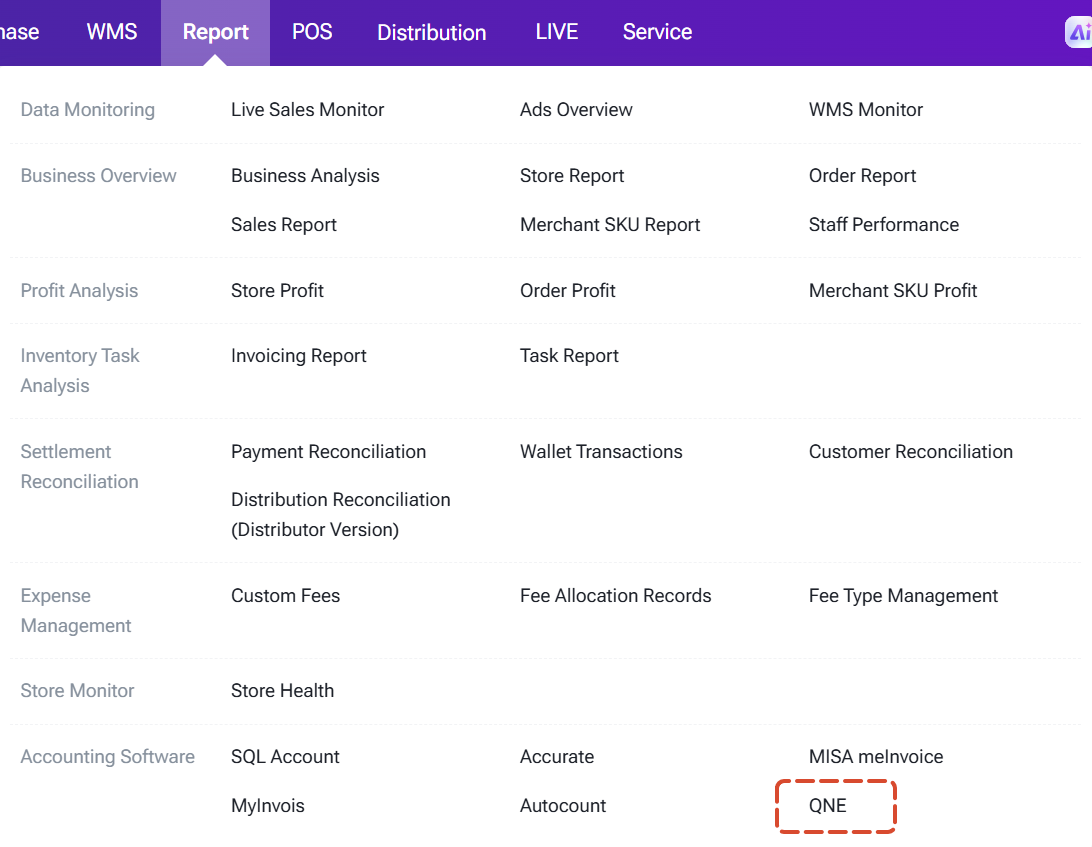
Until you finish store mapping, warehouse mapping, SKU mapping, fee mapping, and invoice settings, BigSeller can't create invoices for you. If you see a reminder about this, you can click Mapping information to jump straight there.
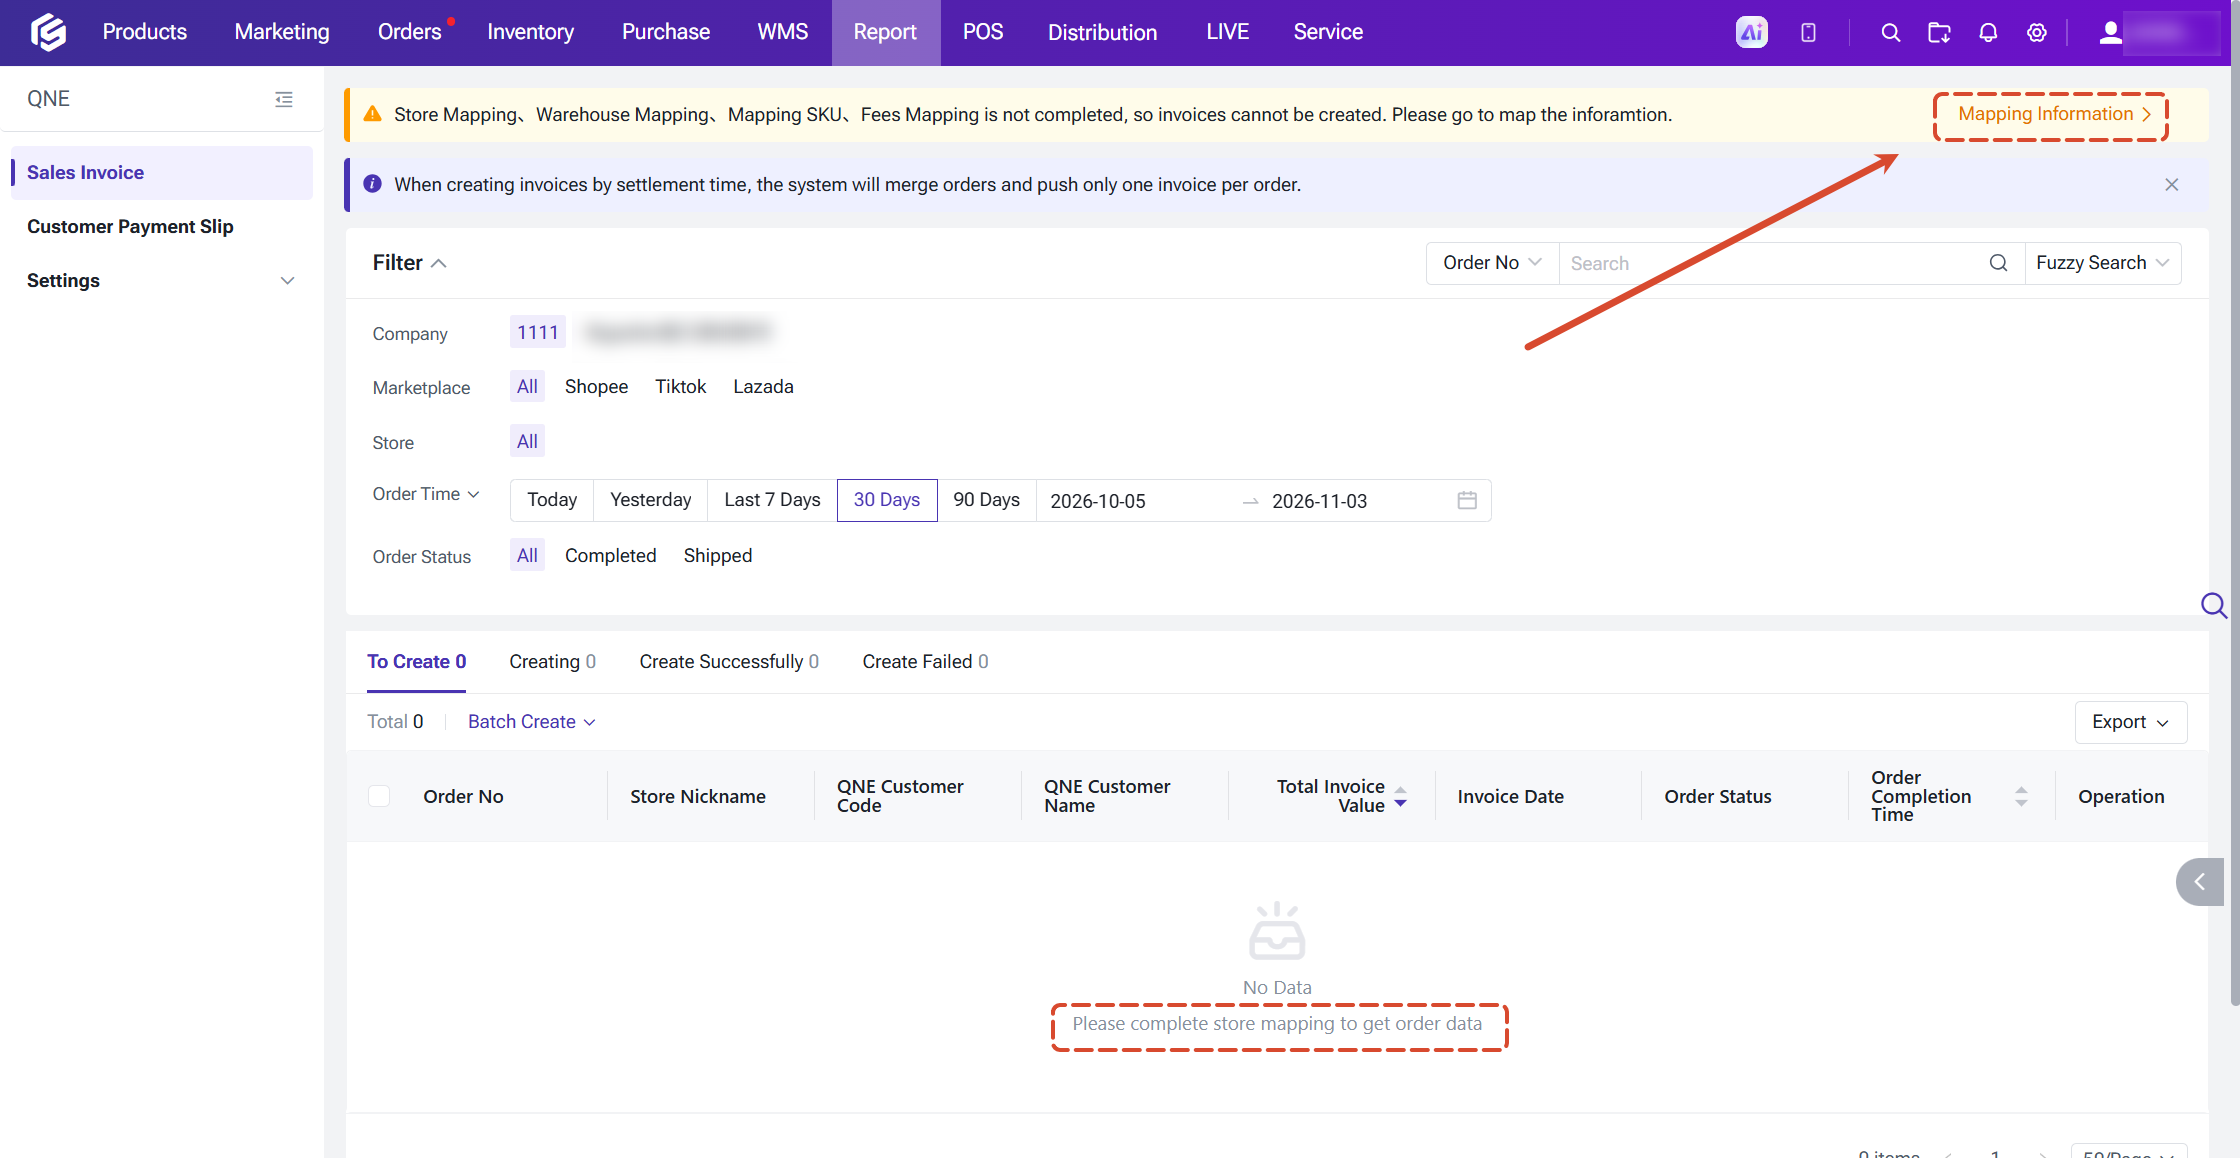
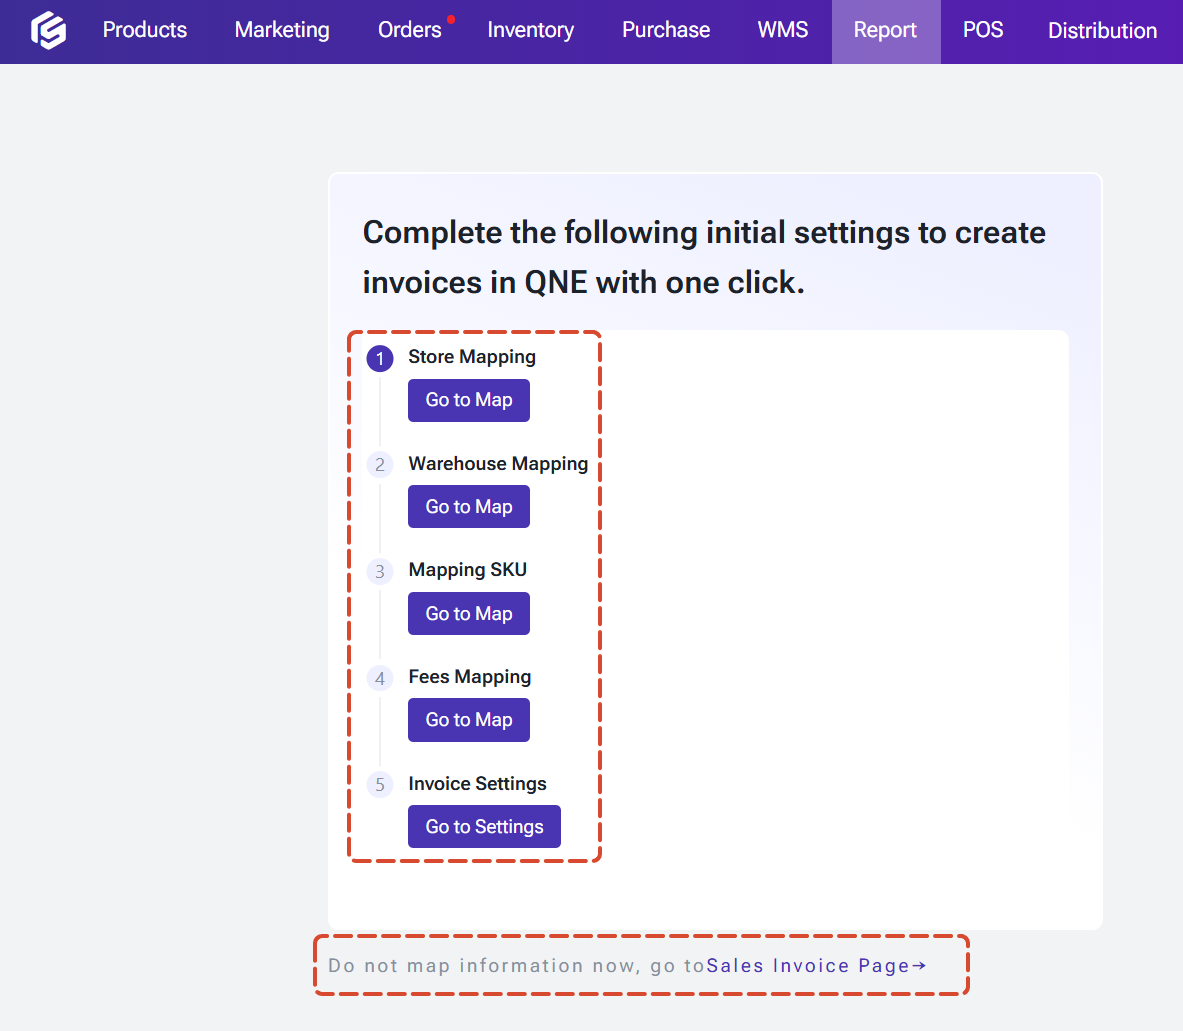
If you'd like to take a look around first, you can also choose Do not map information now, go to Sales Invoice Page.
Note: If you have more than one company, please select the right company at the top of each page first. Mapping is saved separately for each company.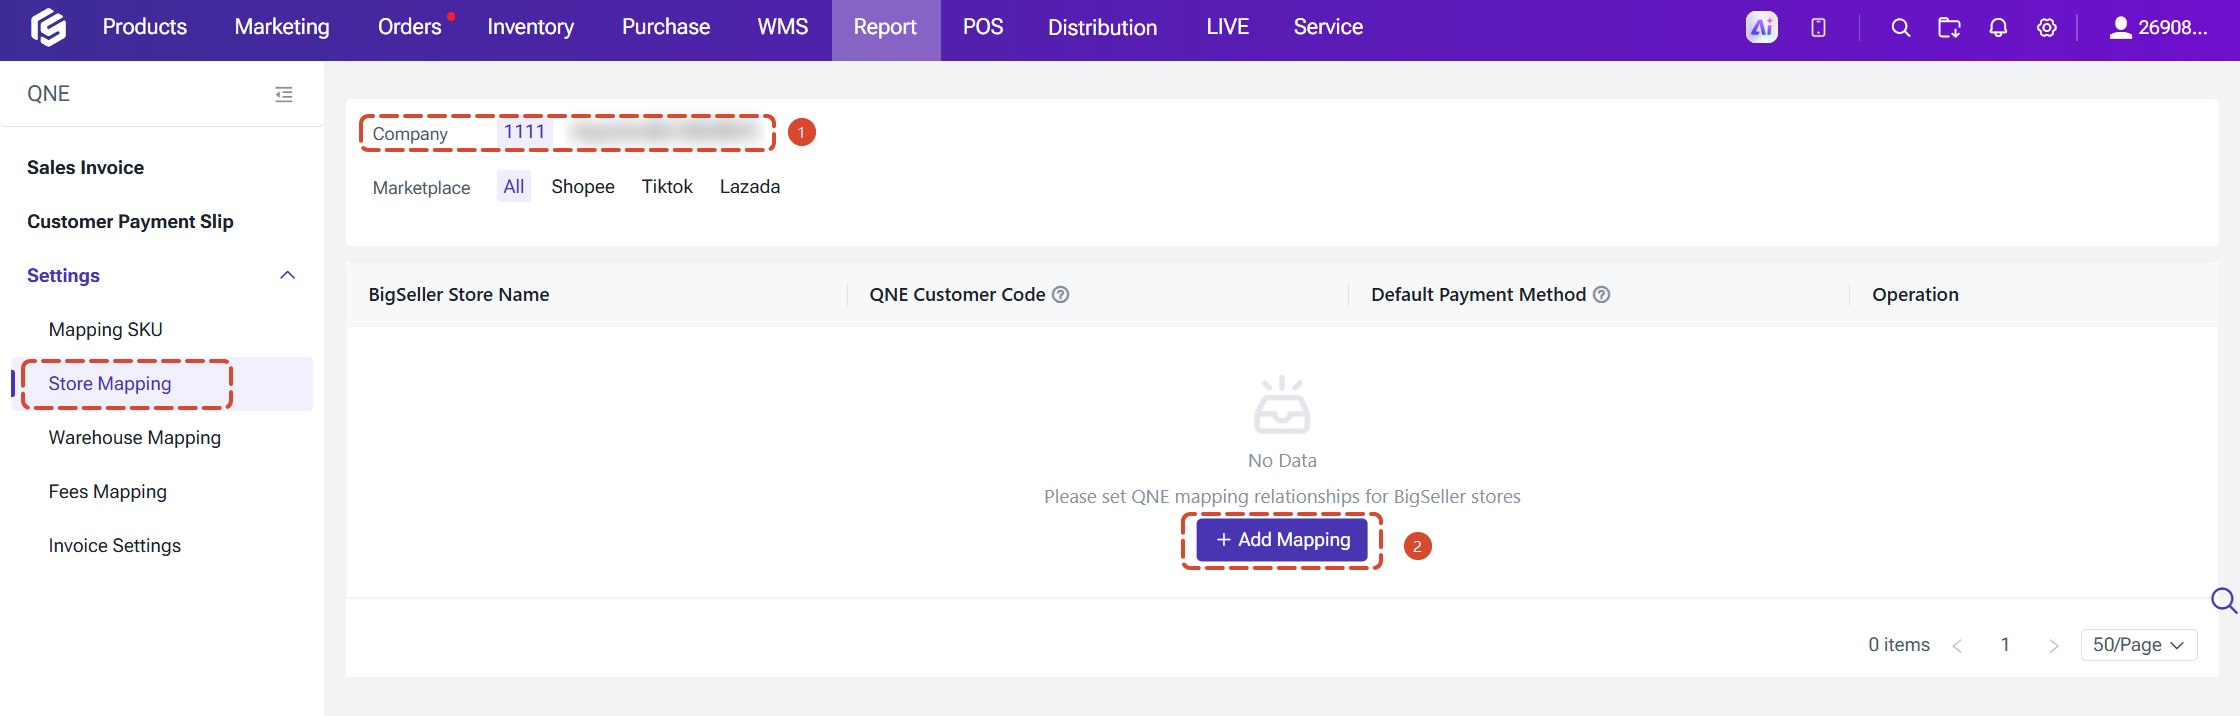
Notes: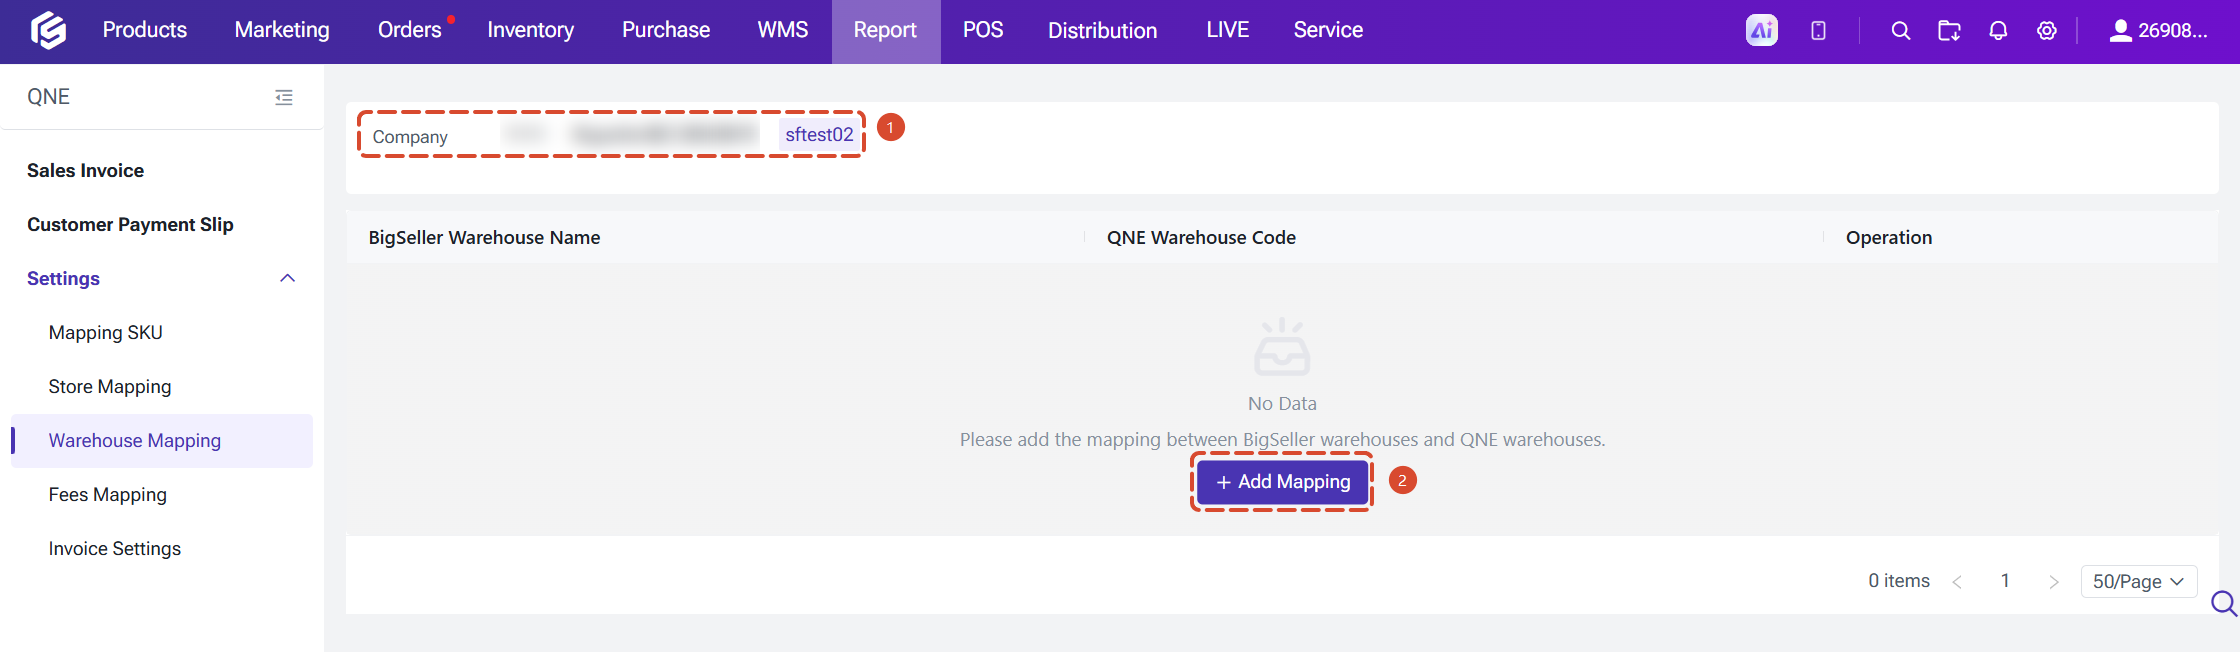
Notes: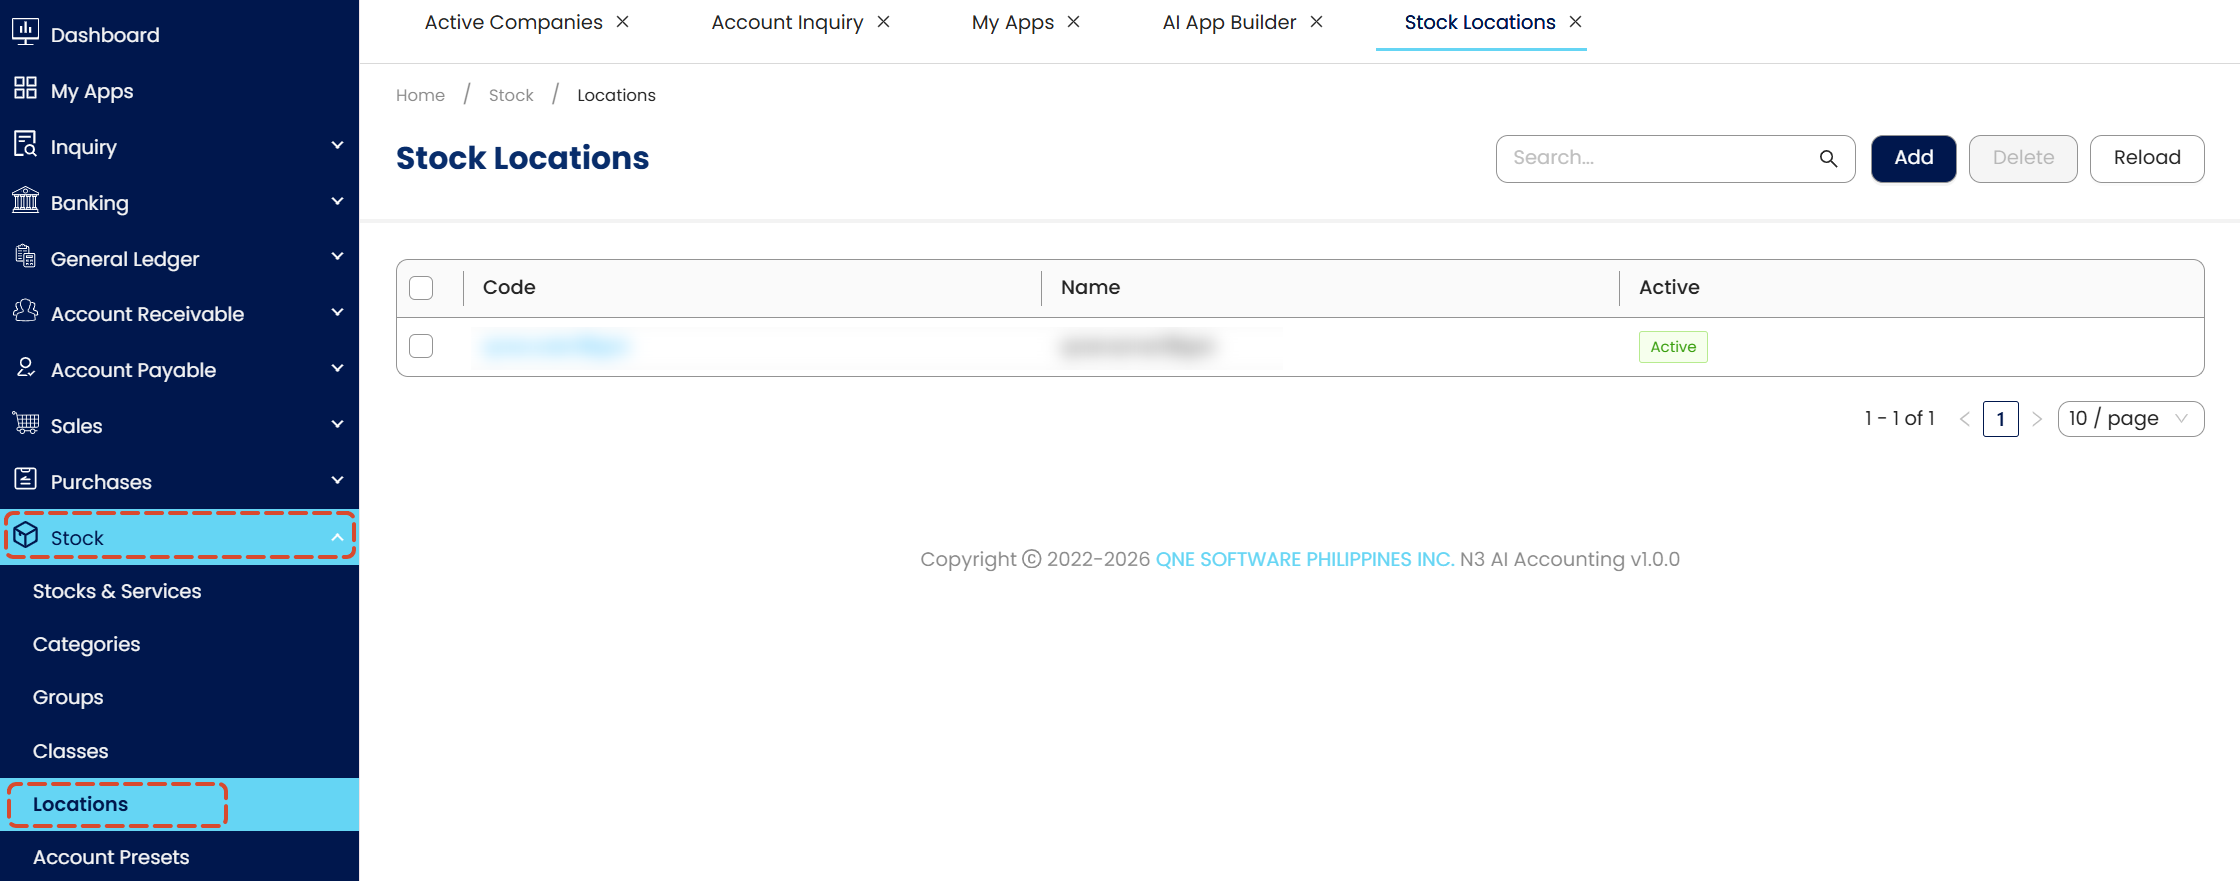
You have three ways to map your SKUs:
3.1 Manual mapping
You can enter the stock code from QNE > Stocks for any SKU. If BigSeller can't find that stock code, it creates a new QNE stock and maps it for you.
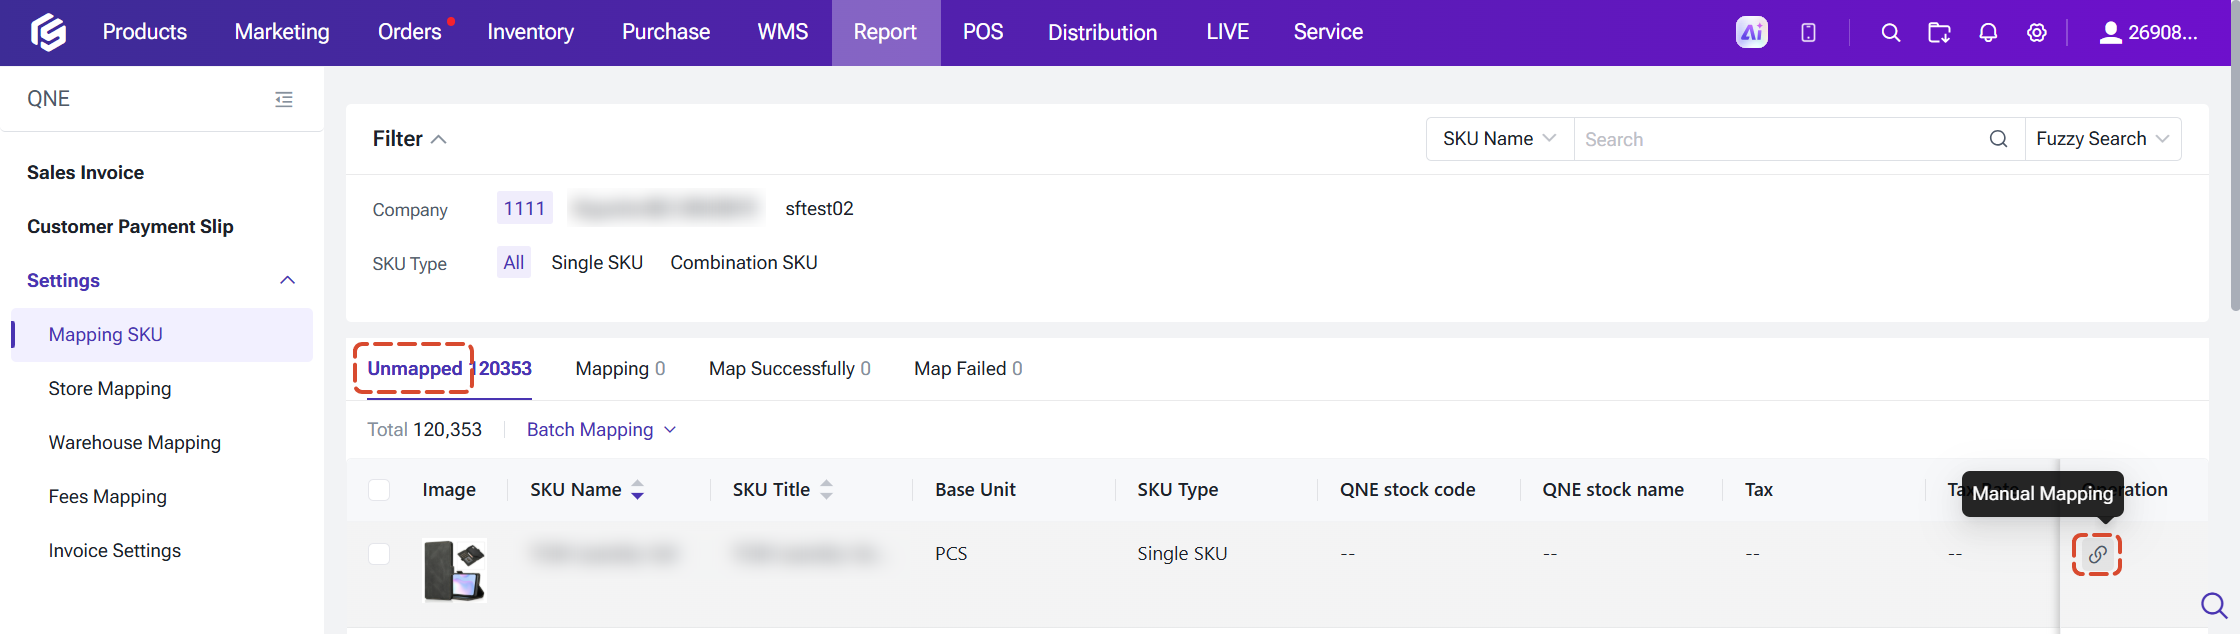
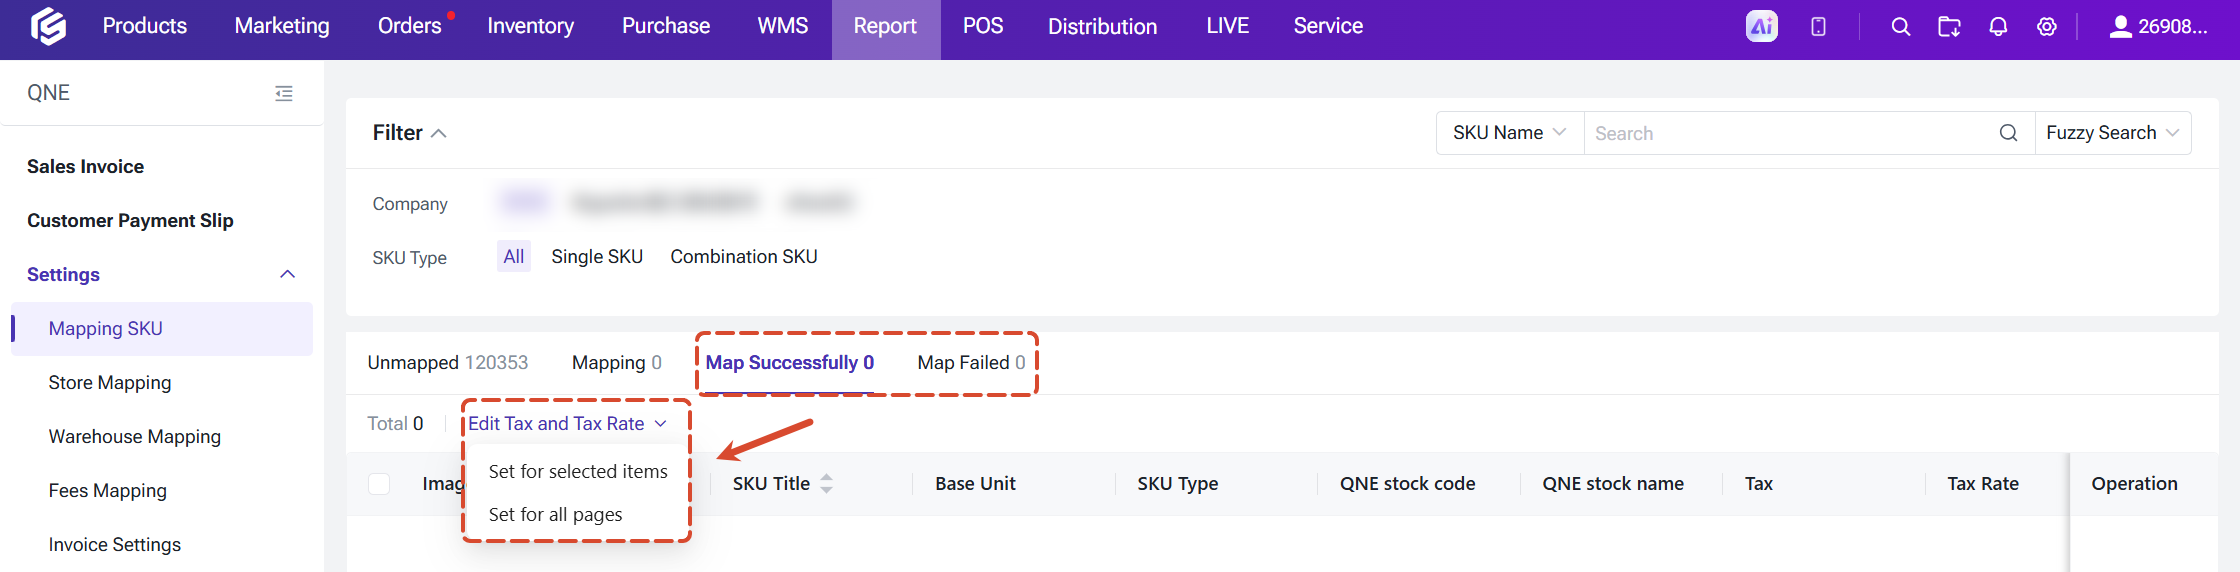
You can also select multiple SKUs and click Edit Tax and Tax Rate to give them the same tax and tax rate.
3.2 Batch Mapping > Mapping
BigSeller maps mulitple SKUs at once, which works well if you haven't used QNE before. When a SKU number matches a QNE stock code, BigSeller maps them automatically.
For SKUs without a match, you can choose how you'd like them handled in Auto-Mapping Settings: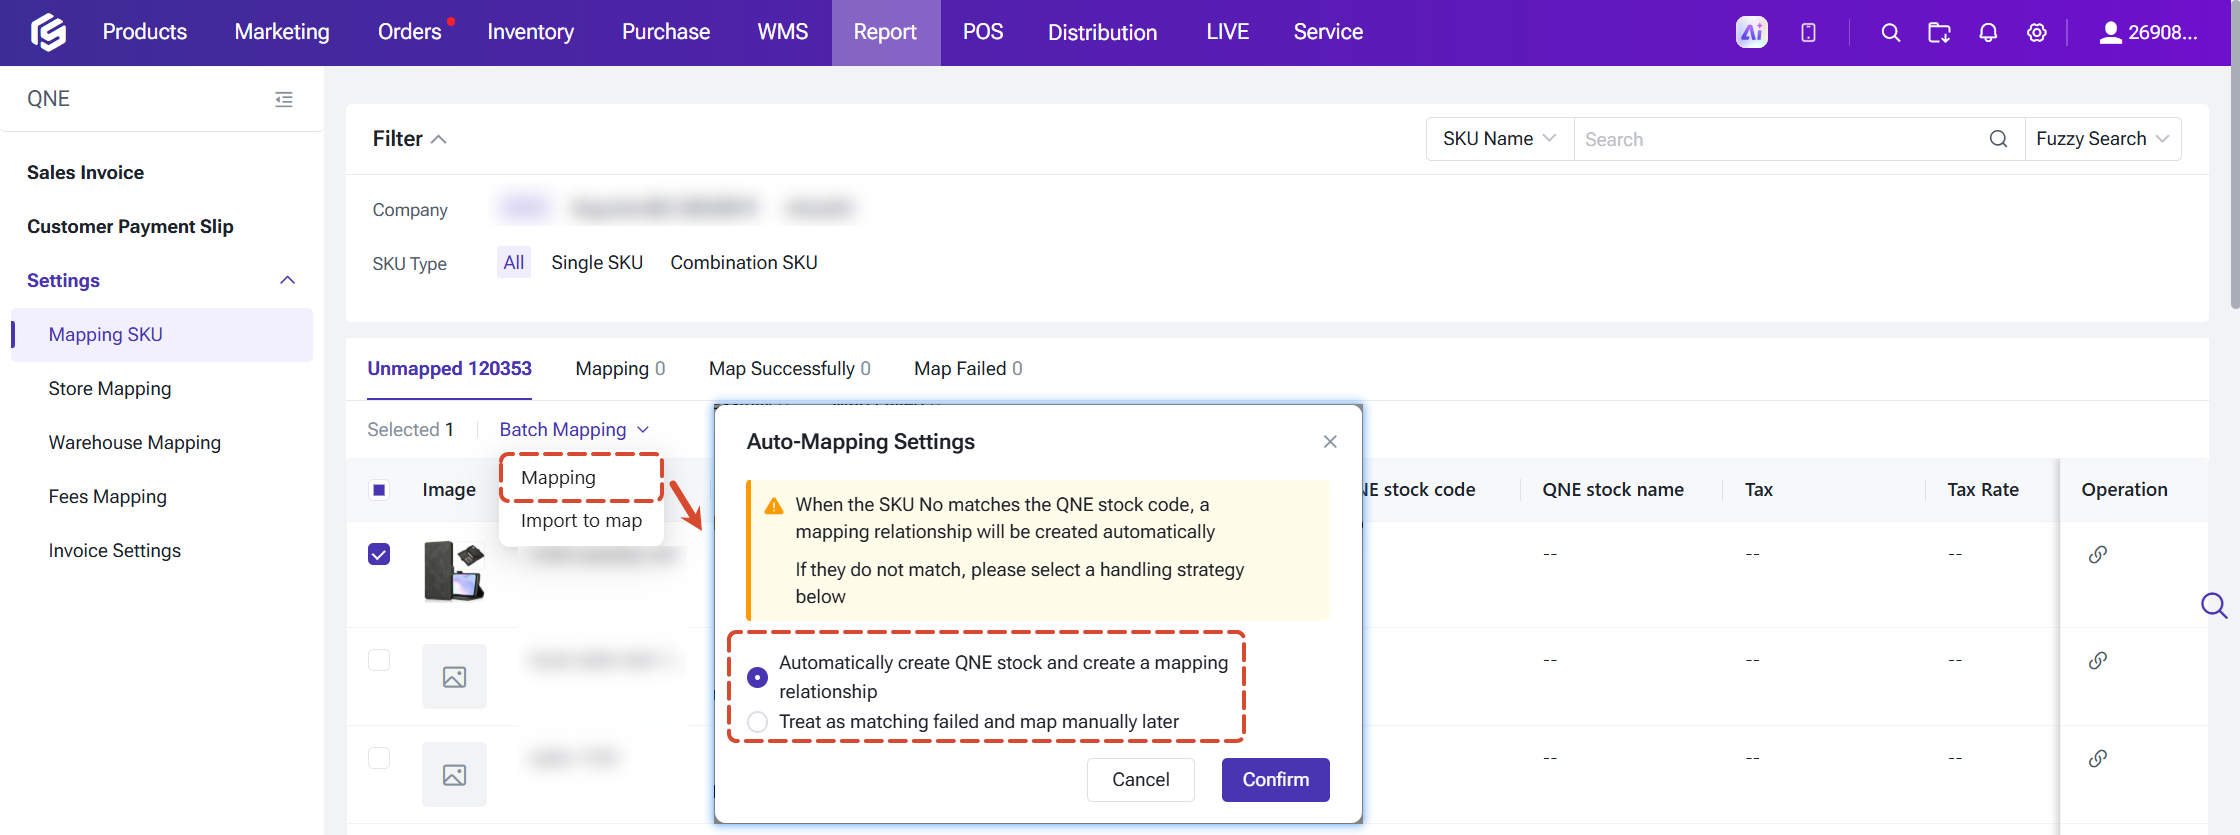
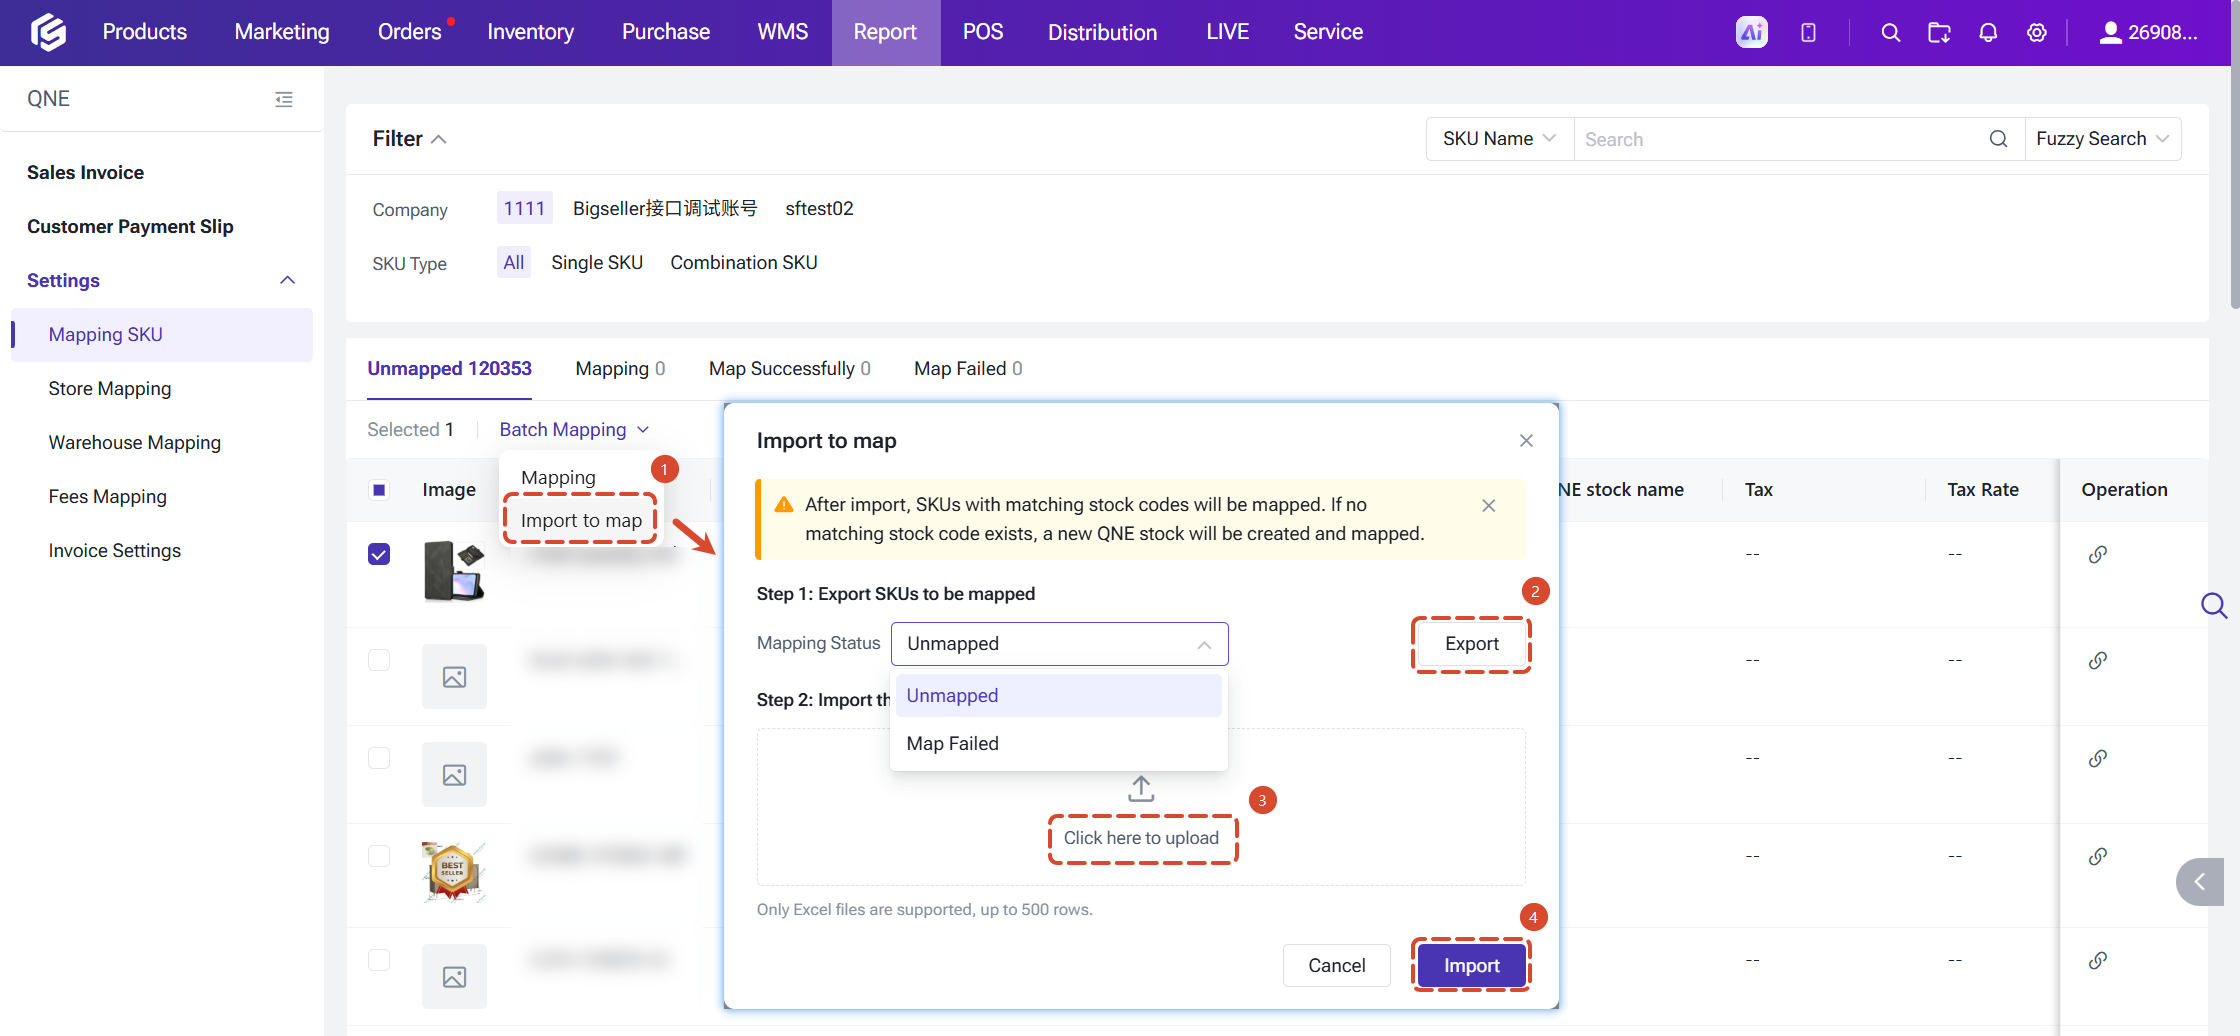
3.3 Batch mapping > Import to Map
Notes: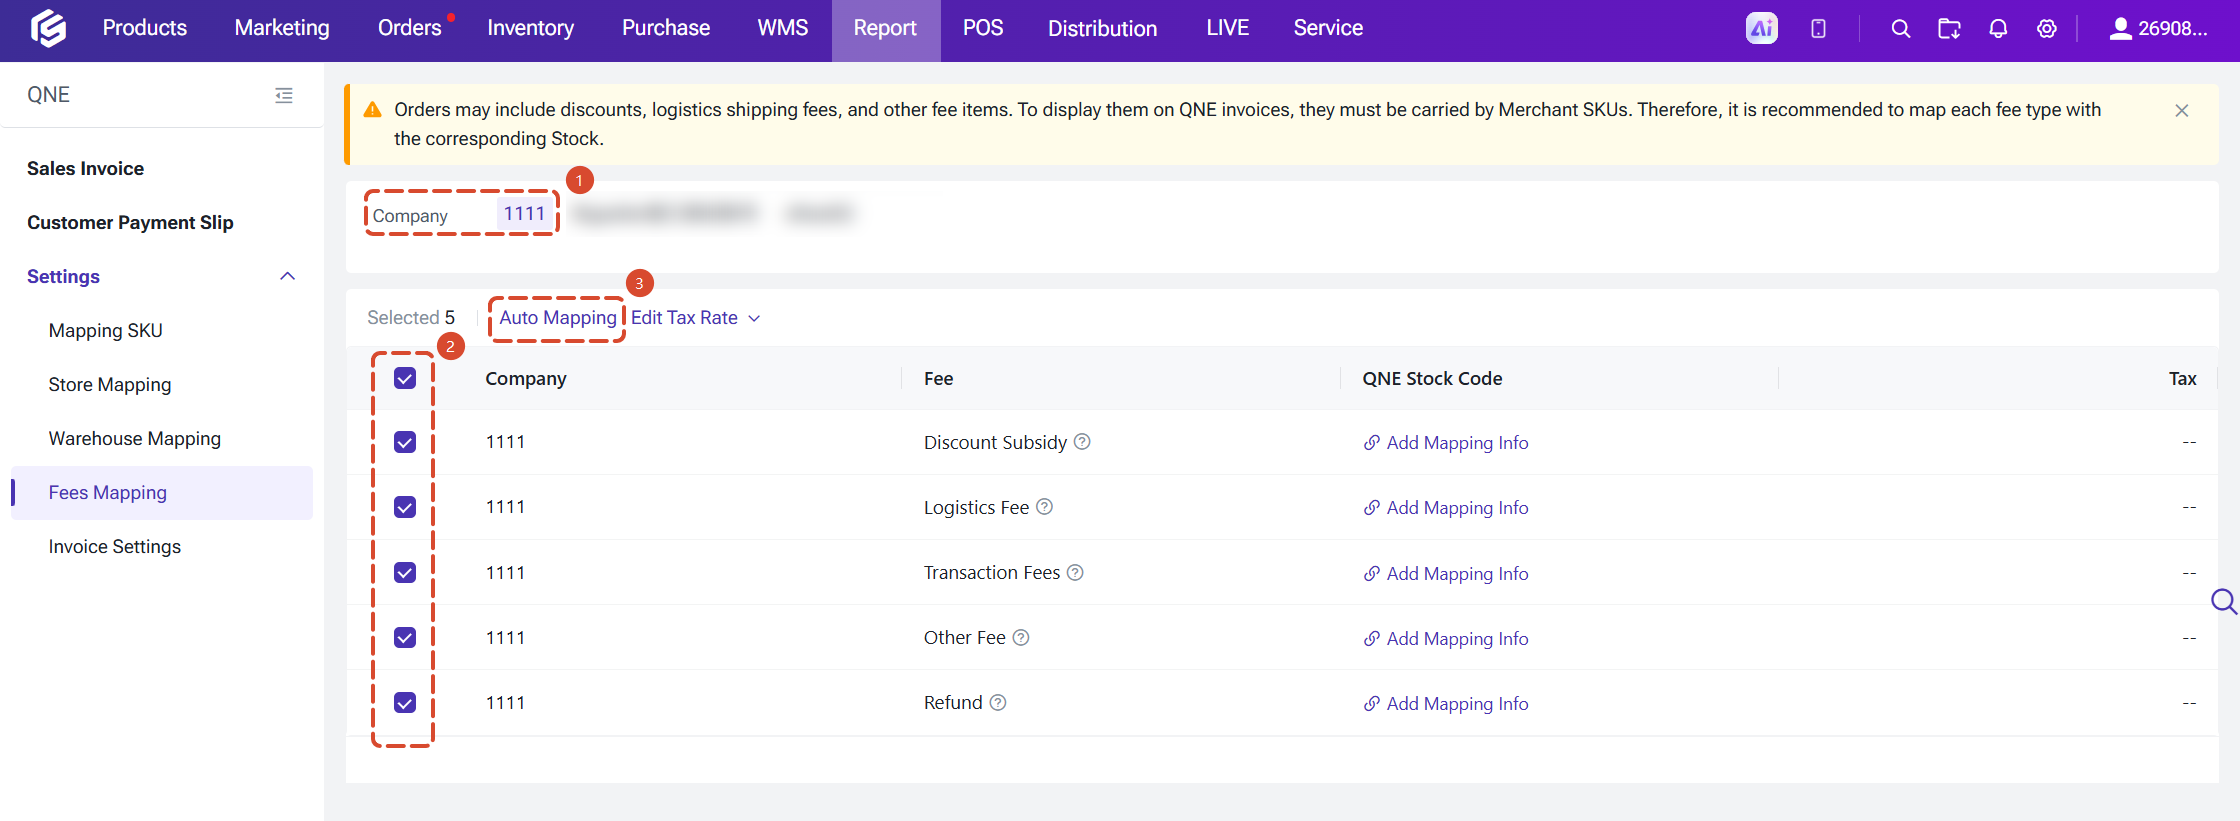
Click Edit Tax Rate, and you can set the tax and tax rate for selected items or items across all pages.
Note: If an invoice contains a fee that isn't mapped, BigSeller uses the default fee automatically.
Invoice Scenario: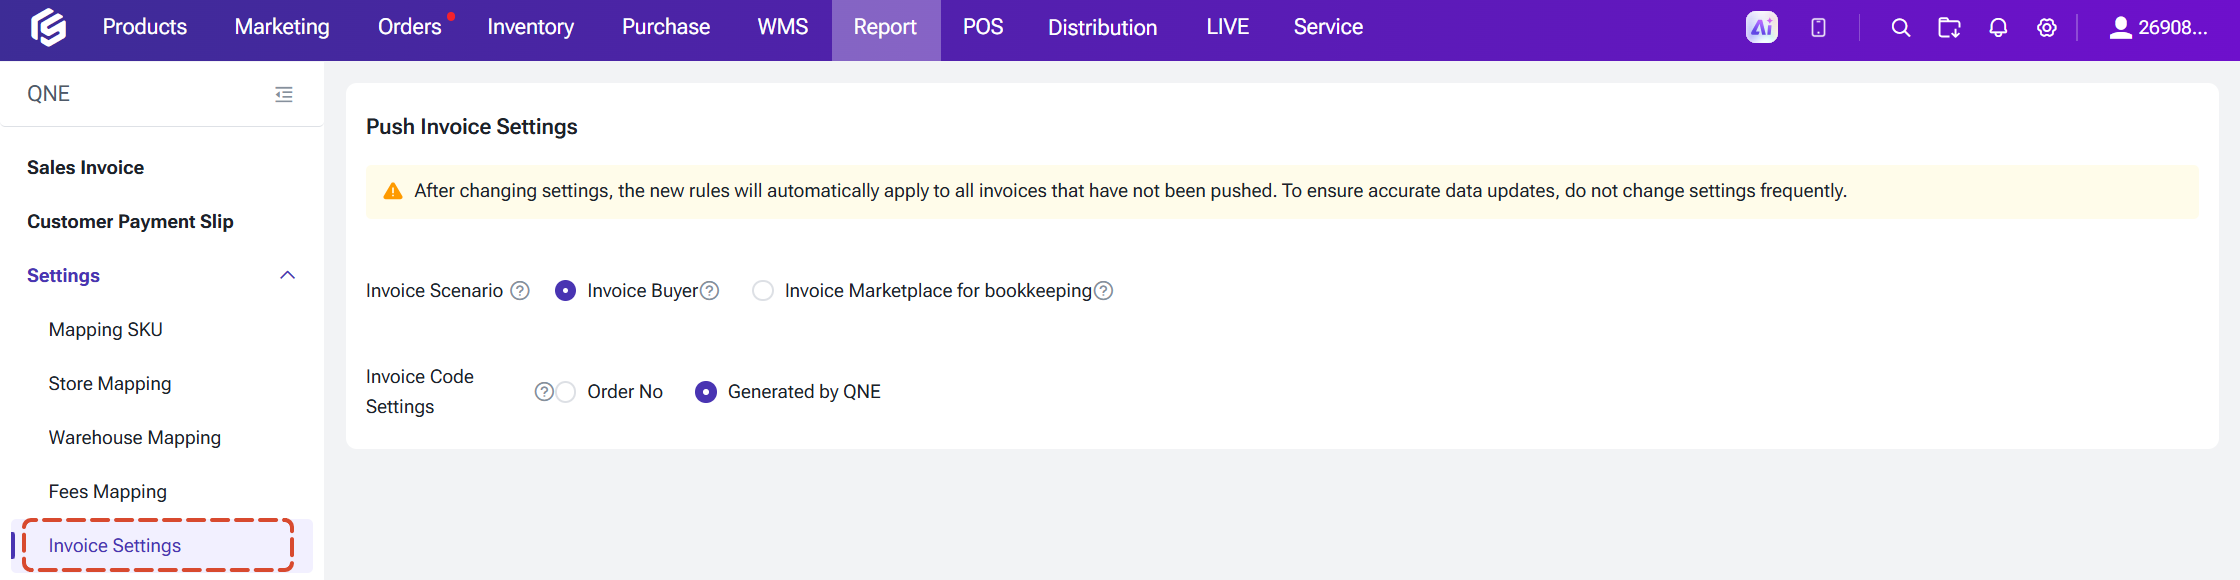
Note: After you change these settings, the new rules apply to all invoices that haven't been pushed yet. To keep your data accurate, we recommend not changing them too often.
Find your orders:
You can narrow down the list by company, platform, store, time, and order status (Completed or Shipped). You can also search by order number, with fuzzy search and precise search both available.
Create your invoices: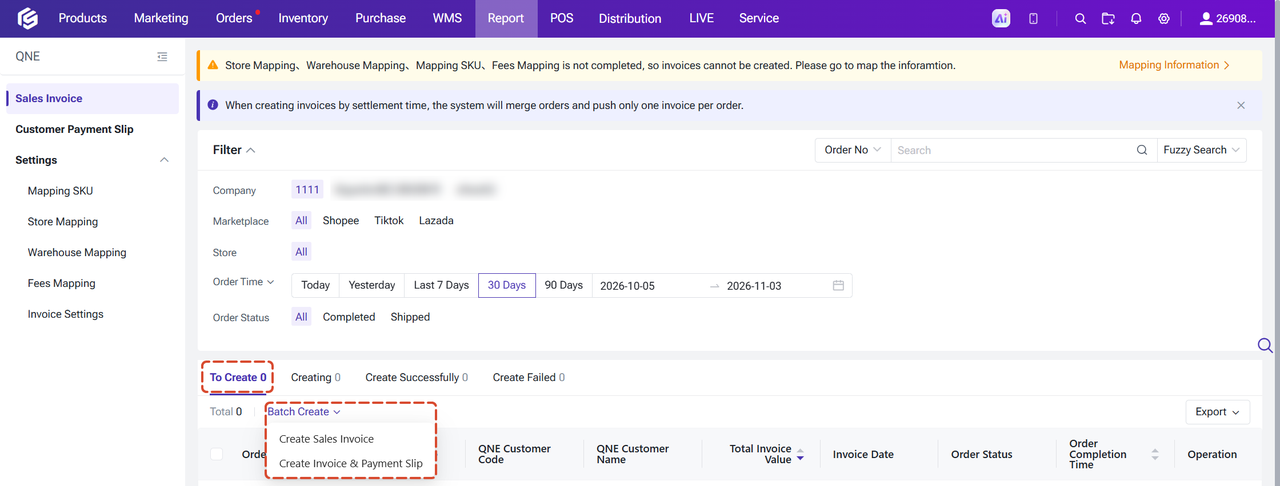
Invoice statuses: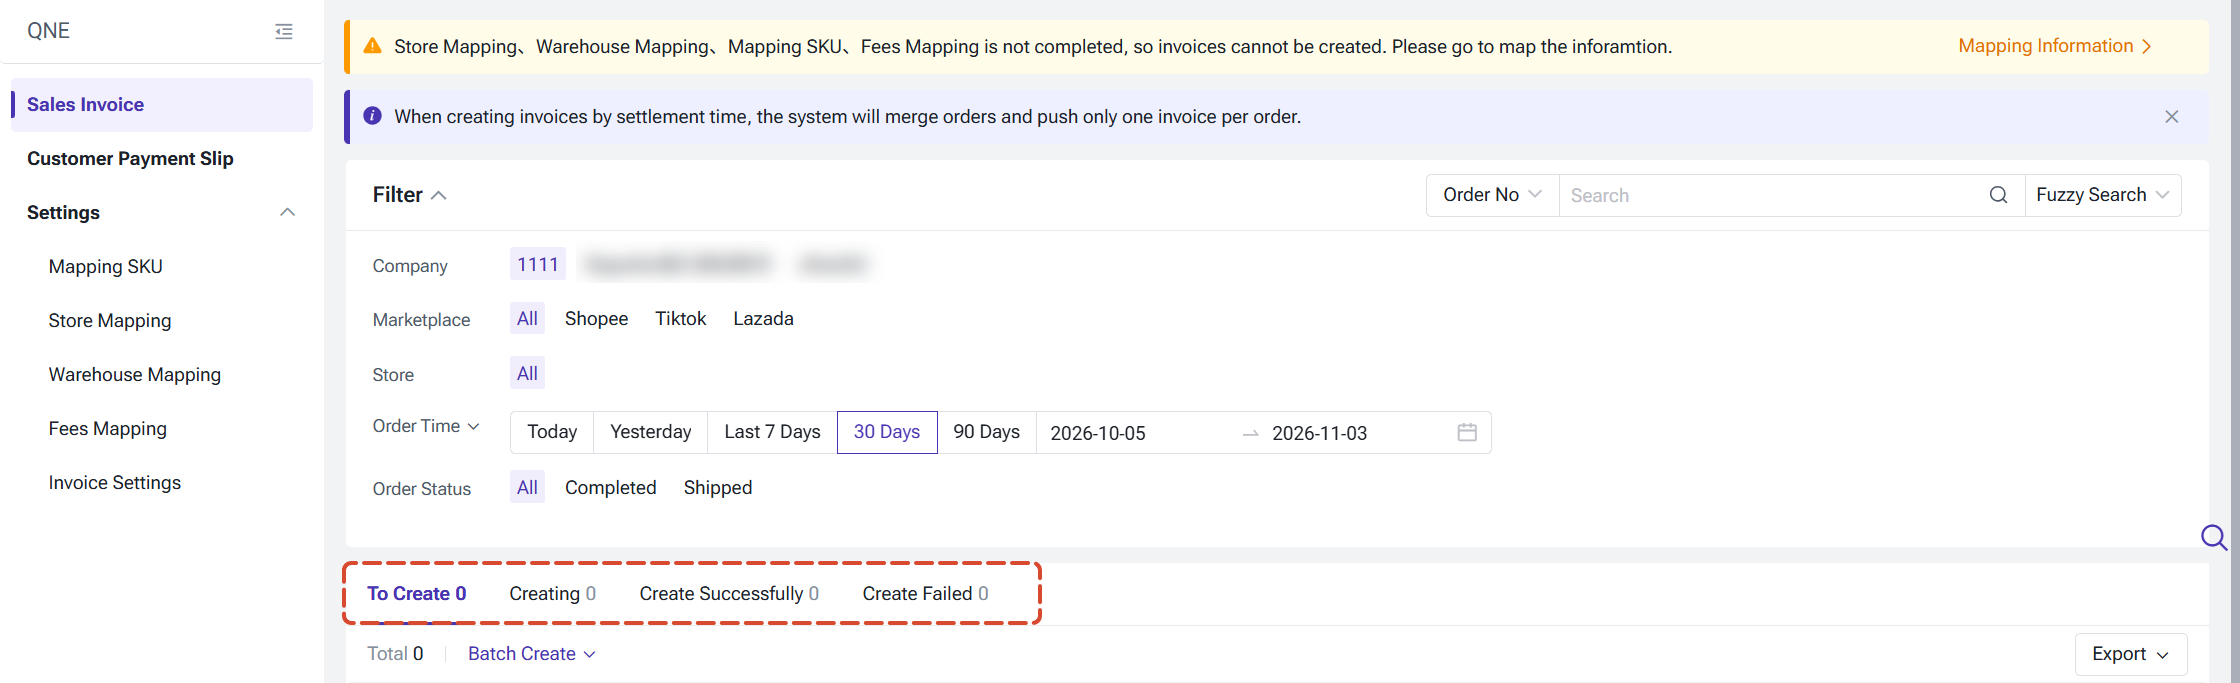
Notes:
Go to Report > Accounting Software > QNE > Customer Payment Slip.
Create a payment slip: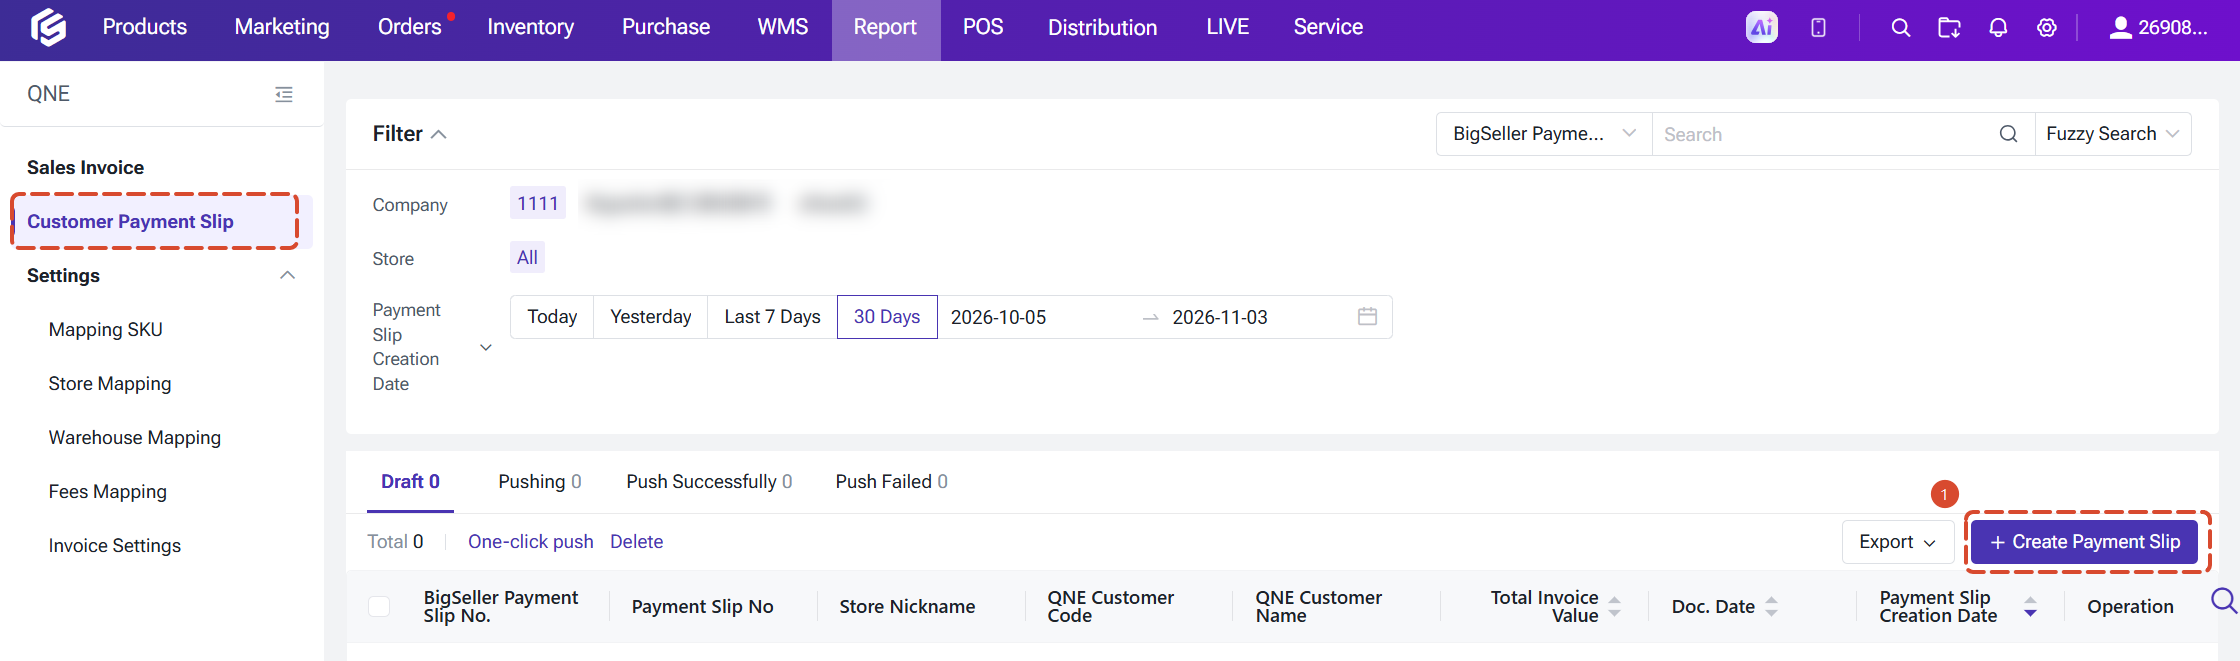
Notes:
Push and manage payment slips:
Payment slips are organized into four tabs: Draft, Pushing, Pushed Successfully, and Push Failed.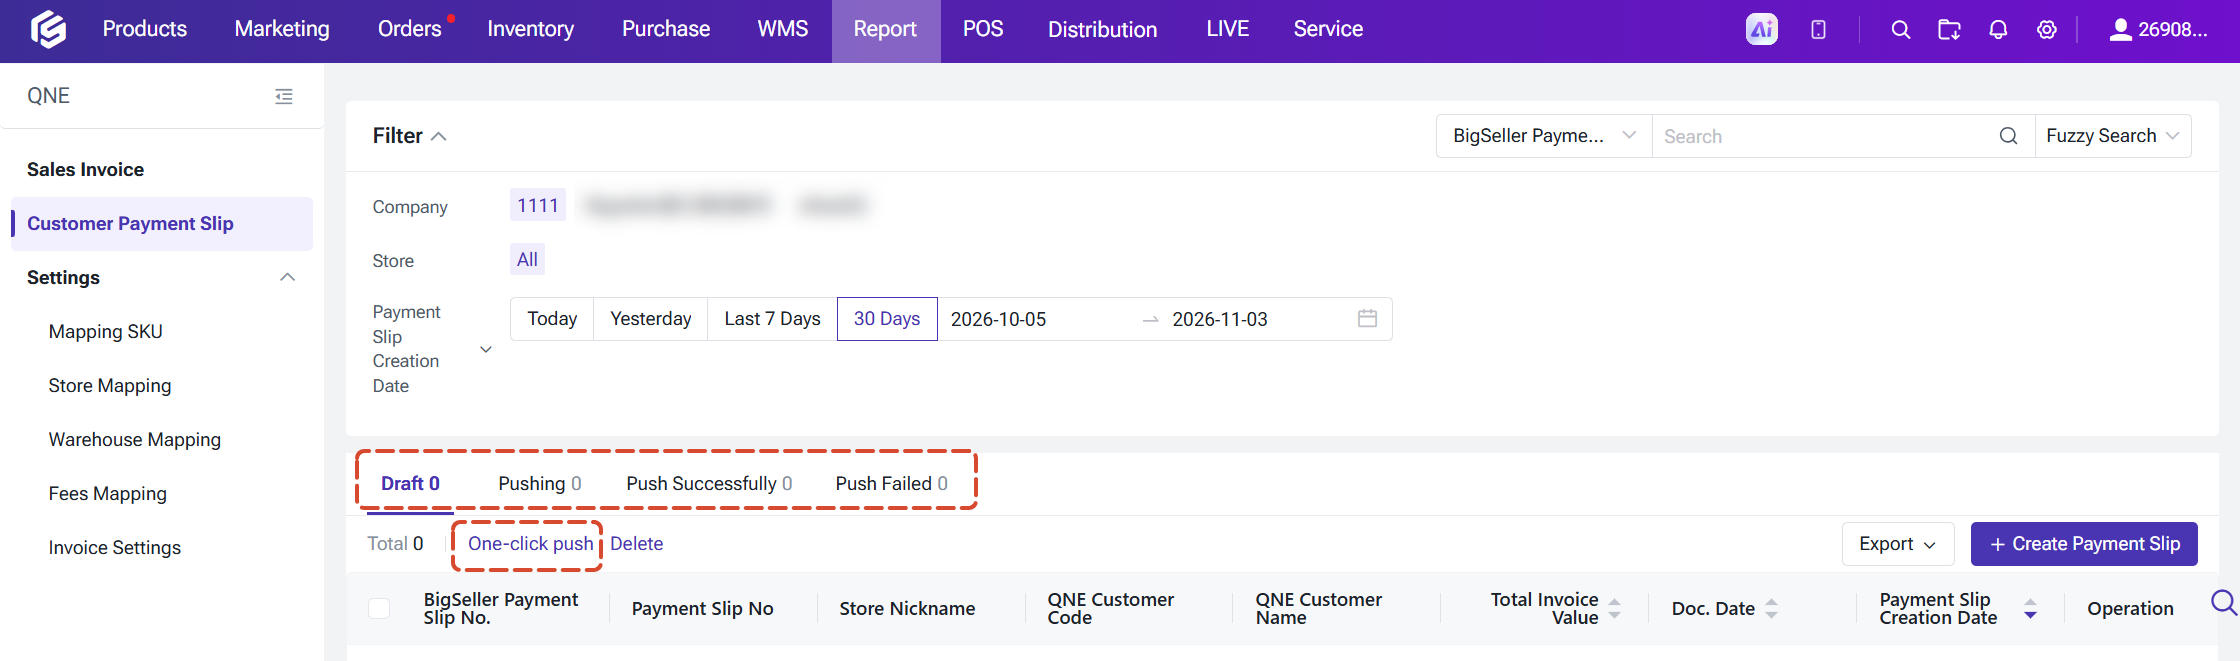
Note: Deleting a payment slip also removes the matching customer payment slip in QNE.
Export payment slips:
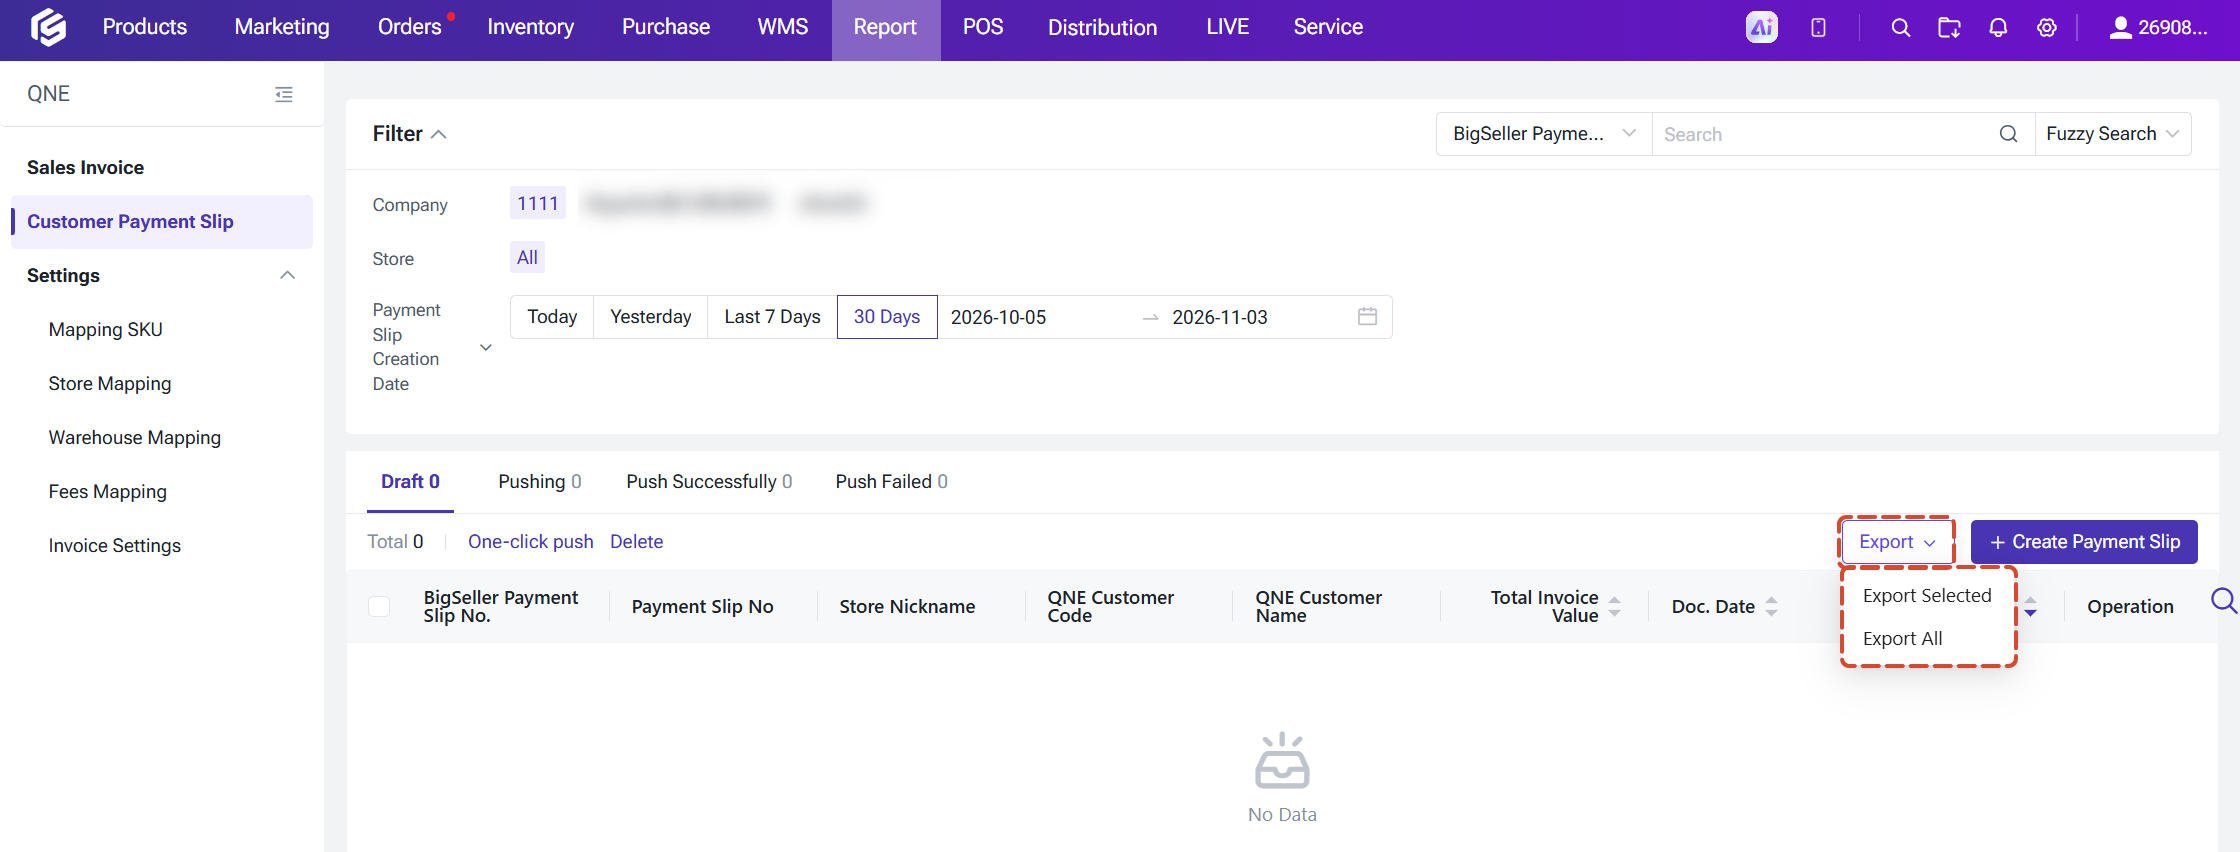
You can click Export to download your payment slips along with their invoice details. If a payment slip includes several invoices, it appears on several rows. The payment slip information stays the same, and only the invoice details differ (invoice code, order number, invoice date, and invoice amount).
Go to Permission Settings > Sub-Accounts > Add Sub-Accounts > Add Role > Accounting Software, where you'll find three permissions (all selected by default): QNE Settings, QNE Sales InvoiceQNE Customer Payment Slip.
Note: If an account doesn't have permission for a page, that page and its menu entry are hidden.
It usually means the API Key was copied incorrectly. You can check that you've pasted the full API Key without extra spaces. If you're still not sure, you can generate a new one in QNE and try again.
Q2: My authorization shows "Expired." What can I do?
This usually happens when automatic refreshes fail several times in a row, or when you haven't logged in for more than 30 days. You can click the refresh button in your authorization list to try again. If it still doesn't work, you can generate a new API Key in QNE and edit your authorization.
Q3: I forgot to save my API Key. What should I do?
QNE only shows the API Key once, so you'll need to generate a new one in QNE. After that, you can edit your authorization in BigSeller and enter the new Key.
Q4: I chose the wrong invoice scenario. Can I change it?
Yes, you can change it anytime in Invoice Settings. The new rule applies to invoices that haven't been pushed yet, and invoices that were already pushed successfully stay as they are.
Q5: Why can't I see the QNE entry?
Please check two things. First, your BigSeller subscription needs to be Basic or above. Second, your account (or sub-account) needs permission for at least one of the QNE pages.
Q6: Why did my invoice fail to be created?
You can check the reason in the Creation Failed tab. The most common causes are an unmapped SKU, store, warehouse, or fee, or an expired authorization. Once you've fixed it, you can create the invoice again.
Q7: Why can't I find an invoice when I'm creating a payment slip?
Only invoices that were pushed successfully and haven't been used for another payment slip are shown, and they need to belong to the company and store you selected. Invoices from different customers can't be combined in one payment slip.
Integrating QNE with BigSeller helps you:
- Stay Compliant: Automatically generate compliant invoices based on the actual amount paid by buyers and report them to reduce tax risks.
- Streamline Accounting: Create customer payment records and sales invoices in BigSeller with one click, then sync them to QNE. Inventory, general ledger, and accounts receivable records are updated automatically.
- Keep Data Accurate: Import CSV files from other accounting software or pull product, warehouse, store, and expense data directly from BigSeller.
Step 1: Set up QNE and authorize your account
Before you use any of the mapping features, you'll need to register a QNE account and authorize it in BigSeller.For detailed instructions, please refer to this guide. Here's a quick guide:
Register your QNE account
- Go to the QNE website and click Sign Up to create your account.
- Create your company in QNE and purchase a plan. Then initialize your customers, products, warehouses, suppliers, accounts, and taxes. You can add them manually or import them as CSV files.
- Log in to QNE and go to AI Studio > AI App Builder.
- Create a new app, and QNE will show you an API Key.
- Copy the API Key and keep it somewhere safe.
Authorize QNE in BigSeller
- In BigSeller, go to Integrations > Other Authorization > Accounting Software > QNE.
- Click Add Authorization, then enter the API Key you copied.
- Save, and your authorization is set up.
- If you haven't logged in to BigSeller for more than 30 days, BigSeller stops refreshing your authorization, and the status changes to Expired after 24 hours. You can log in and re-authorize at any time.
- If you delete an authorization, you won't be able to sync that company's data to QNE anymore, and all current invoice information will be deleted.
Step 2: Complete mapping and settings
You'll find all the mapping pages under Data > Accounting Software > QNE > Settings.Until you finish store mapping, warehouse mapping, SKU mapping, fee mapping, and invoice settings, BigSeller can't create invoices for you. If you see a reminder about this, you can click Mapping information to jump straight there.
If you'd like to take a look around first, you can also choose Do not map information now, go to Sales Invoice Page.
Note: If you have more than one company, please select the right company at the top of each page first. Mapping is saved separately for each company.
1. Store mapping
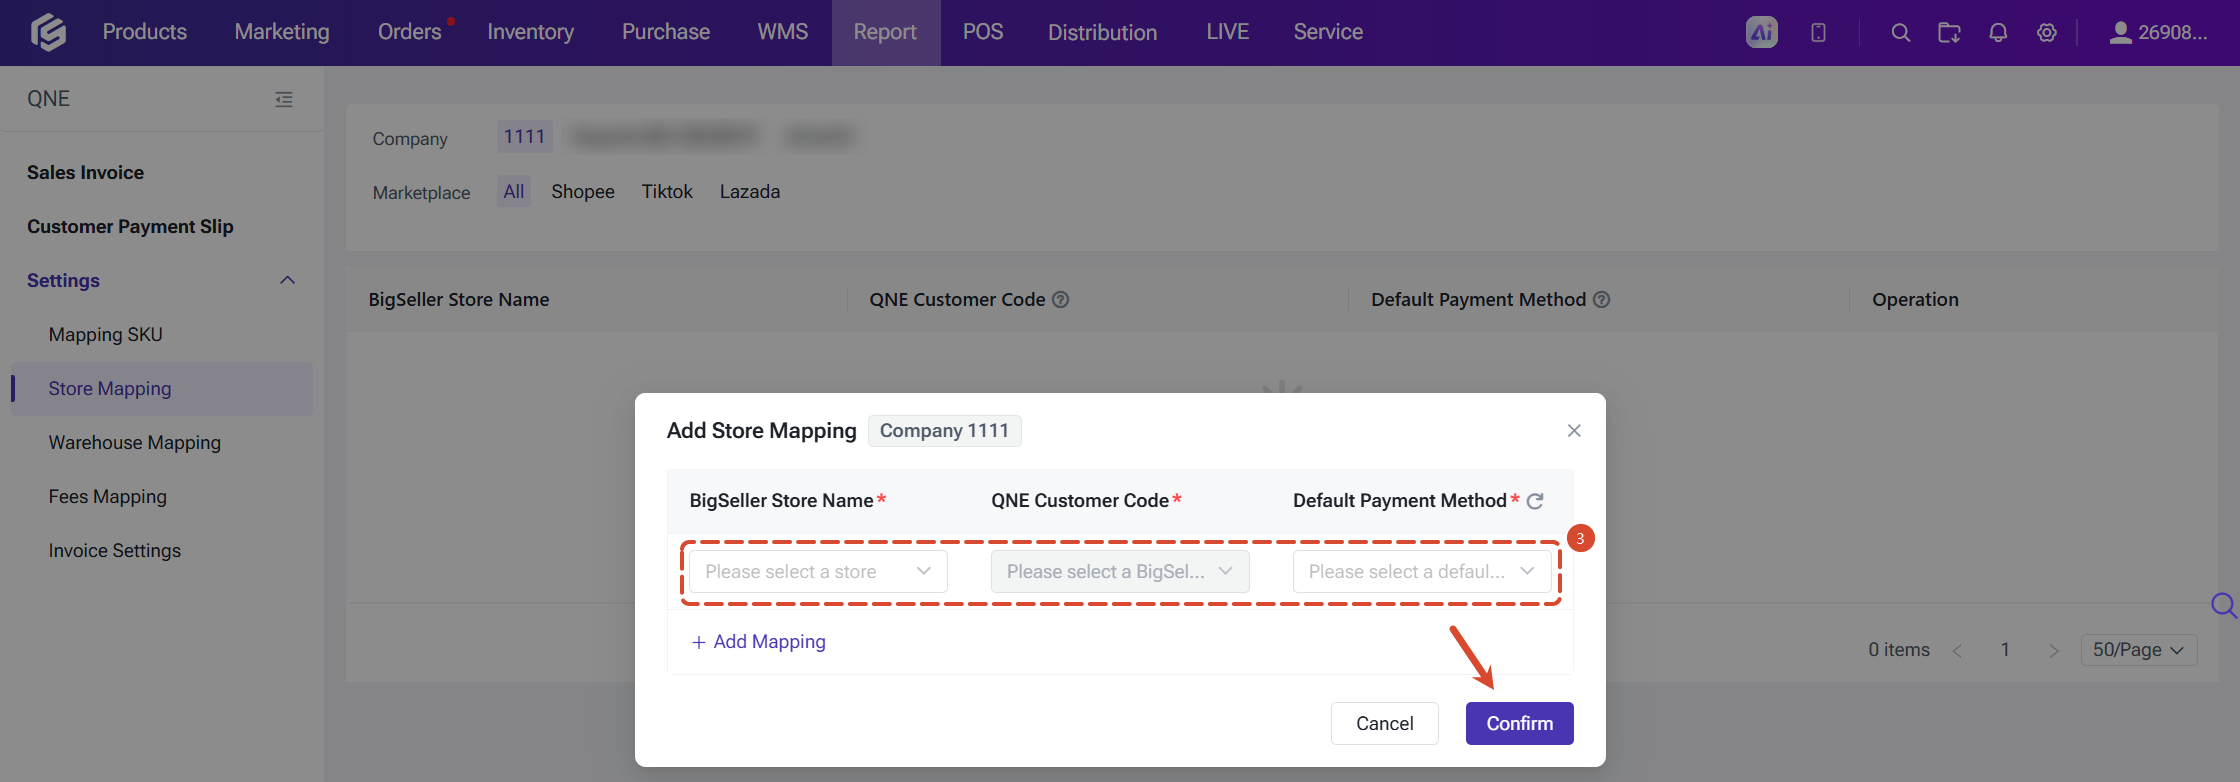
Store mapping connects your BigSeller stores to customers in QNE, so each store's invoices are issued to the right customer.- Select your company. You can also filter by platform (Shopee, Lazada, or TikTok).
- Click Add Mapping and select a BigSeller store.
- Choose the QNE Customer Code and the Default Payment Method for that store.
Notes:
- Each store can be mapped to one default customer, while one customer can be mapped to several stores.
- Each store can belong to one company, while one company can have several stores.
- The customer's currency needs to match the store's site currency.
- If no customer matches the currency, you can go to QNE > Account Receivable > Customers to add one first.
- When you set a default payment method, you'll be able to create the customer payment slip at the same time as the sales invoice.
- If you delete a store mapping, invoices under that store can no longer be pushed to the corresponding company.
2. Warehouse mapping
Warehouse mapping connects your BigSeller warehouses to your QNE warehouses. Once an invoice is created, QNE uses this to deduct stock from the right warehouse.- Select your company.
- Click Add Mapping.
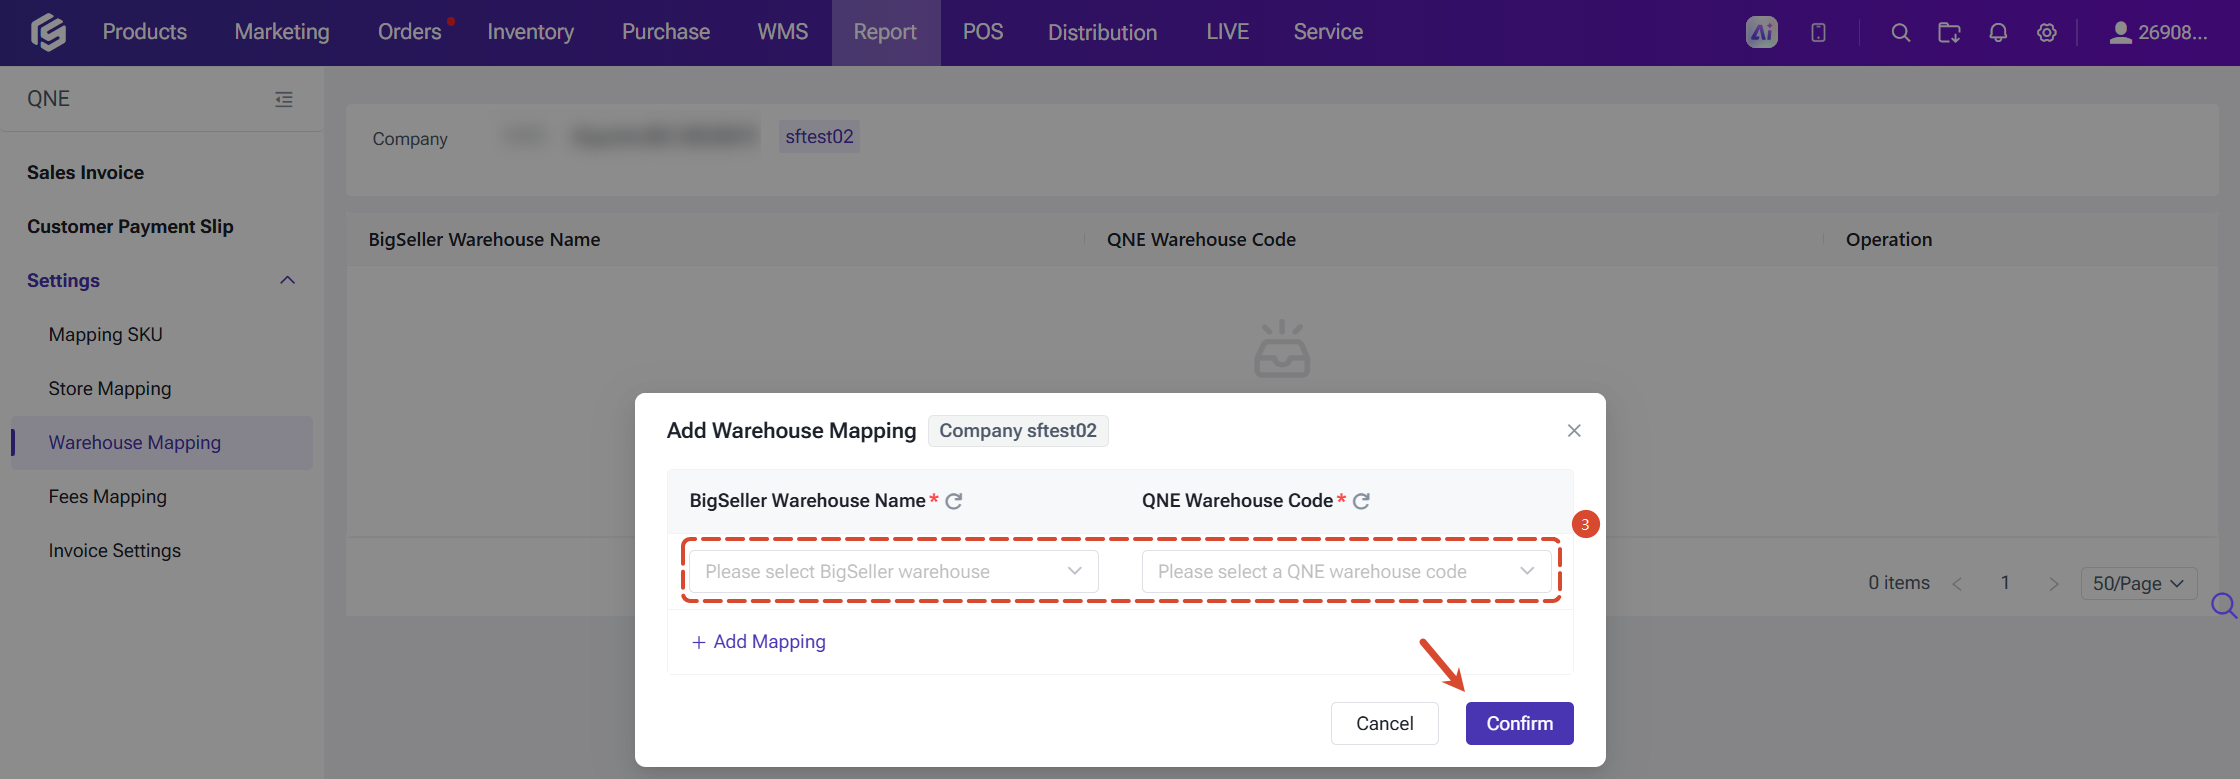
- Select your BigSeller warehouse and the matching QNE Warehouse Code.
Notes:
- If you don't see the warehouse you need, you can go to QNE > Stock > Locations and add it there first.
- After you delete a mapping, invoices under that warehouse can no longer be pushed to the corresponding company.
3. Mapping SKU
Mapping SKU links your BigSeller single and combined SKUs to the Stock or Bundle Stock in QNE. The page has four tabs (Unmapped, Mapping, Map Successfully, and Map Failed), so you can work through your SKUs one status at a time.You have three ways to map your SKUs:
3.1 Manual mapping
You can enter the stock code from QNE > Stocks for any SKU. If BigSeller can't find that stock code, it creates a new QNE stock and maps it for you.
You can also select multiple SKUs and click Edit Tax and Tax Rate to give them the same tax and tax rate.
3.2 Batch Mapping > Mapping
BigSeller maps mulitple SKUs at once, which works well if you haven't used QNE before. When a SKU number matches a QNE stock code, BigSeller maps them automatically.
For SKUs without a match, you can choose how you'd like them handled in Auto-Mapping Settings:
- Automatically create a QNE stock from the SKU information and map it.
- Treat it as mapping failed, so you can map it manually later.
3.3 Batch mapping > Import to Map
- Export the SKUs you want to map.
- Fill in the QNE stock code for each SKU, then import the Excel file back. Only Excel files are supported, with up to 500 rows each time.
Notes:
- When you add, edit, or delete a SKU in BigSeller Inventory, the changes sync automatically. New SKUs start in Unmapped, and edited SKU information updates across all tabs.
- You can unmap a SKU at any time.
- If an export takes too long, you can find the file in the Download Center a little later.
4. Fees mapping
Your orders may include fees such as discounts and shipping. On a QNE invoice, these fees have to be carried by a product (Stock). So we recommend mapping each fee type to a stock, especially the default fees.- Select your company.
- Select the data you want to map.
- Click Auto Mapping, and BigSeller will create the fee stocks in QNE for you and map them.
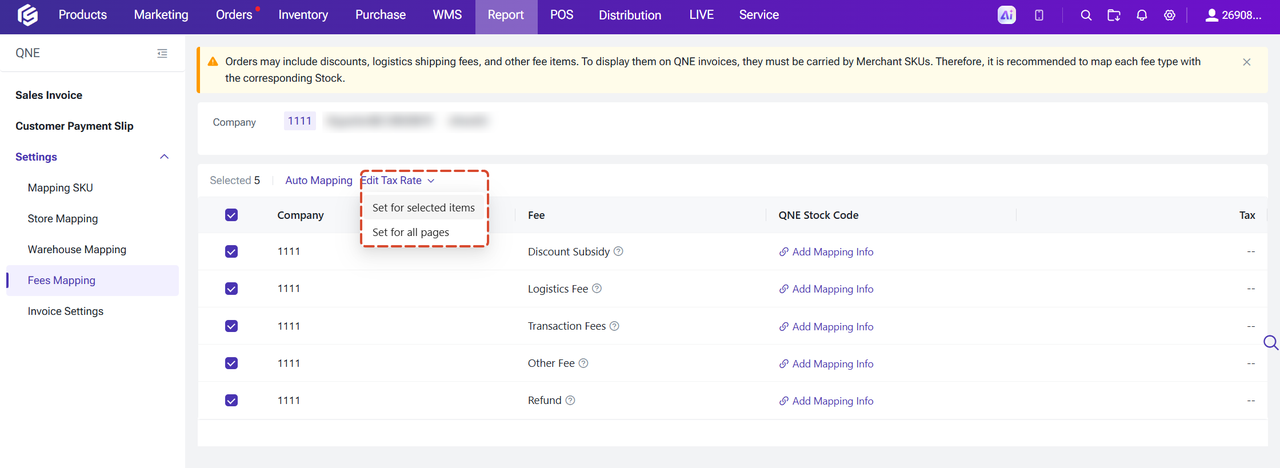
Click Edit Tax Rate, and you can set the tax and tax rate for selected items or items across all pages.
Note: If an invoice contains a fee that isn't mapped, BigSeller uses the default fee automatically.
5. Invoice settings
Invoice settings decide how your invoices are created. Each setting is a single choice, and you'll see "Setting successful" once you select one.Invoice Scenario:
- Invoice Buyer: BigSeller pushes the invoice based on the amount your buyer paid. This is the right choice for Philippine tax requirements.
- Invoice Marketplace for bookkeeping: BigSeller pushes the invoice based on the order revenue in your profit report.
- Order Number: BigSeller uses the order number as the invoice code.
- Generated by QNE: QNE creates the invoice code using its own numbering rules.
Note: After you change these settings, the new rules apply to all invoices that haven't been pushed yet. To keep your data accurate, we recommend not changing them too often.
Step 3: Create sales invoices
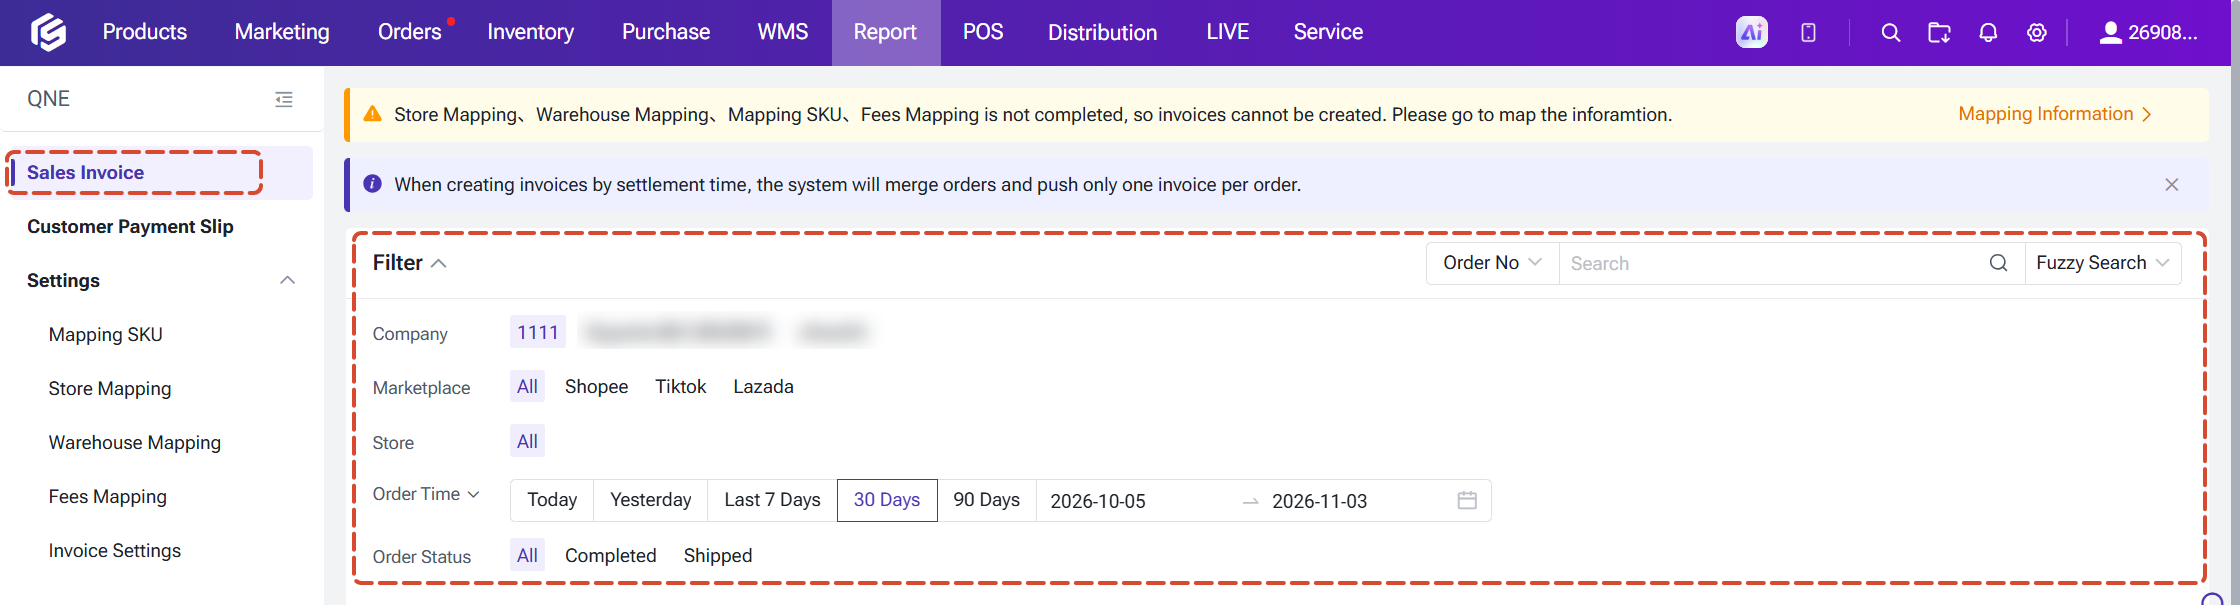
Go to Report > Accounting Software > QNE > Sales Invoice.Find your orders:
You can narrow down the list by company, platform, store, time, and order status (Completed or Shipped). You can also search by order number, with fuzzy search and precise search both available.
Create your invoices:
- Select the orders you'd like to invoice under the To Create tab.
- Click Batch Create > Create Sales Invoice. If you've set a default payment method for the store, you can also choose Create Invoice & Payment Slip to create both together.
- Your orders move to Creating, and then to Create Successfully or Create Failed.
Invoice statuses:
- To Create: The order has been shipped and is waiting for an invoice.
- Creating: The invoice has been submitted and is being pushed to QNE.
- Create Successfully: QNE has generated the invoice.
- Create Failed: The push failed. You can check the reason under this tab, fix it, and create the invoice again.
Notes:
- If an order has an unmapped product line, you can click Edit to fill in the Location and QNE Stock code before creating the invoice.
- If you delete an invoice, the matching invoice and customer payment slip in QNE are deleted too.
- If a store has been deleted or unmapped, its orders can't be invoiced. They'll disappear from the list after you refresh.
Step 4: Create customer payment slips
After your buyer pays, you can create a customer payment slip that references your sales invoices, and push it to QNE with one click. This keeps your payments and invoices clearly linked.Go to Report > Accounting Software > QNE > Customer Payment Slip.
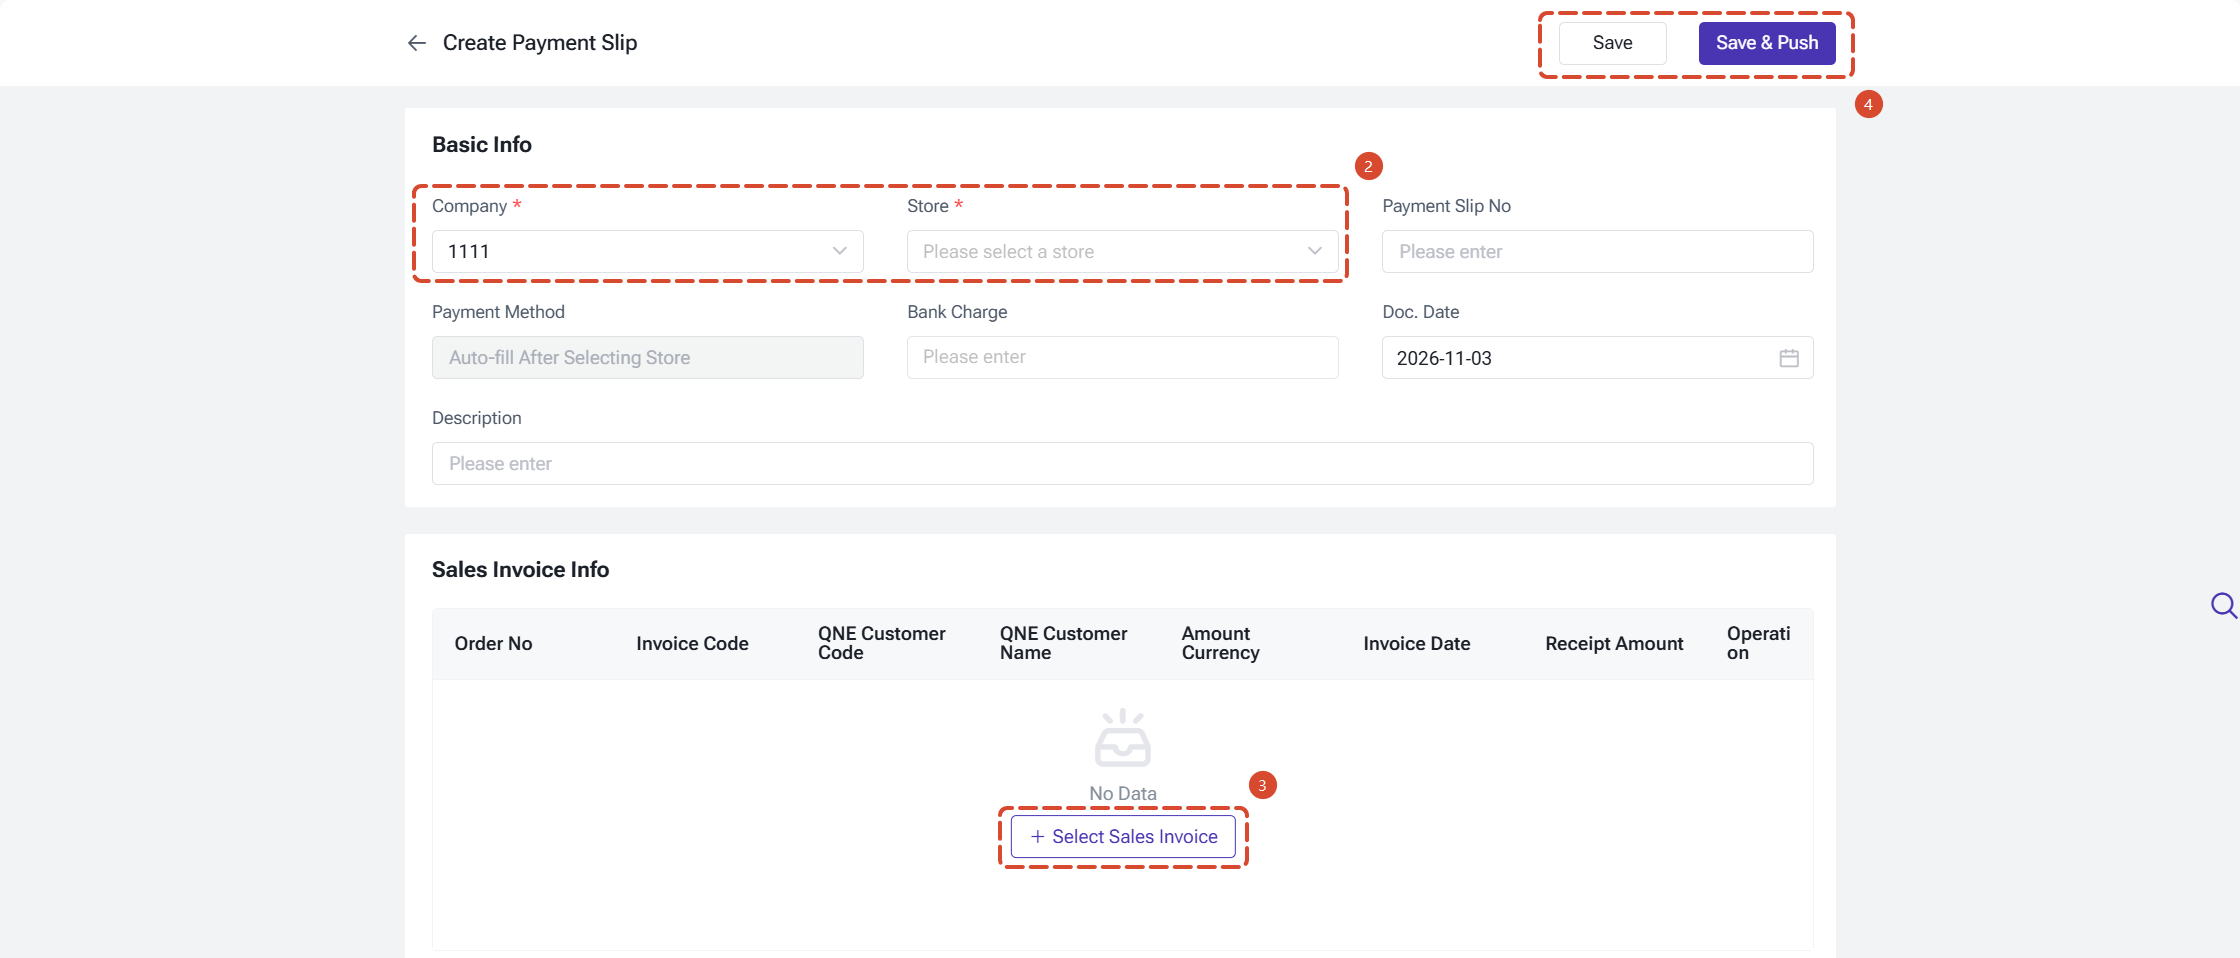
Create a payment slip:
- Click Create Payment Slip.
- Fill in the basic information.
- Under Sales Invoice Info, click Select Sales Invoice and choose the invoices this payment covers.
- Click Save to keep it in your drafts, or Save & Push to save it and push it to QNE right away.
Notes:
- One payment slip can include several invoices, but they all need to belong to the same customer.
- The payment slip date can't be earlier than the invoice date.
Push and manage payment slips:
Payment slips are organized into four tabs: Draft, Pushing, Pushed Successfully, and Push Failed.
- You can edit payment slips in Draft, and push several at once with One-click Push.
- If a push fails, you can check the reason in Push Failed and push it again.
Note: Deleting a payment slip also removes the matching customer payment slip in QNE.
Export payment slips:
You can click Export to download your payment slips along with their invoice details. If a payment slip includes several invoices, it appears on several rows. The payment slip information stays the same, and only the invoice details differ (invoice code, order number, invoice date, and invoice amount).
Permission settings
Go to Permission Settings > Sub-Accounts > Add Sub-Accounts > Add Role > Accounting Software, where you'll find three permissions (all selected by default): QNE Settings, QNE Sales InvoiceQNE Customer Payment Slip.Note: If an account doesn't have permission for a page, that page and its menu entry are hidden.
FAQs
Q1: What does "Invalid API Key" mean when I authorize it?It usually means the API Key was copied incorrectly. You can check that you've pasted the full API Key without extra spaces. If you're still not sure, you can generate a new one in QNE and try again.
Q2: My authorization shows "Expired." What can I do?
This usually happens when automatic refreshes fail several times in a row, or when you haven't logged in for more than 30 days. You can click the refresh button in your authorization list to try again. If it still doesn't work, you can generate a new API Key in QNE and edit your authorization.
Q3: I forgot to save my API Key. What should I do?
QNE only shows the API Key once, so you'll need to generate a new one in QNE. After that, you can edit your authorization in BigSeller and enter the new Key.
Q4: I chose the wrong invoice scenario. Can I change it?
Yes, you can change it anytime in Invoice Settings. The new rule applies to invoices that haven't been pushed yet, and invoices that were already pushed successfully stay as they are.
Q5: Why can't I see the QNE entry?
Please check two things. First, your BigSeller subscription needs to be Basic or above. Second, your account (or sub-account) needs permission for at least one of the QNE pages.
Q6: Why did my invoice fail to be created?
You can check the reason in the Creation Failed tab. The most common causes are an unmapped SKU, store, warehouse, or fee, or an expired authorization. Once you've fixed it, you can create the invoice again.
Q7: Why can't I find an invoice when I'm creating a payment slip?
Only invoices that were pushed successfully and haven't been used for another payment slip are shown, and they need to belong to the company and store you selected. Invoices from different customers can't be combined in one payment slip.
Is this content helpful?
Thank you for your feedback. It drives us to provide better service.
Please contact us if the document can't answer your questions