Introduction to Move Feature
Update Time: 20 Jun 2025 10:03
Move means moving goods from one shelf to another within the warehouse for better organization.
Examples:
- One SKU one shelf: If you get new shelves and need to move the goods from the old ones, you can add a move list in BigSeller to relocate the SKUs.
- One SKU multiple shelves: If a warehouse staff needs to free up space on a high-demand shelf, they can move excess stock to a lower-traffic area to optimize storage.
1. Steps to Use the Move Feature

Step 2: Add Move List
If you need to update shelf information for a large number of SKUs, this method is highly recommended for efficiency.
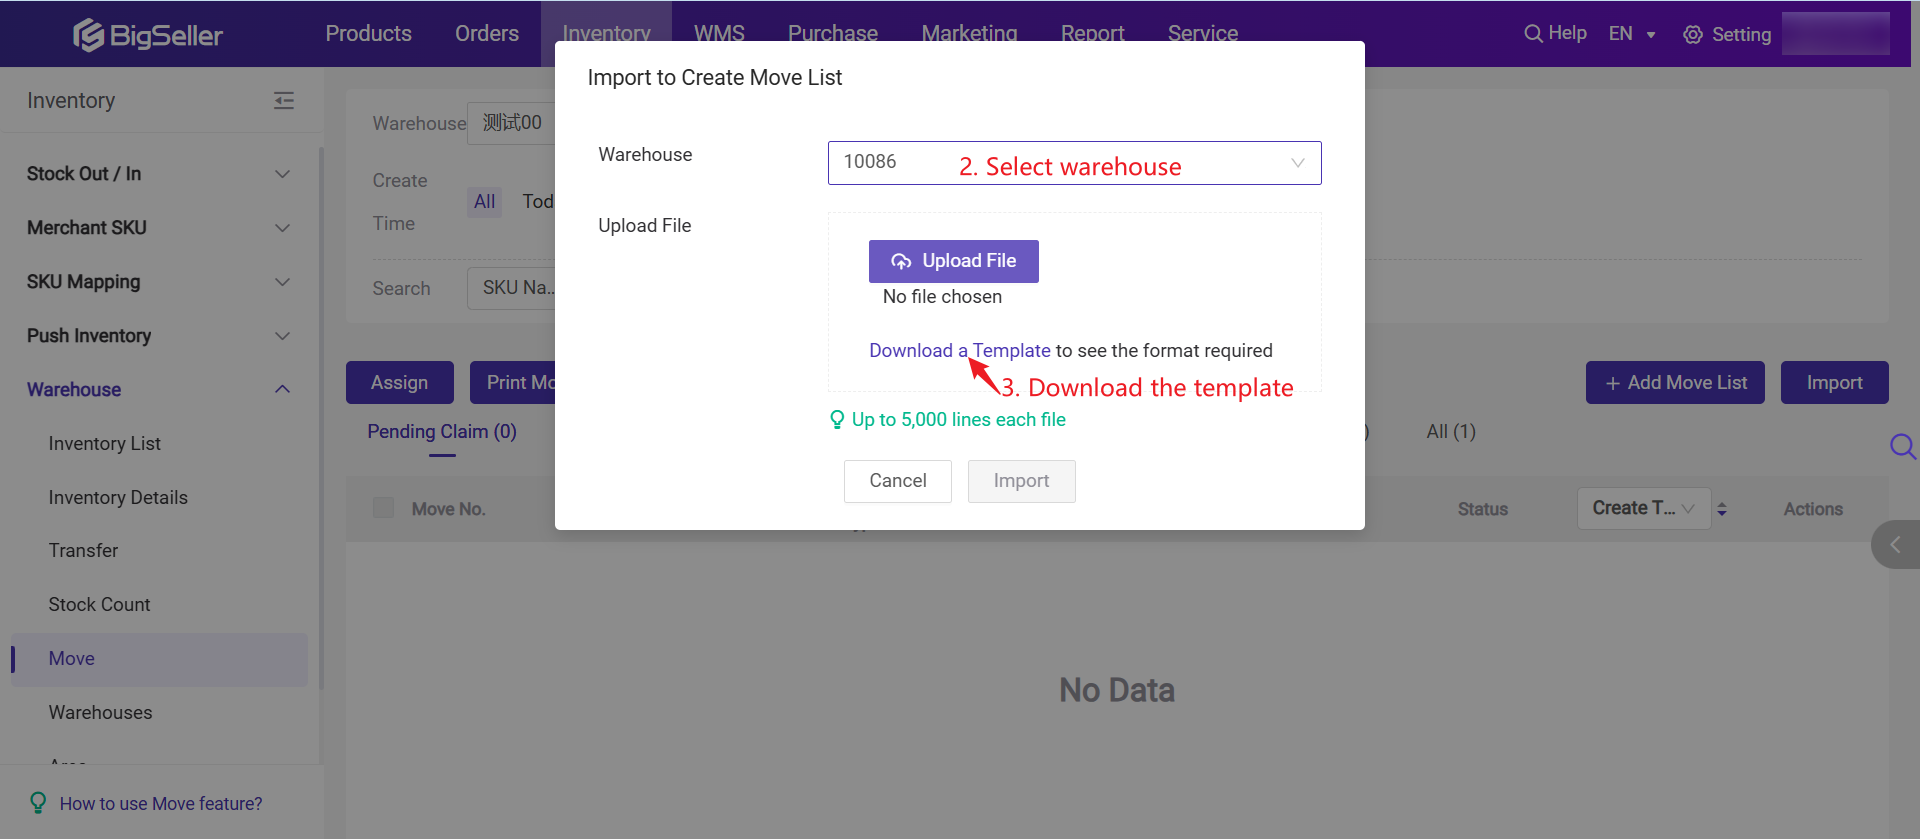
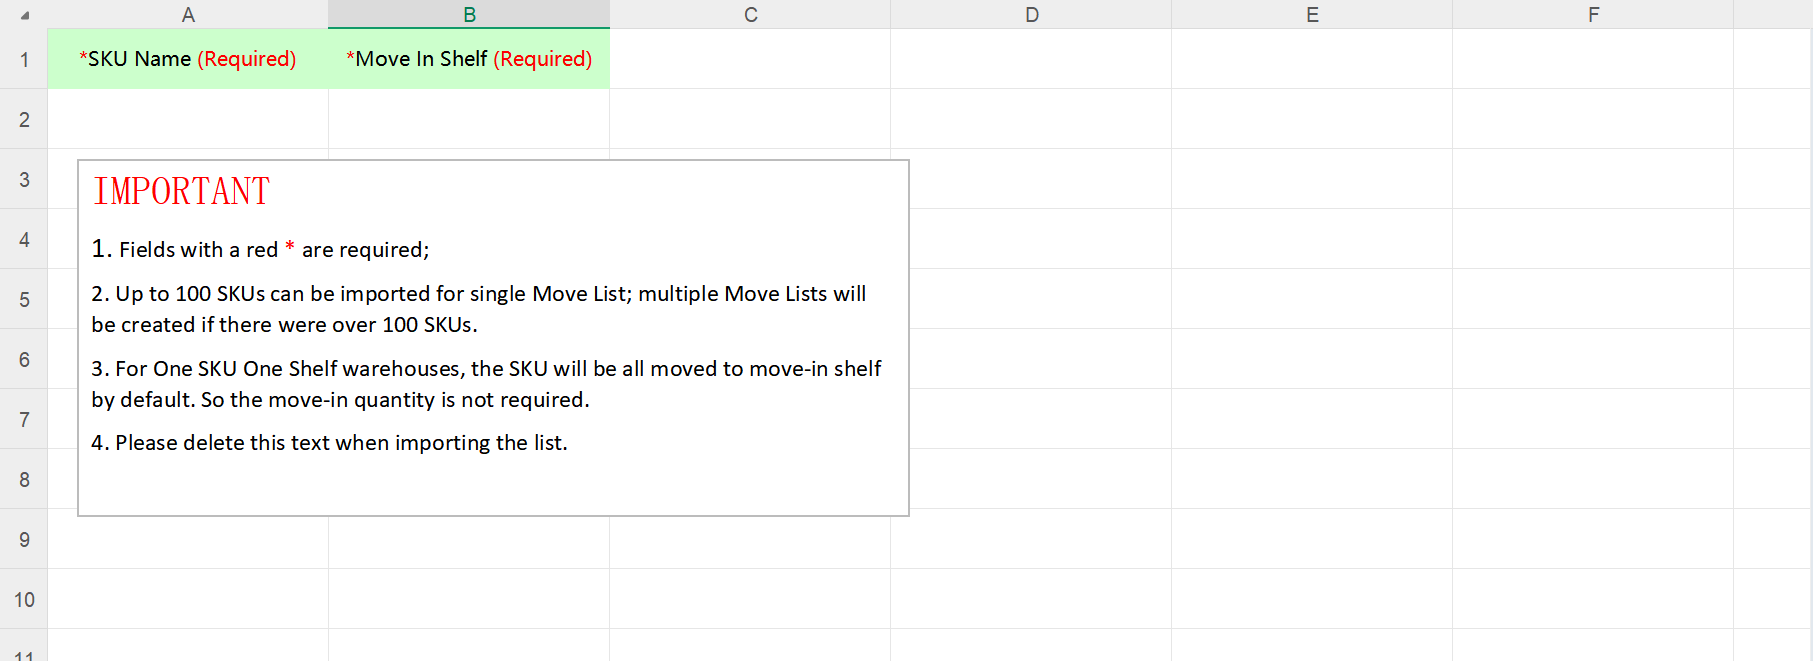
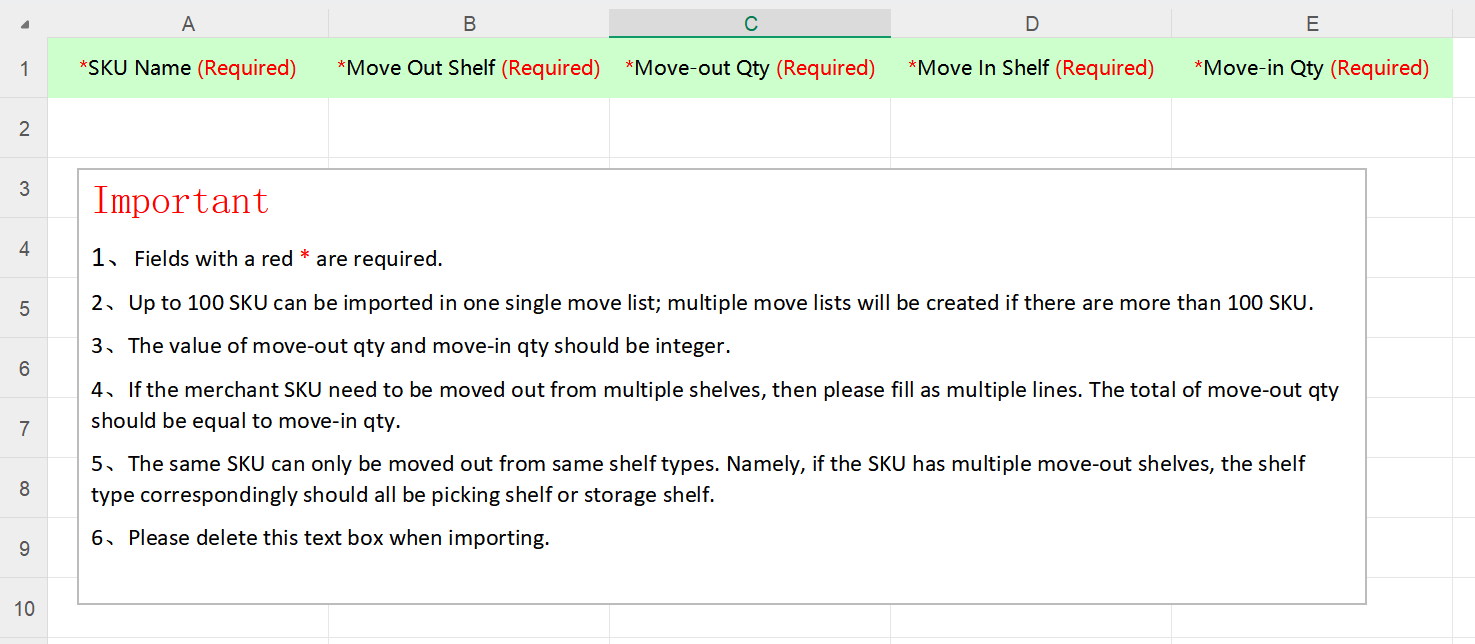
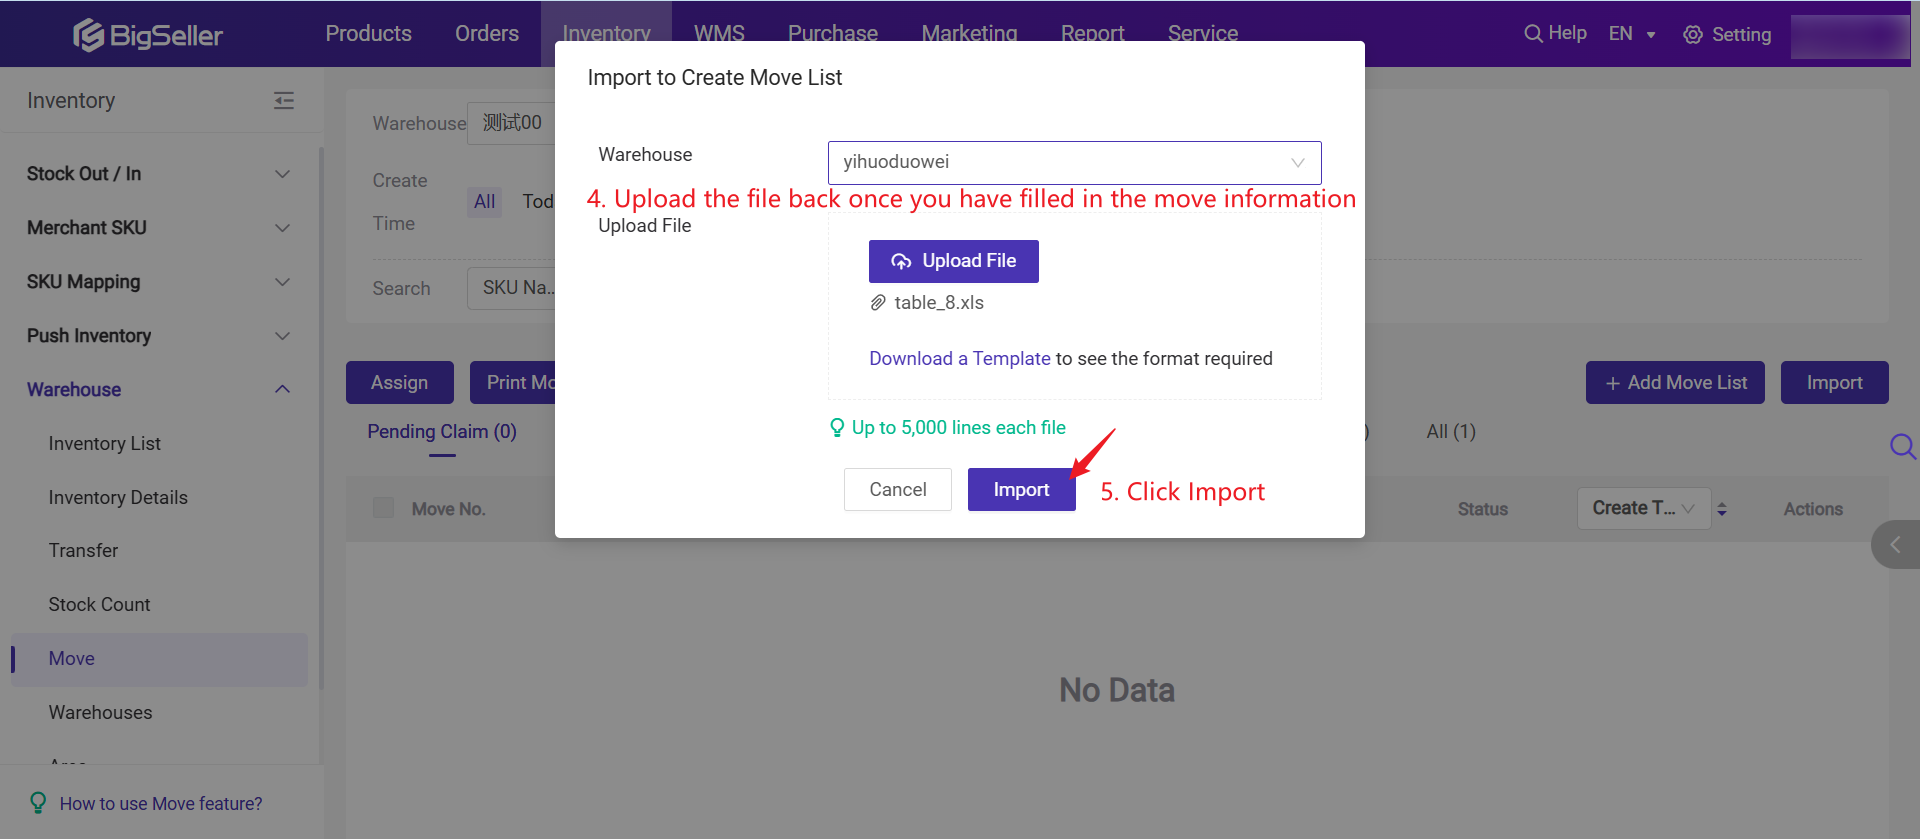
Please fill in the template according to the instructions below. Once completed, save the file and upload it back to BigSeller. The template for One SKU One Shelf is different from the template for One SKU Multiple Shelves. Please make sure to use the correct version based on your warehouse setup.
- Template for One SKU One Shelf Warehouse
- Template for One SKU Mutiple Shelves Warehouse
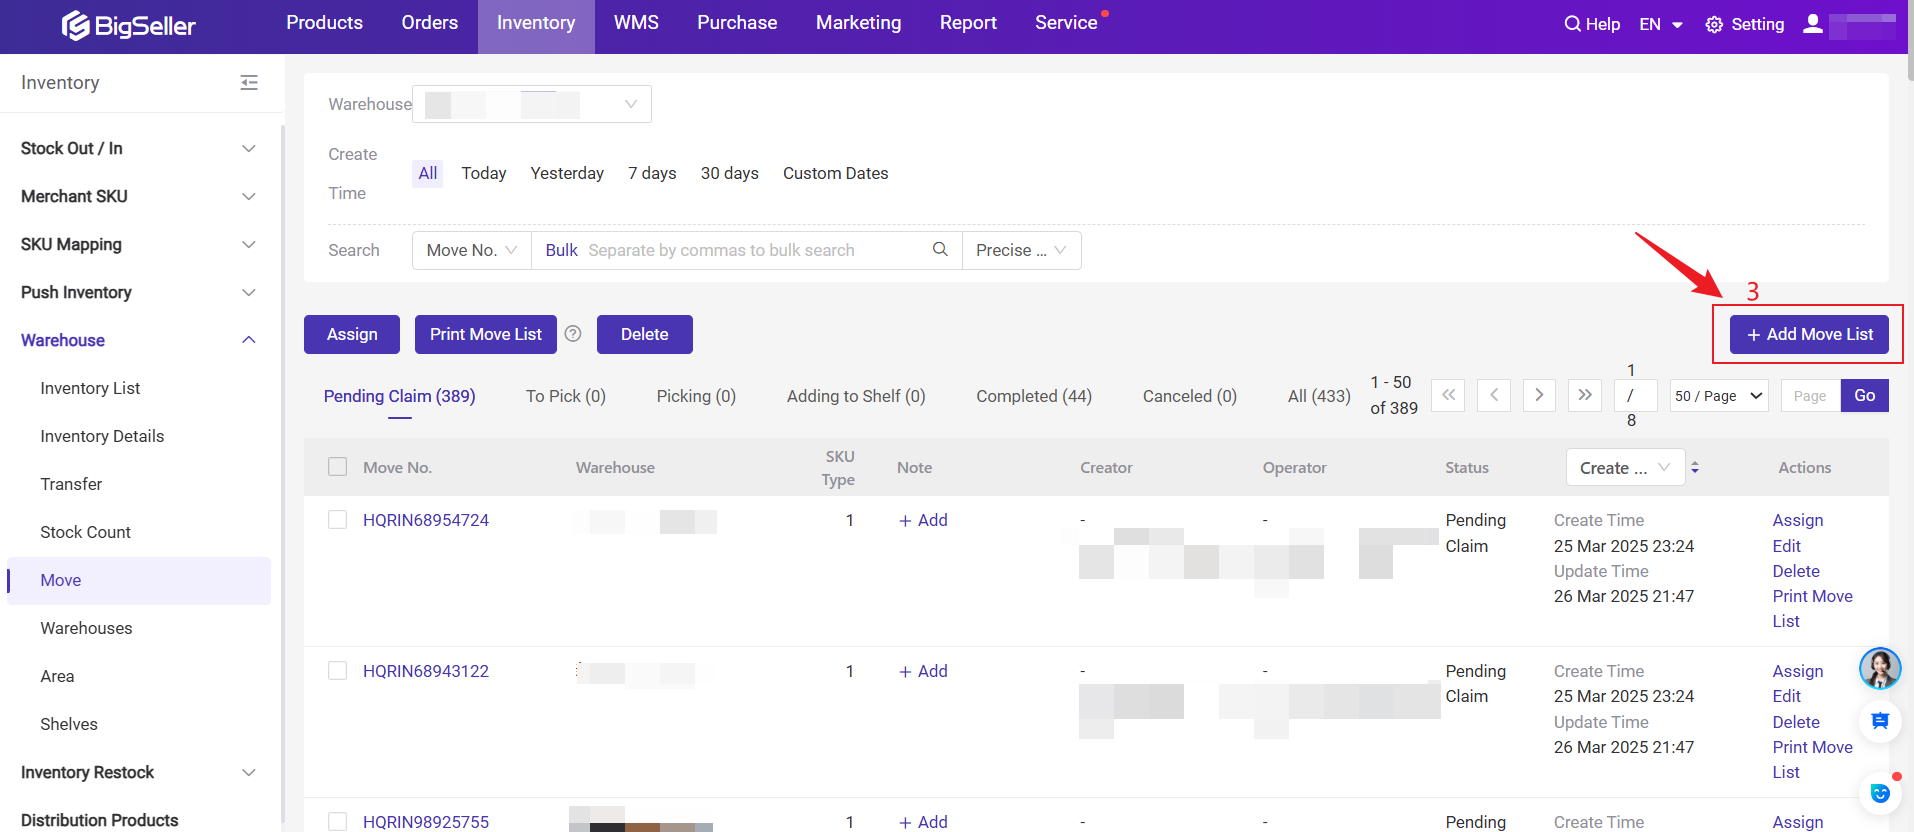
Method 2: Manually add move list
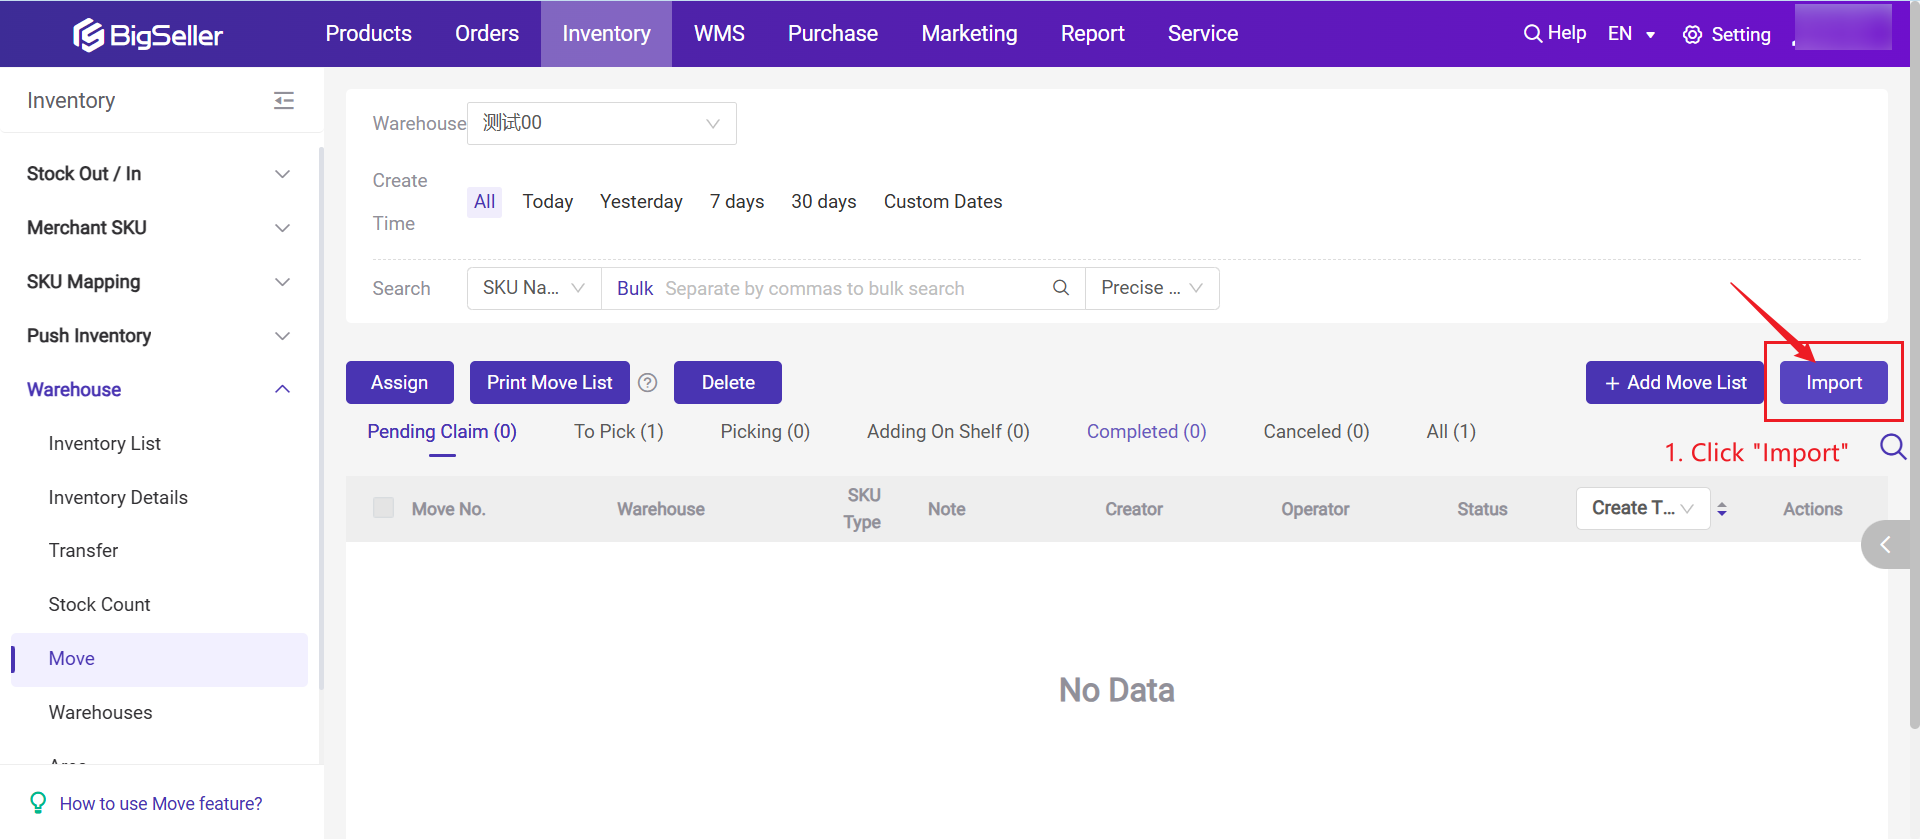
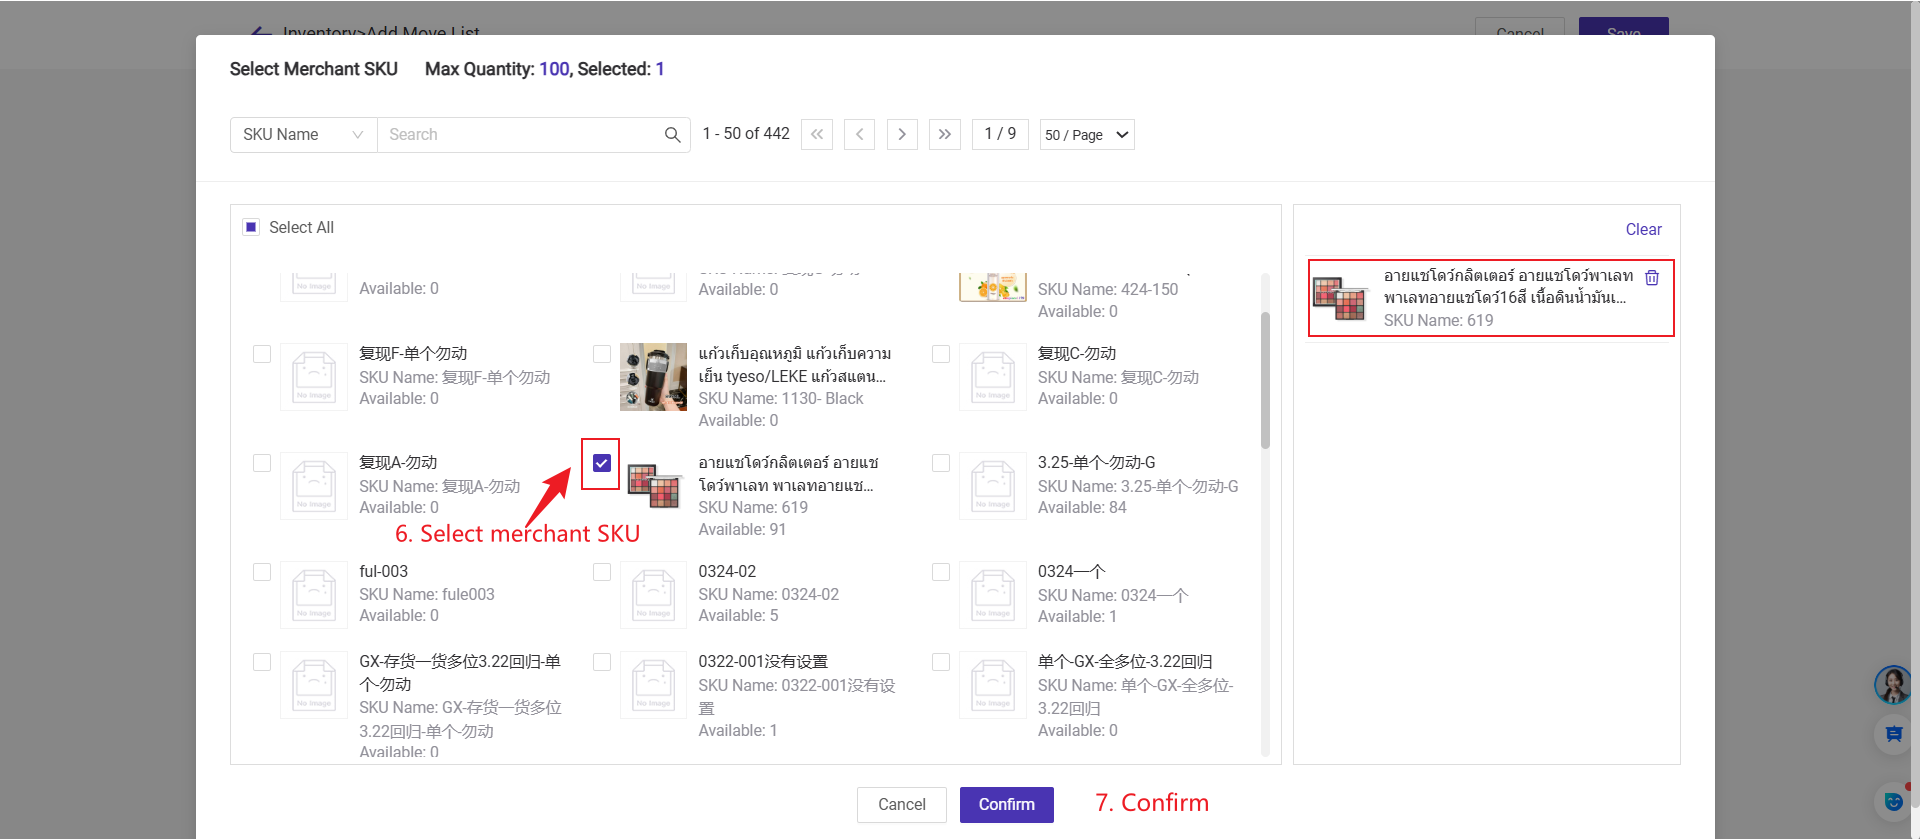
1)Click Add Move List
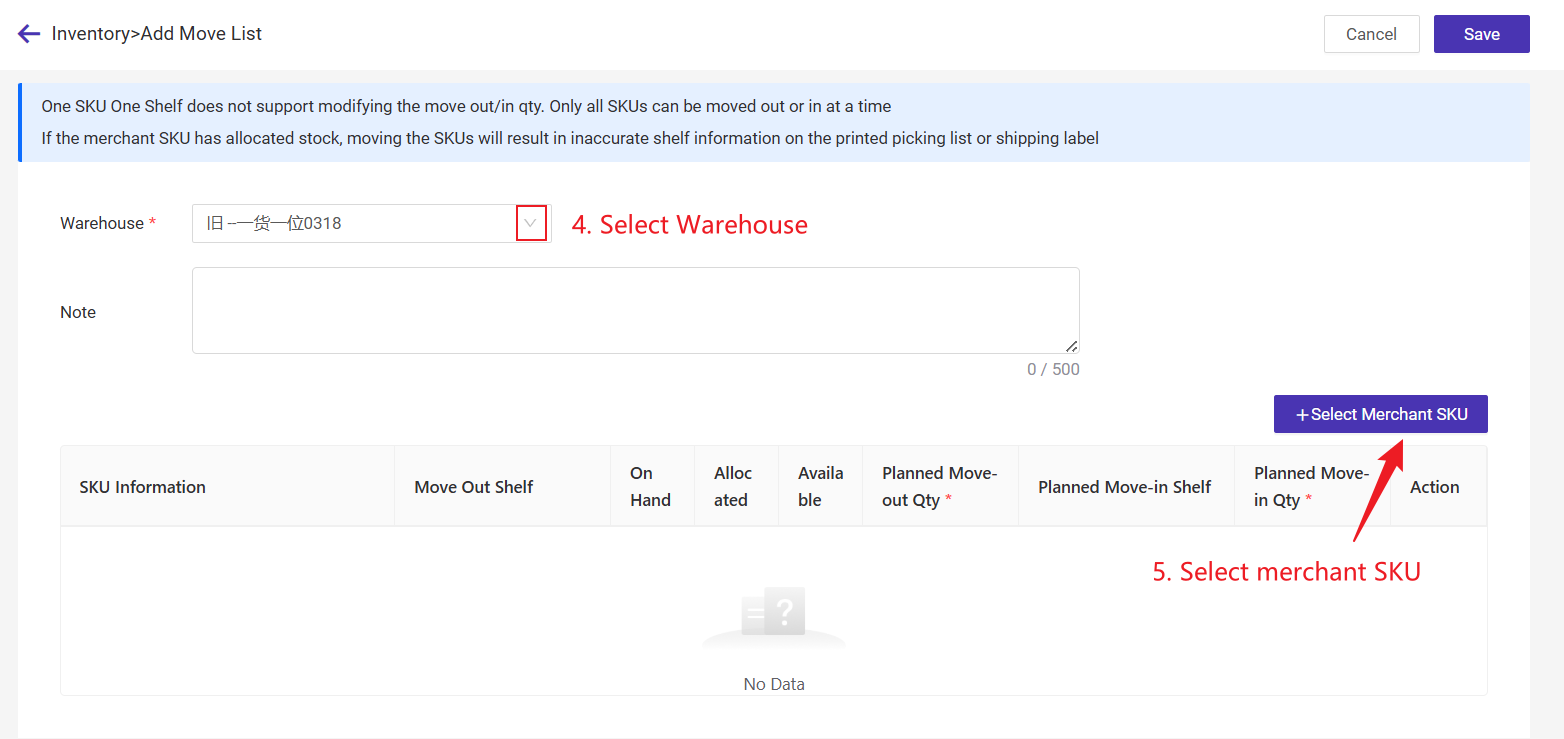
4) Select the move-in shelf > Save the move list
📑For One SKU One Shelf
- If your warehouse has not enabled Pick & Store Zoning, you only need to select the target shelf for the move. Once the move is completed, all stock of the selected SKUs will be transferred to the new shelf.
- One SKU can only be assigned to one shelf, and stock quantity adjustments during the move are not supported.
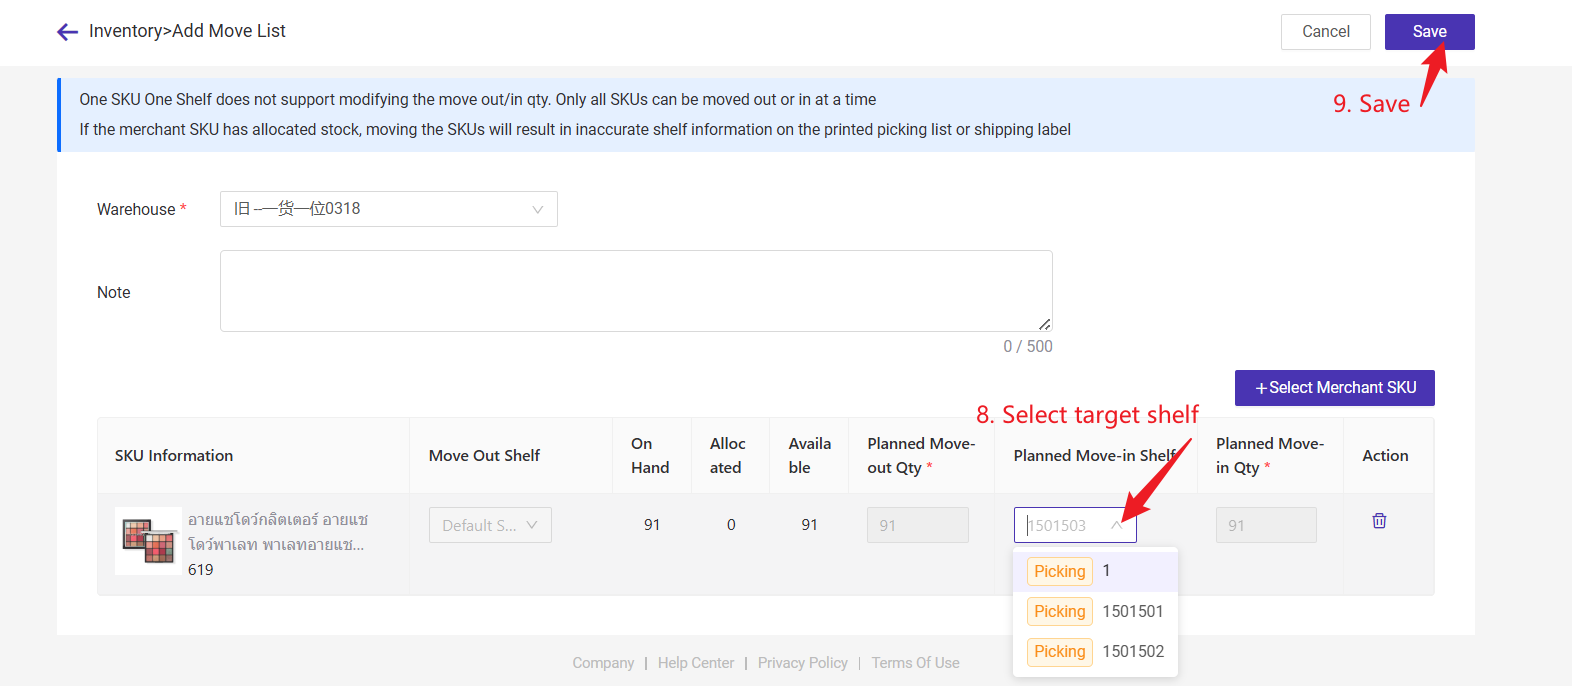
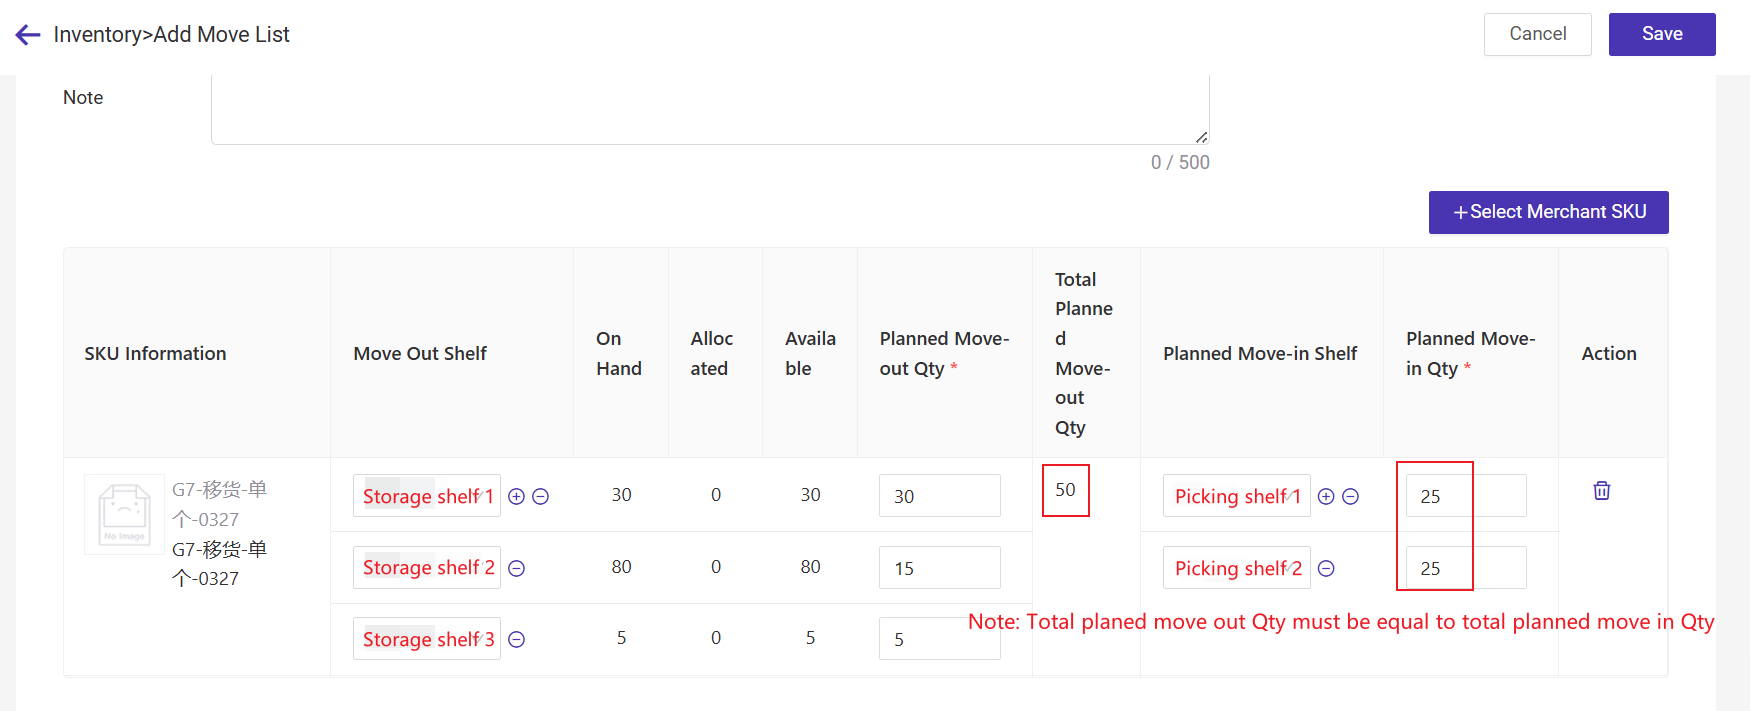
📑For One SKU Multiple Shelves (Warehouse Pick & Store Zoning)
- When creating a Move List, whether you can add multiple source and target shelves depends on the shelf types and whether they support one SKU multiple shelves.
- For example, SKU A can be moved from 3 different storage shelves to 2 picking shelves if this feature is enabled for the respective shelf types.
Note: The move-out shelf must be of a single type; it cannot contain both storage inventory shelves and picking shelves.
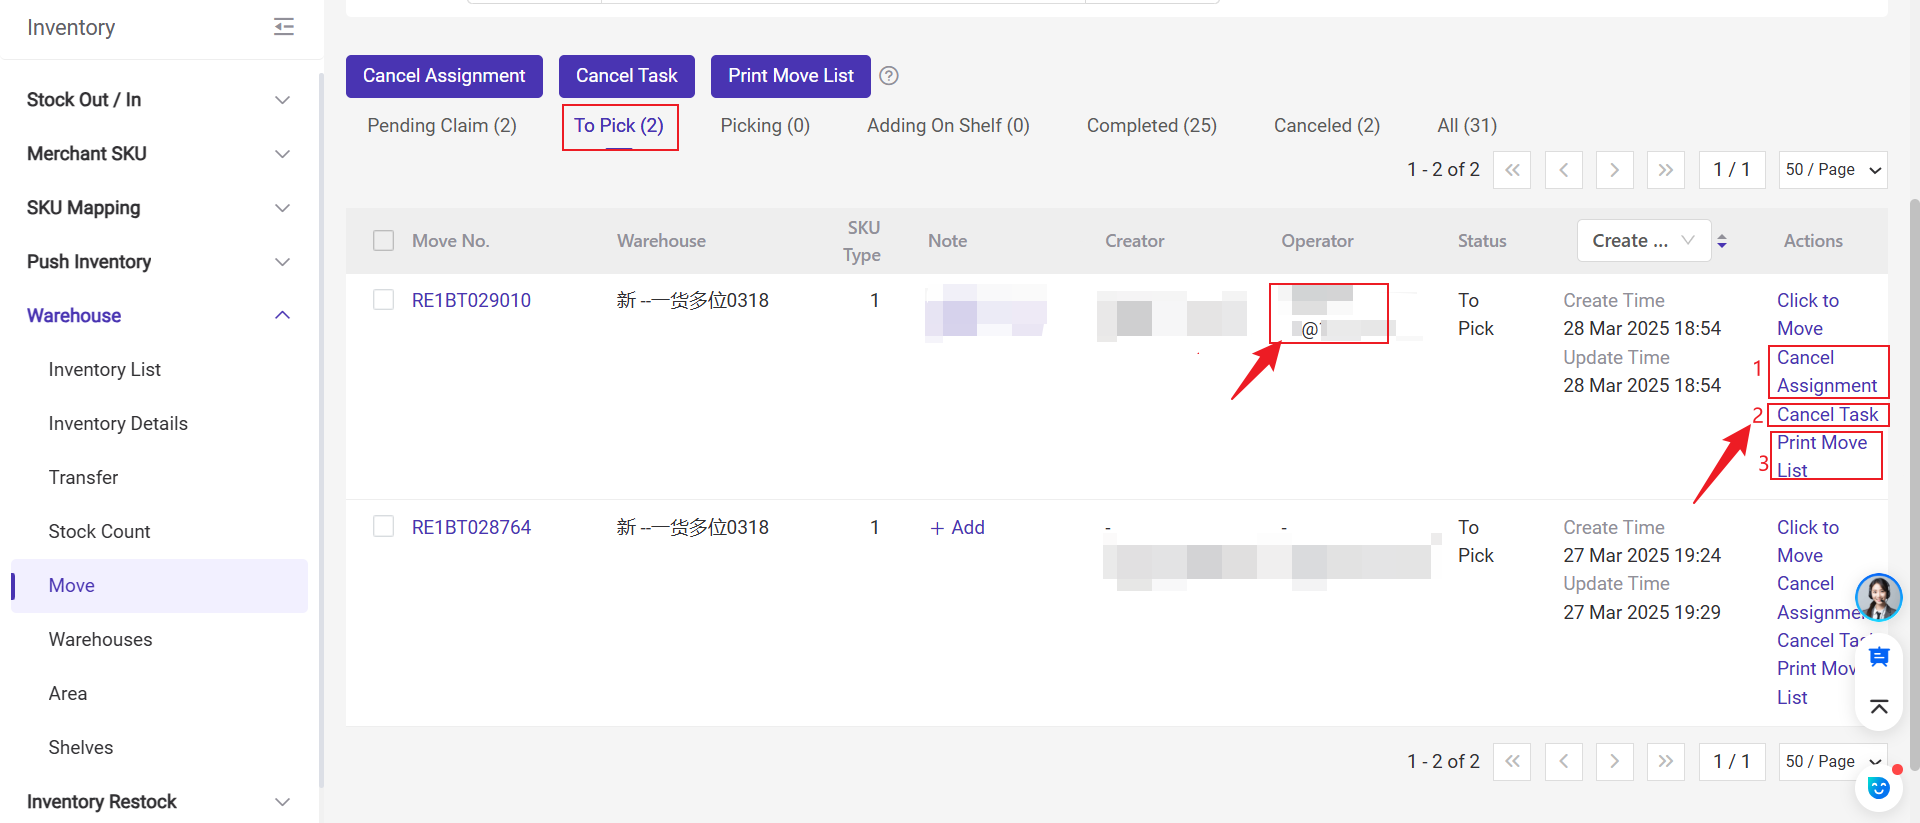
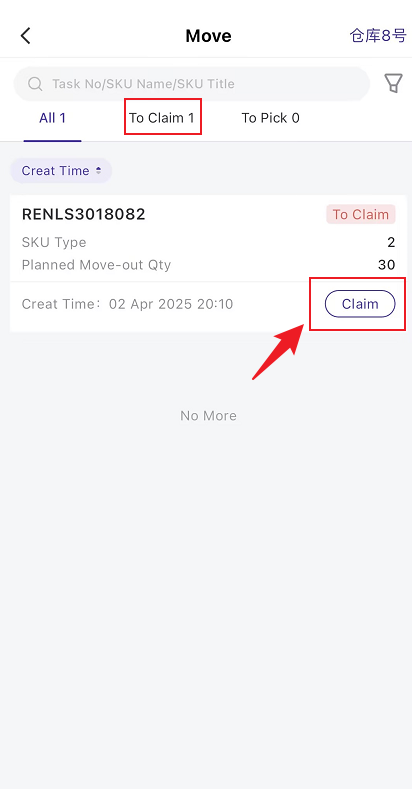
Step 3: Once the move list is successfully created, it will appear in the [Pending Claim].
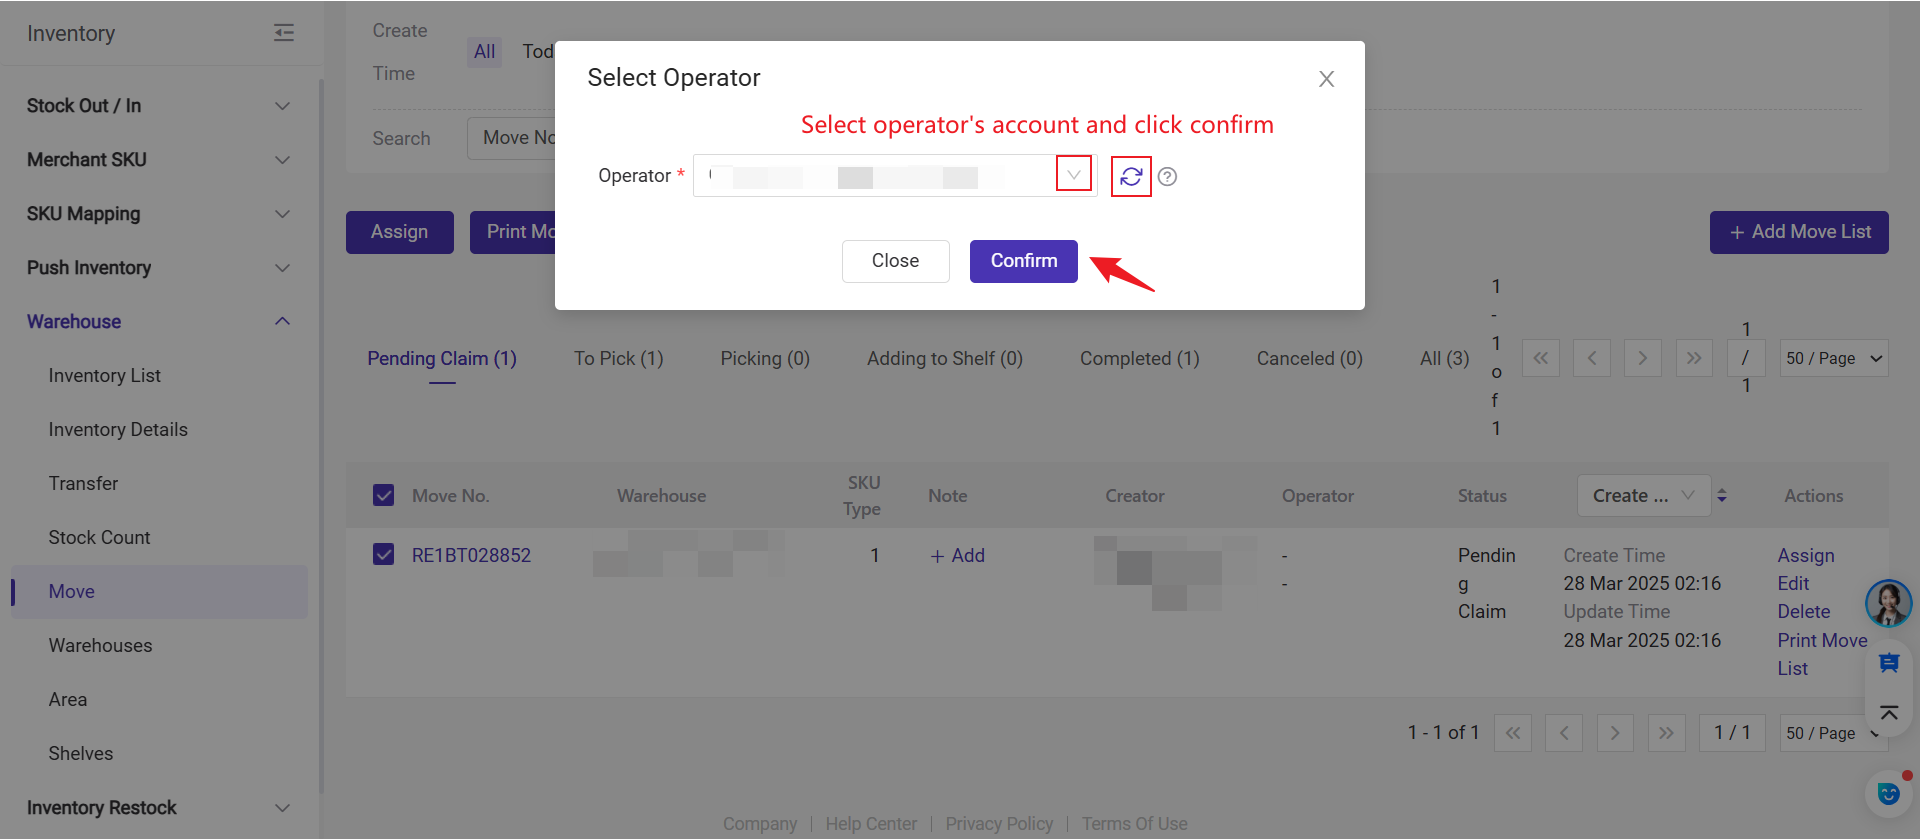
You will need to click Assign to assign the task to the appropriate operator.
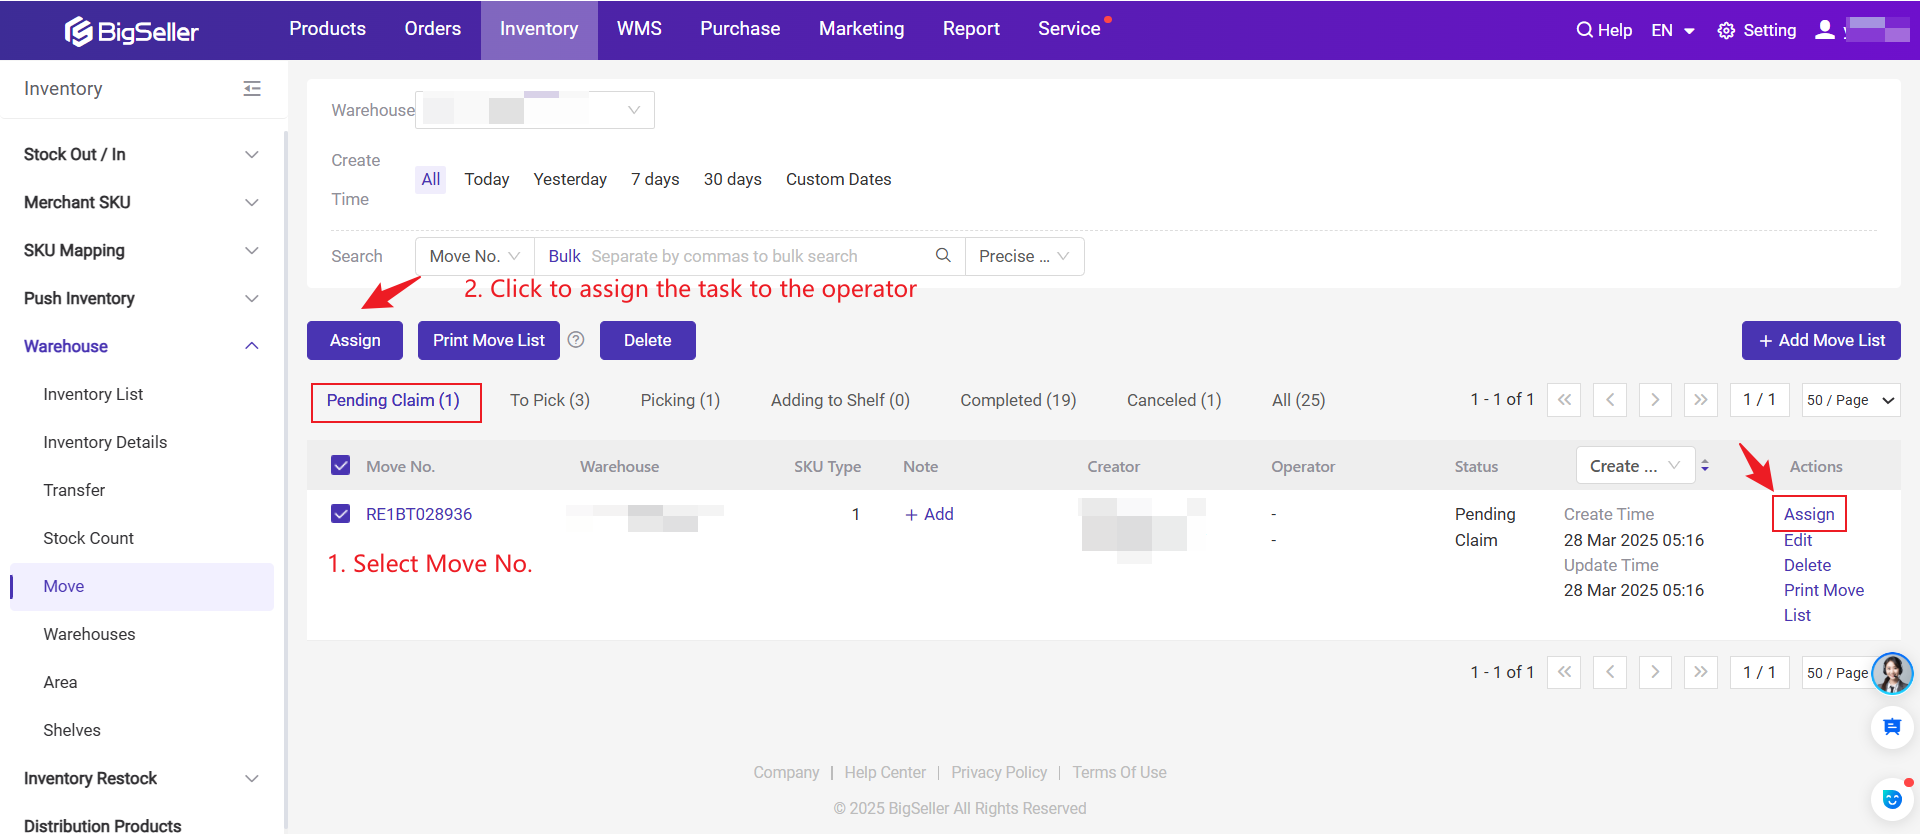
The operator can be any accounts including your own's.
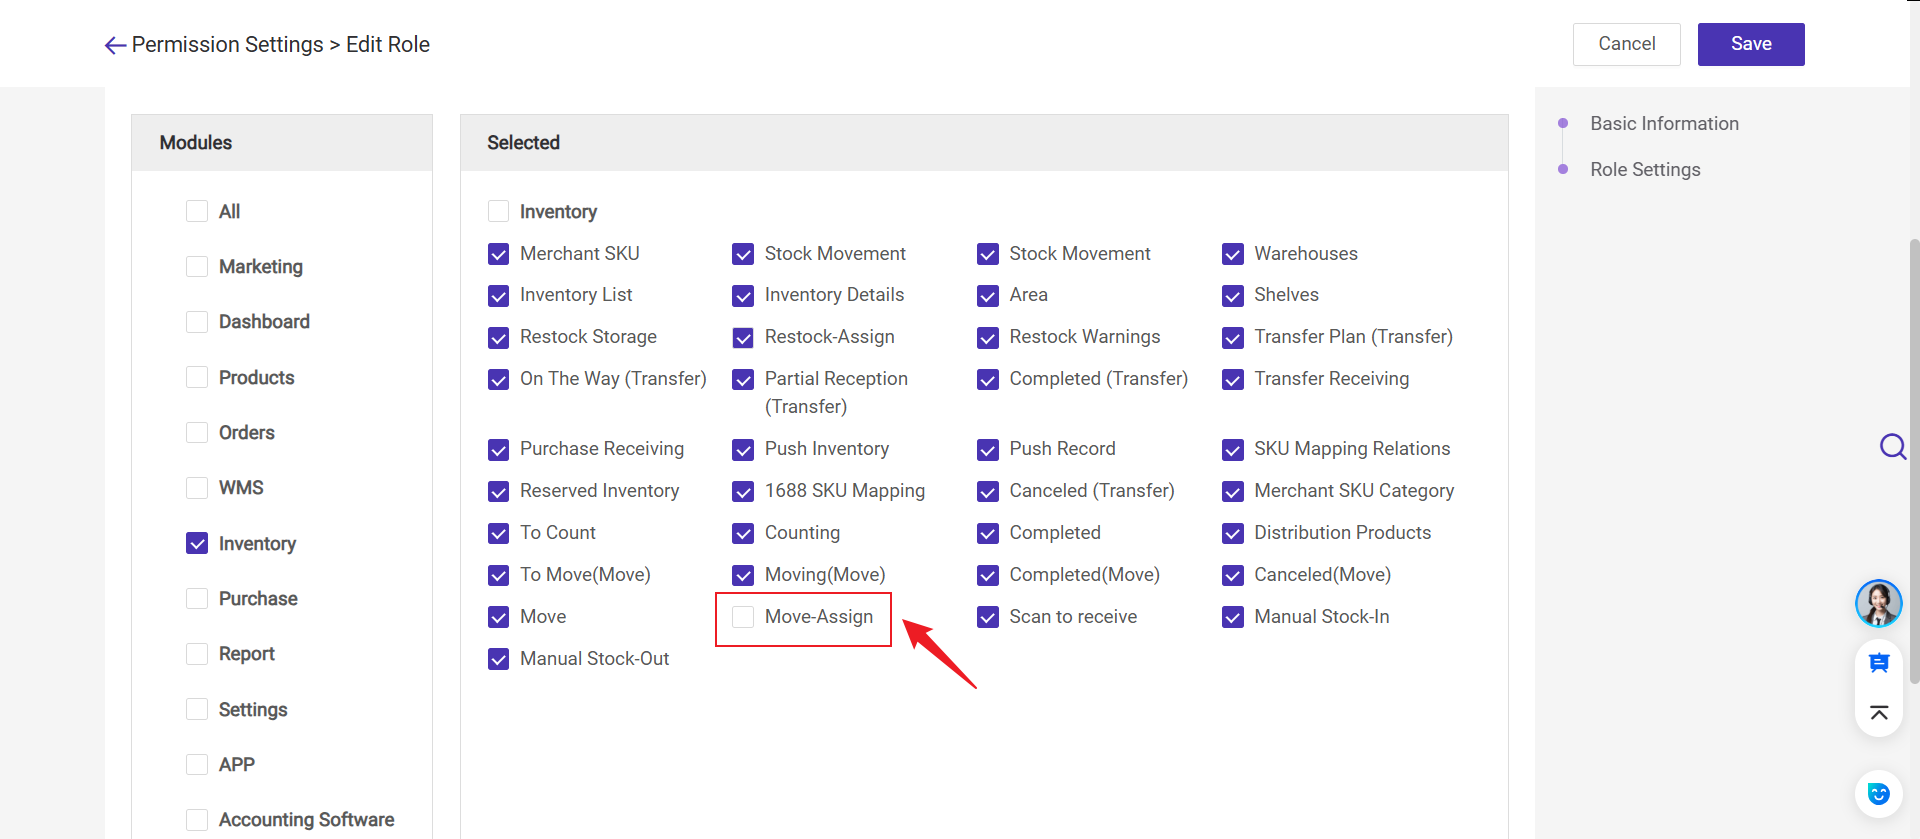
Note: If a sub-account cannot assign, please contact the main account to grant the "Move-Assign" permission.
Step 4: After assigning the task, the move task will appear in the [To Pick] list, showing the assigned operator.
In [To Pick], the operator can perform actions such as printing the move list, canceling the assignment, and canceling the move task. The move list will go to [Canceled] once it is canceled.
After the operator has completed the move task, the operator can Click to Move and Sumbit.
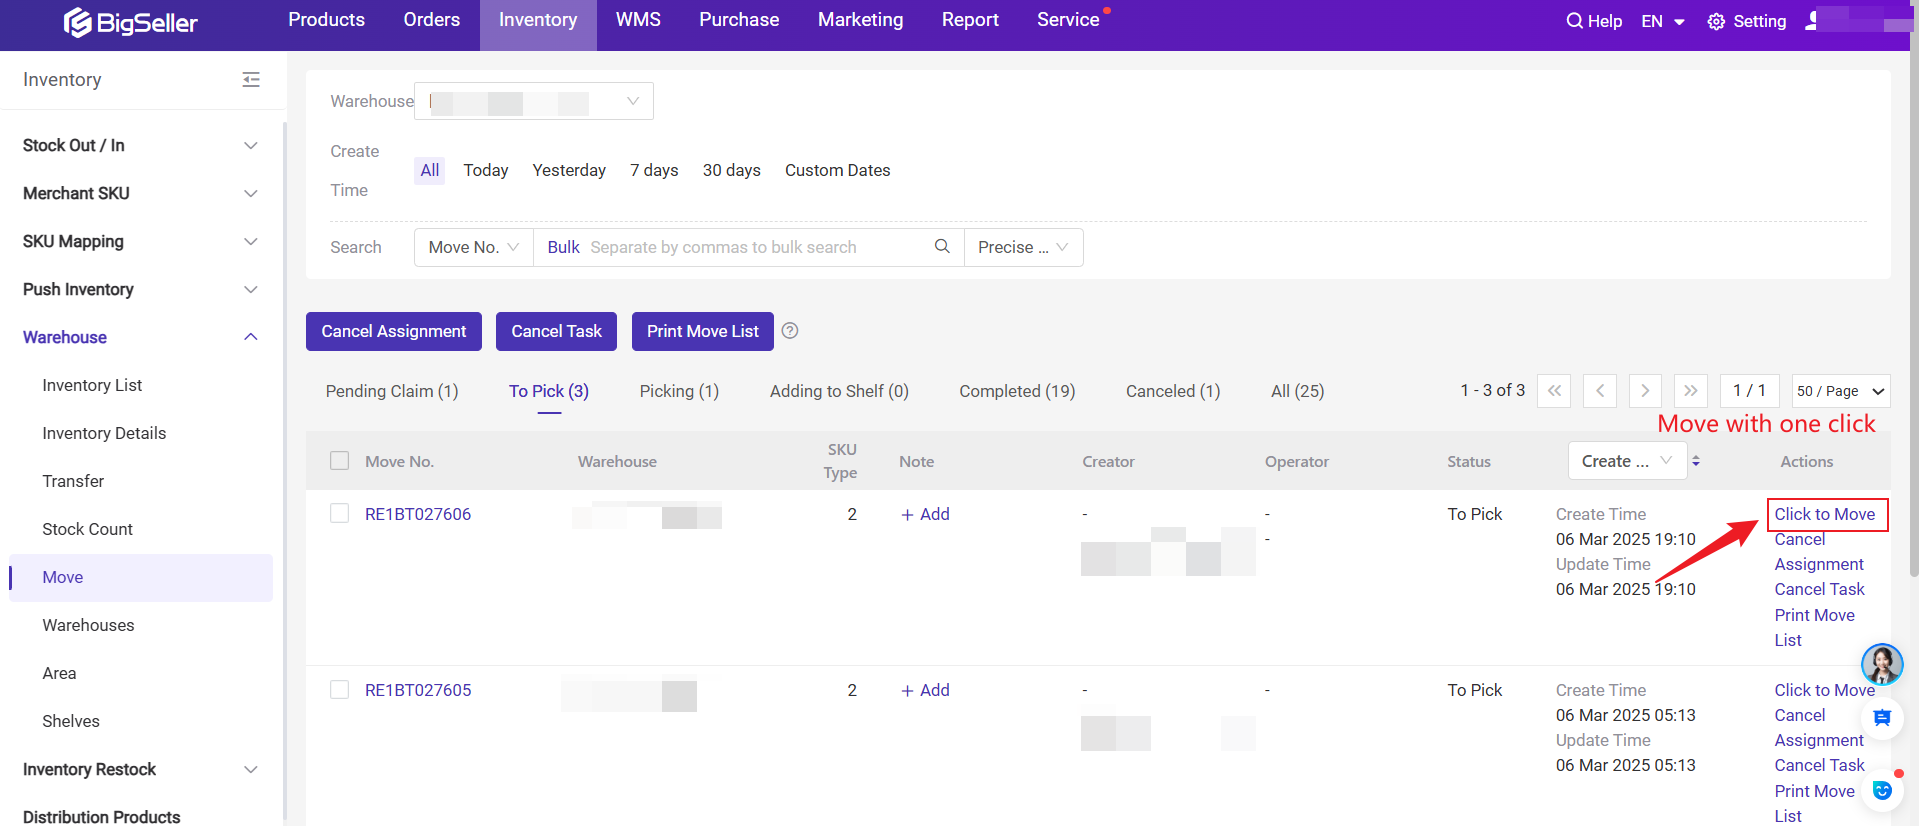
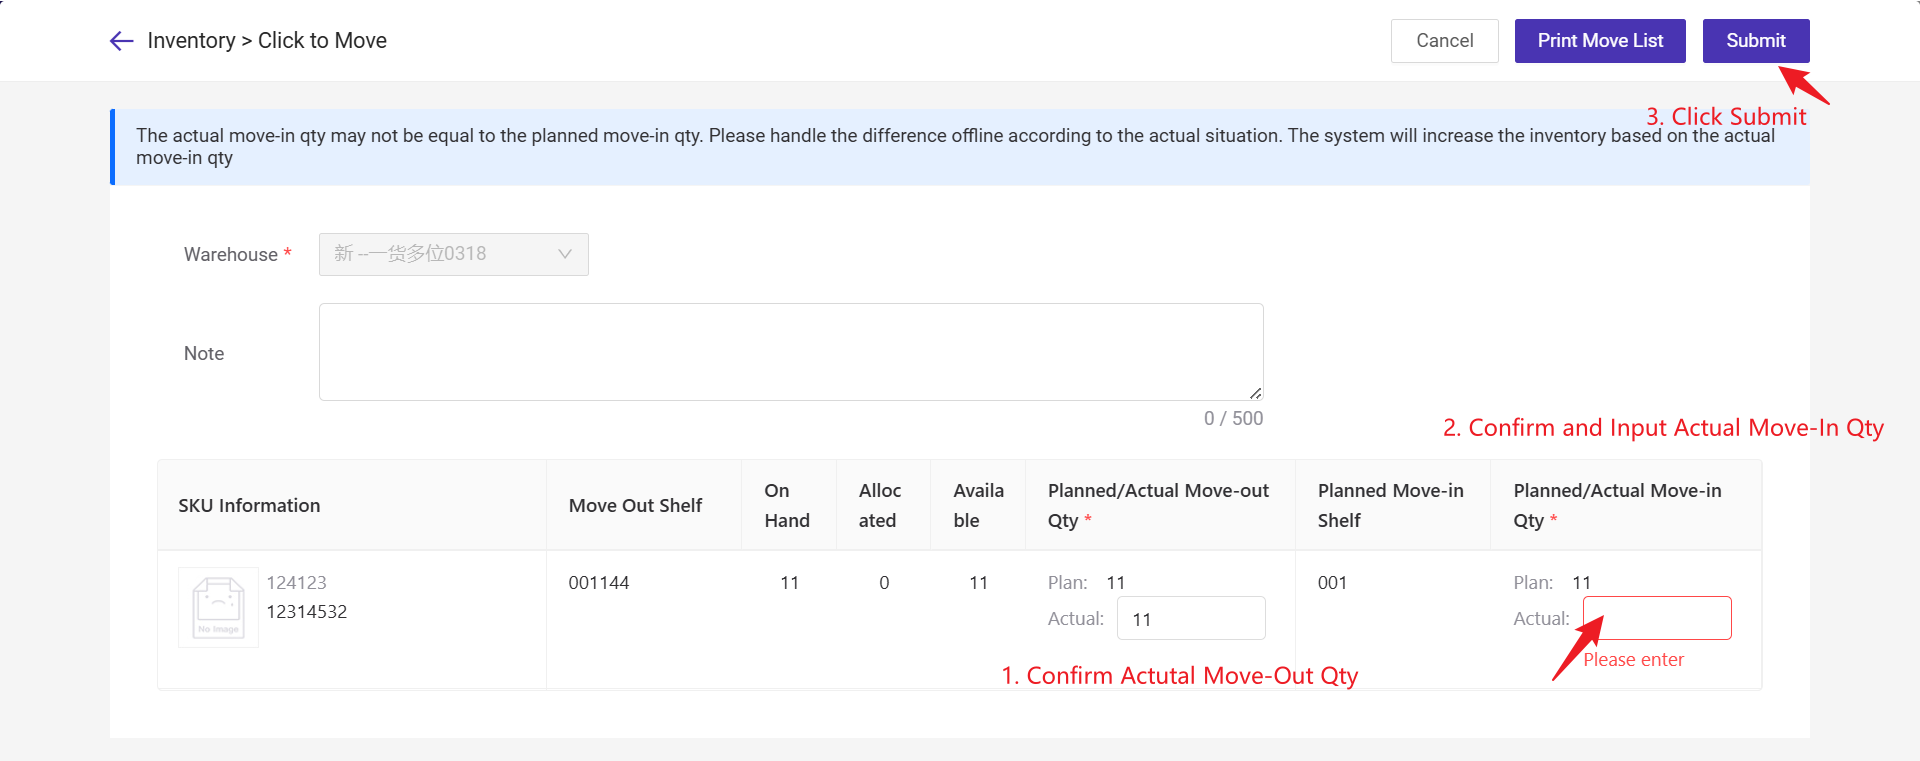
💡 Click to Move feature is only available on the BigSeller PC version.This button is used to quickly complete the move task without generating unstored inventory.
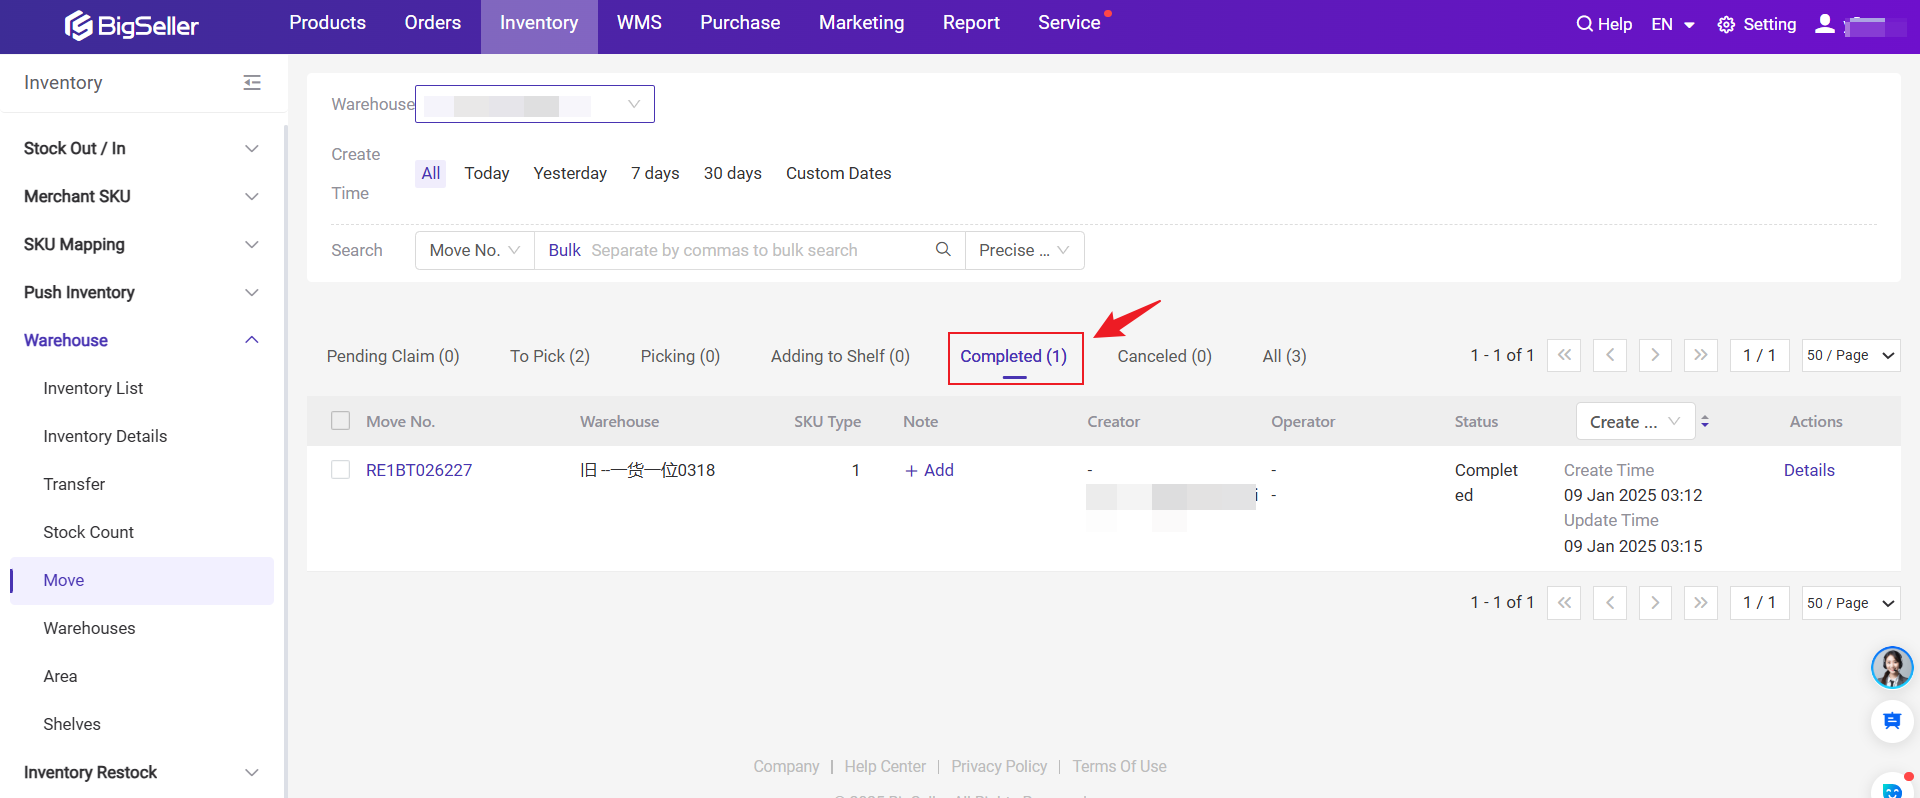
Step 5: After clicking Submit, the move list will go to the [Completed] list.
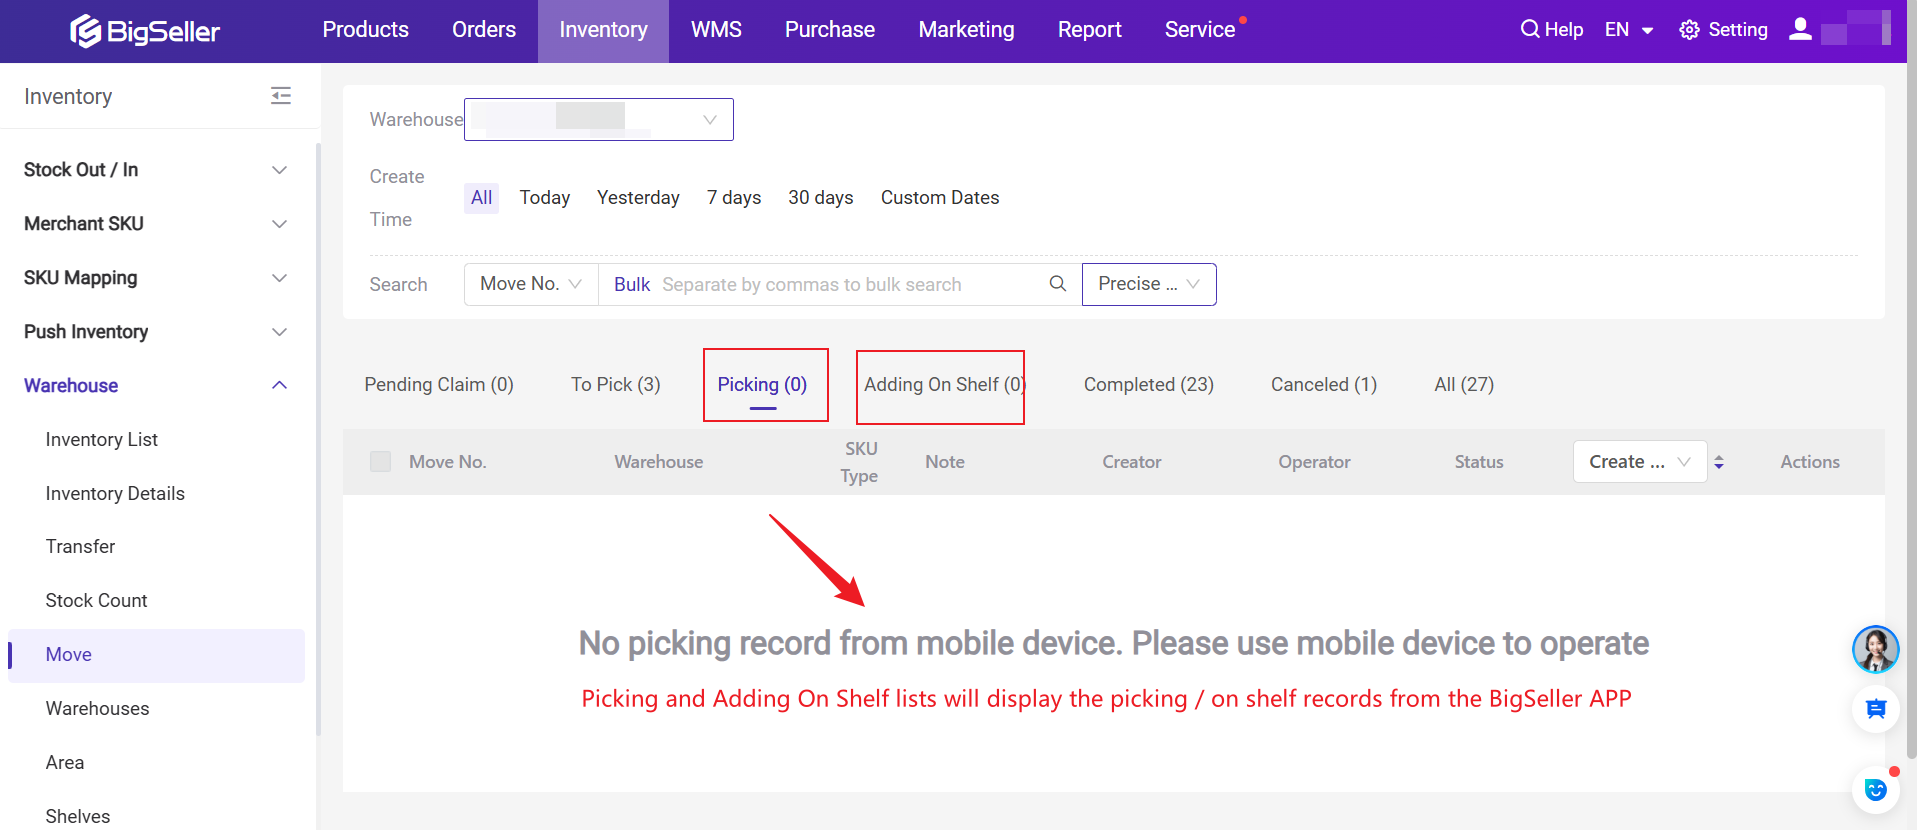
2. Picking and Adding on Shelf Using BigSeller APP [New]
📱 The Move feature is now supported on the BigSeller APP. Warehouse staff can use the app to scan SKUs and efficiently complete off-shelf and on-shelf tasks.
💡Notes
-
Picking → Adding On Shelf: You must complete one task before executing the next. (On the mobile version, this process will generate unstored inventory.)
-
If your warehouse is one SKU one shelf, you must first contact BigSeller Customer Service to enable Unstored Inventory Management before you can use the Move feature in the BigSeller APP.
-
The APP needs to be updated to version 2.10.26 or above.
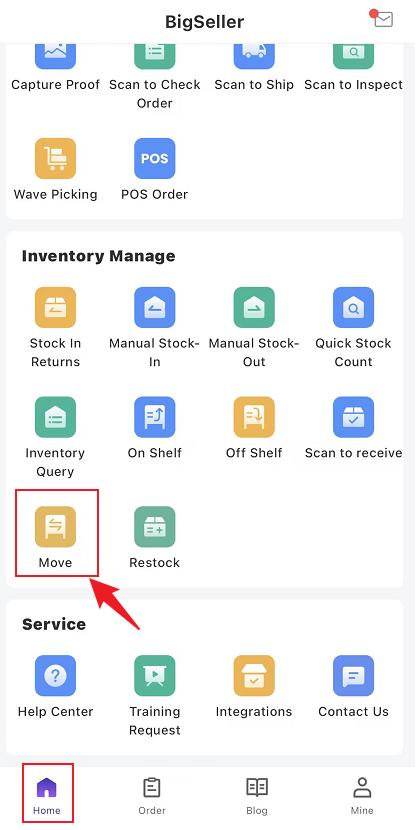
Step 1: Go to BigSeller APP Home > Click Move; Click the top right corner to select a warehouse.
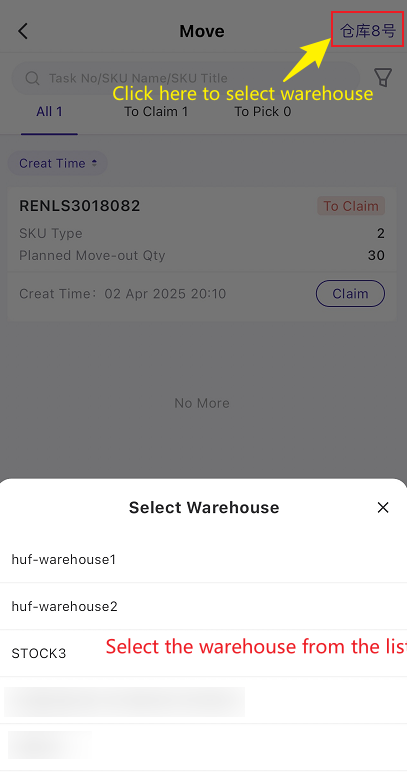
Step 2: Go to the To Claim list to claim the move task.
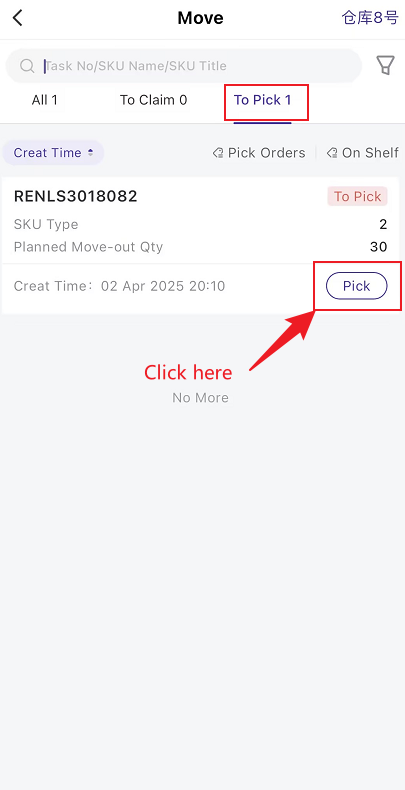
Step 3: After claiming the Move Task, the task will move to the [To Pick] list. (On the mobile version, operators can only see their own pending tasks.)
- The operator can click Pick to start the task.
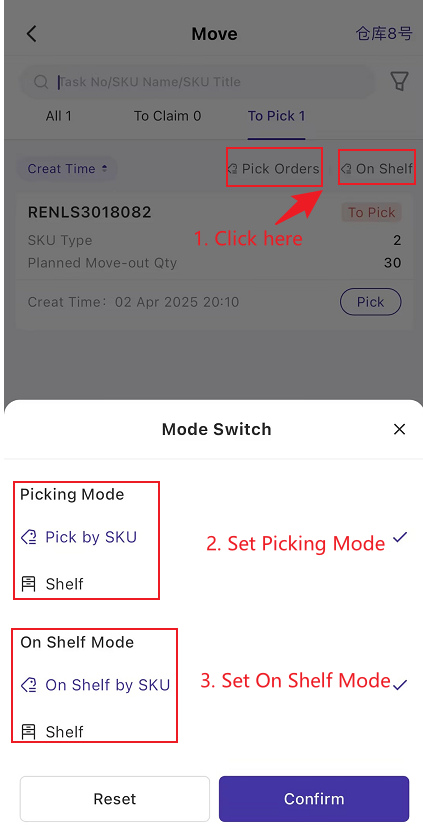
- You can click the top right corner to select the Picking or On Shelf type: Pick/On Shelf by Shelf or Pick/On Shelf by SKU.
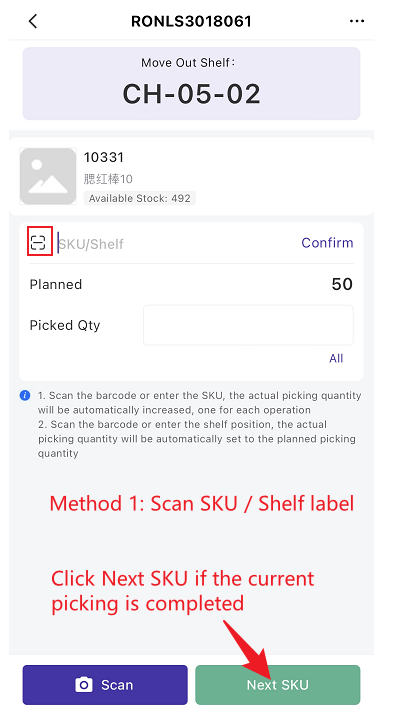
Step 4: Picking the SKUs from the source shelves
Method 1: Pick by SKU
This method requires you to pick SKU one by one within each shelf before moving to the next shelf.
You can either scan or manually enter:
-
Scan SKU: Each scan increases the pick/on-shelf quantity by 1.
-
Scan Shelf: Scanning a shelf will automatically add all planned pick/on-shelf quantities for that shelf.
-
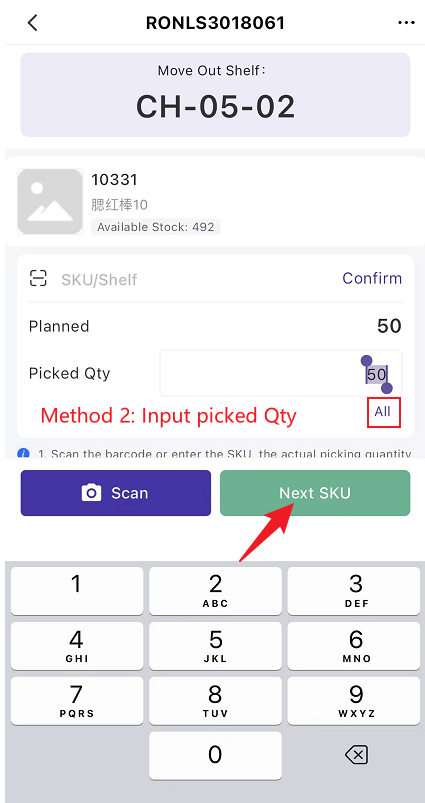
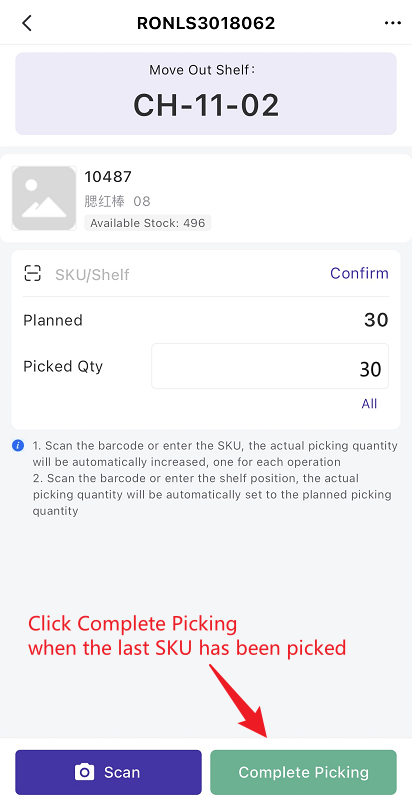
Manually Enter Qty: Input the Picked Qty
- Click All to fill in the actual picking Qty if the target shelf supports one SKU multiple shelves.
Example Workflow (Warehouse with One SKU Multiple Shelves):
Suppose you need to pick 50 units each of SKU1, SKU2, and SKU3 from both shelf A001 and shelf A002
Firstly, the screen will display the first move-out shelf (A001). The warehouse staff will need to go to the first shelf (A001).
1) Pick 50 units of SKU1 → Click [Next SKU]
2) Pick 50 units of SKU2 → Click [Next SKU]
3) Pick 50 units of SKU3 → Click [Next SKU]
Secondly, once all items from A001 have been picked, the screen will display the second shelf (A002). The warehouse staff will then need to go to the next shelf (A002).
1) Pick 50 units of SKU1 → Click [Next SKU]
2) Pick 50 units of SKU2 → Click [Next SKU]
3) Pick 50 units of SKU3 → Click [Complete Picking]
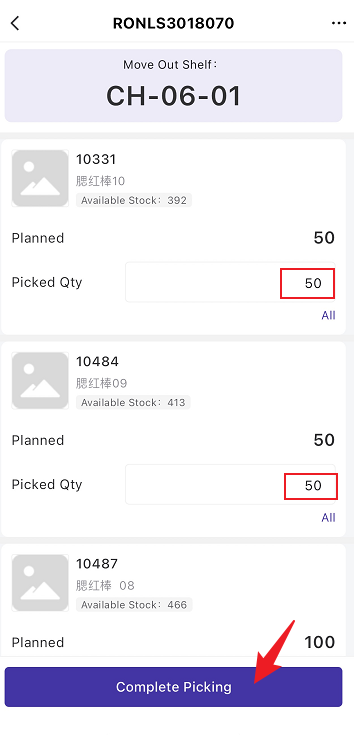
Method 2: Pick by Shelf
This method allows you to pick all the SKUs that need to be off-shelved from the same shelf in bulk (suitable for items without labels, where you can directly input the quantity).
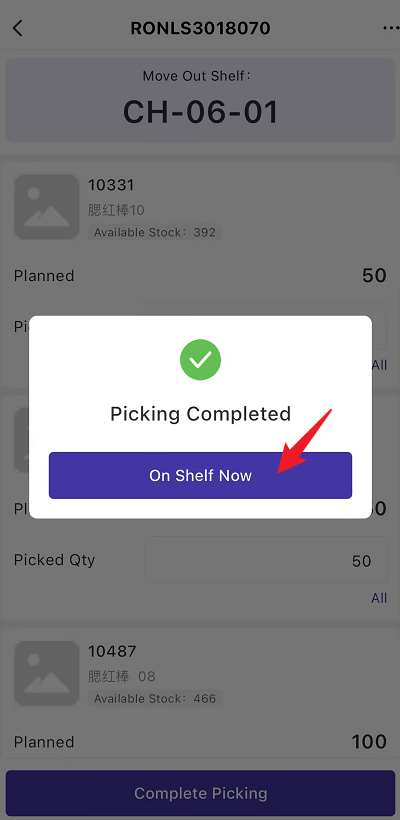
Step 5: Add the SKUs to the move-in shelves
After all picking completed, you can add the SKUs to the target picking shelves.
Method 1: Add On Shelf by SKU
- This method requires you to add SKU one by one.
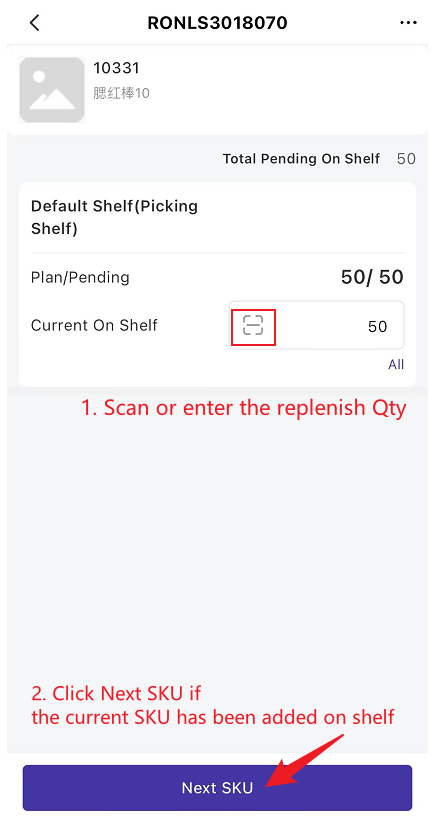
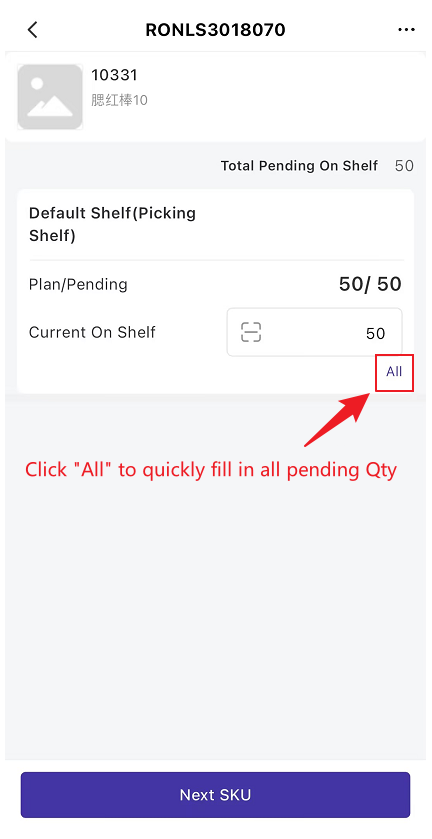
Three Ways to Add the On Shelf Qty:
1) Scan one item at a time, with the quantity increasing by 1 for each scan.
2) Click the actual picking quantity input box and enter the on shelf quantity.
3) If the target shelf supports multiple locations for the same SKU, click All to fill in the actual shelving quantity.
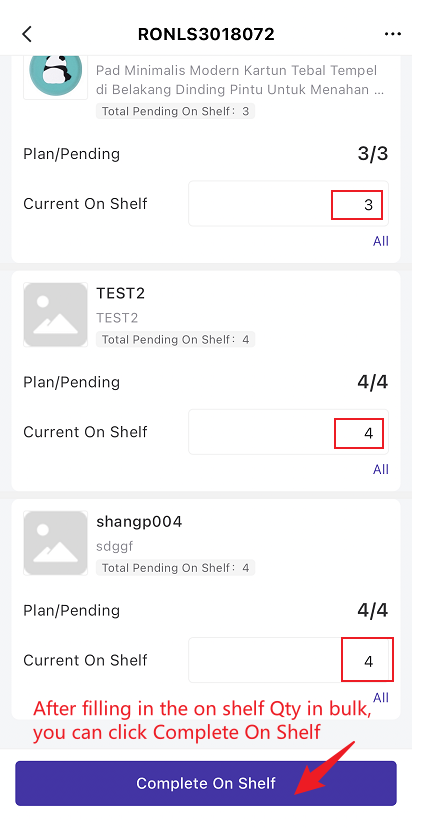
Method 2: Add by Shelf
Field Explanation:
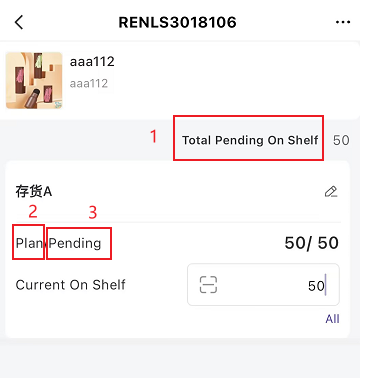
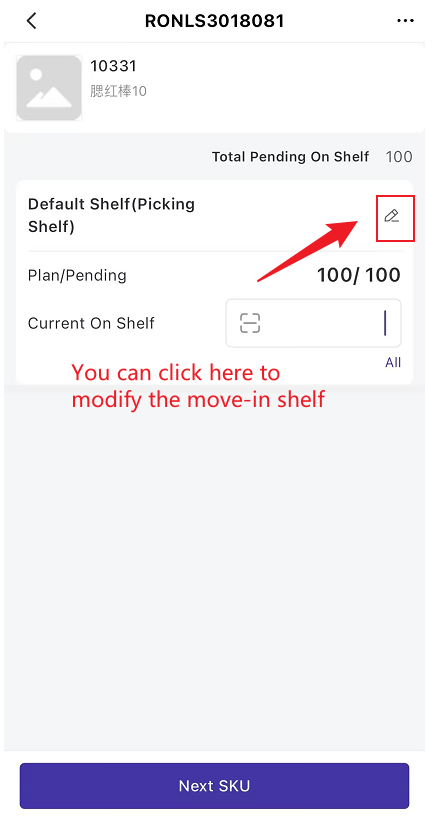
-
Total Pending On Shelf = Actual picked quantity
-
Pending = The Unstored Qty for the SKU, representing the quantity yet to be shelved at the target location.
-
Plan = Data sourced from the Planned Move-In Qty
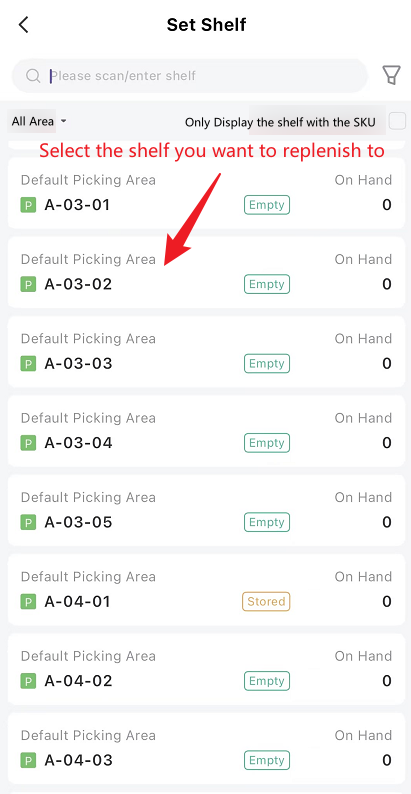
Edit Move-In Shelves
Note: If you want to modify the move-in shelf in Restock-On Shelf by SKU on mobile device, you can go to the Mobile Device Setting on PC and turn on the button.
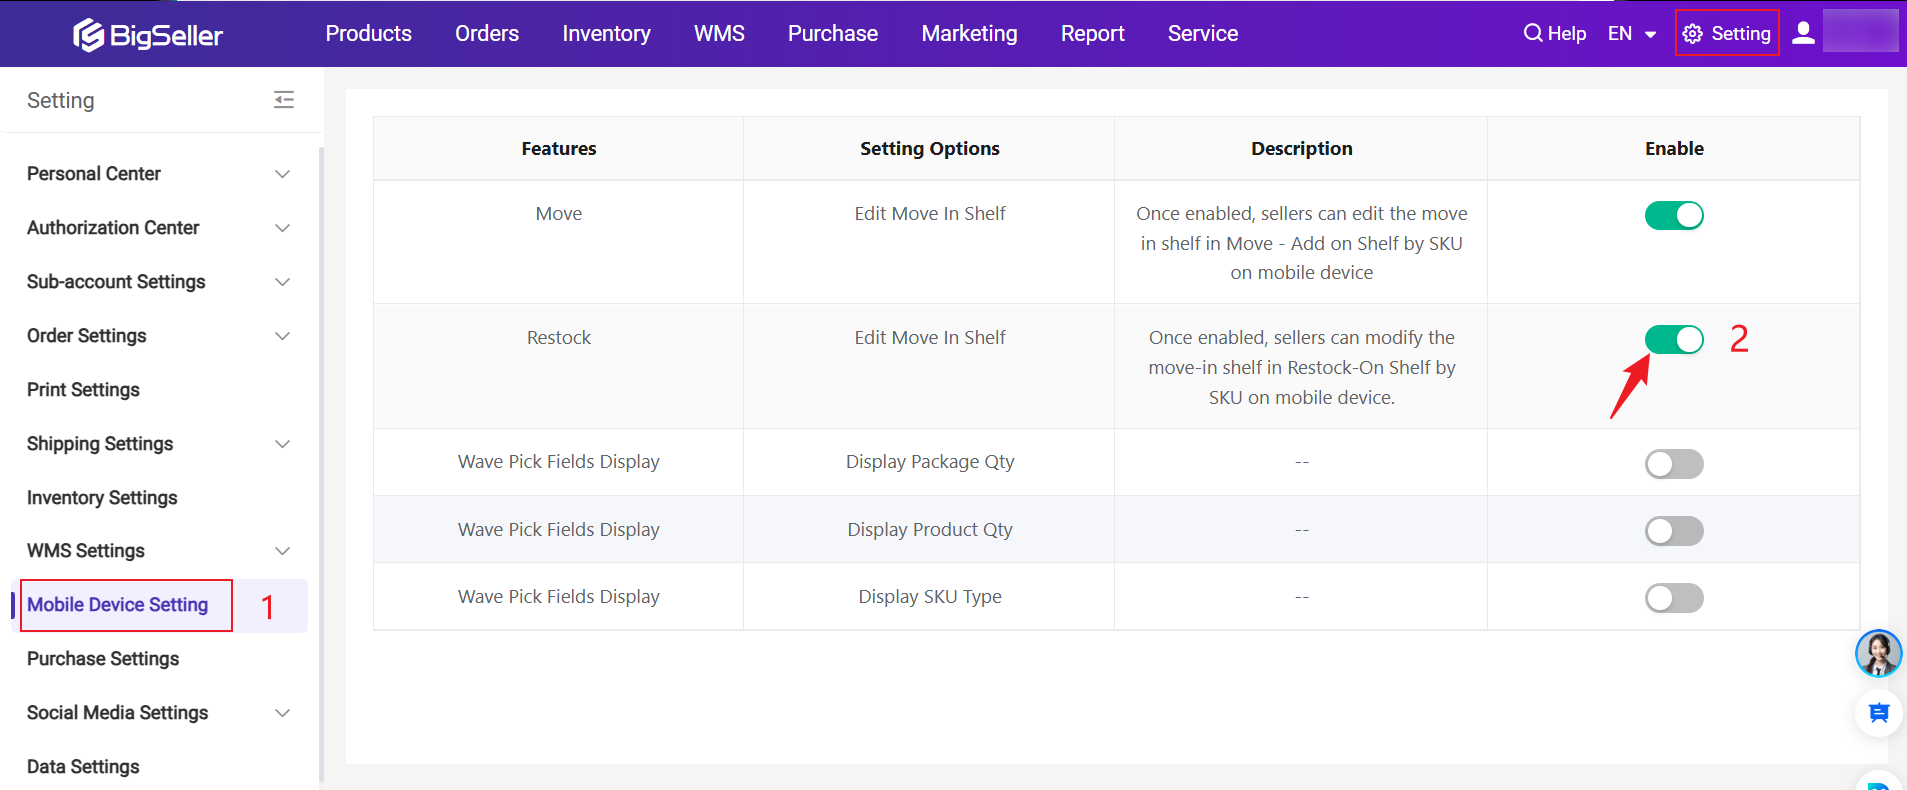
Once enabled, you can modify the move-in shelf location when performing the "on shelf" task.
3. Other Available Actions and Important Notice
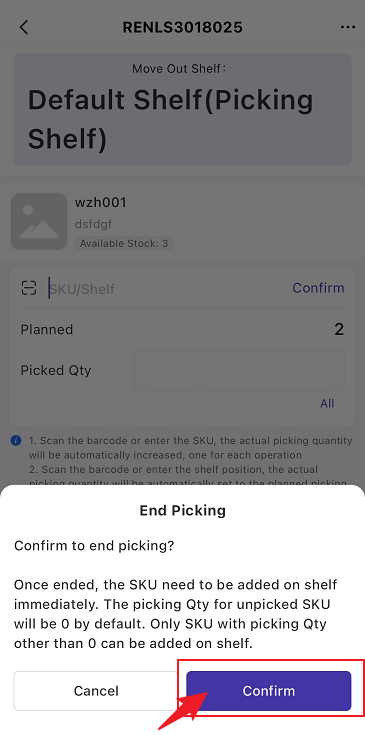
1. if you no longer need to pick the remaining SKUs during the picking process, you can choose to end the picking process. Once ended, you must immediately proceed with on shelf. Any unpicked SKUs will automatically be recorded with a quantity of 0, and only SKUs with a non-zero picked quantity can be added on shelf.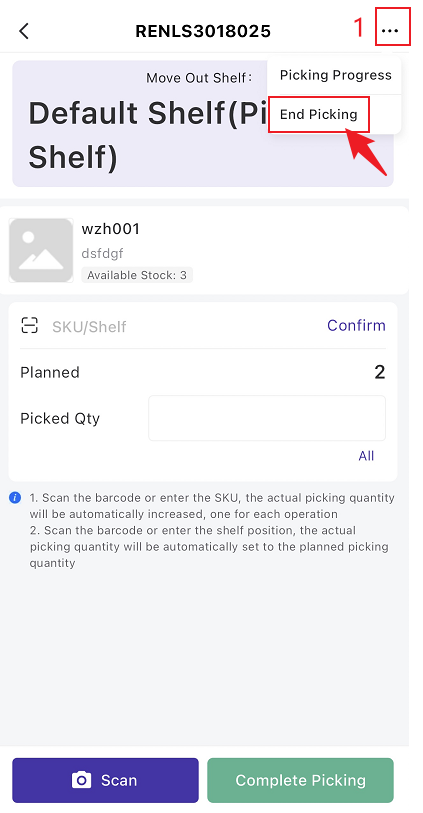
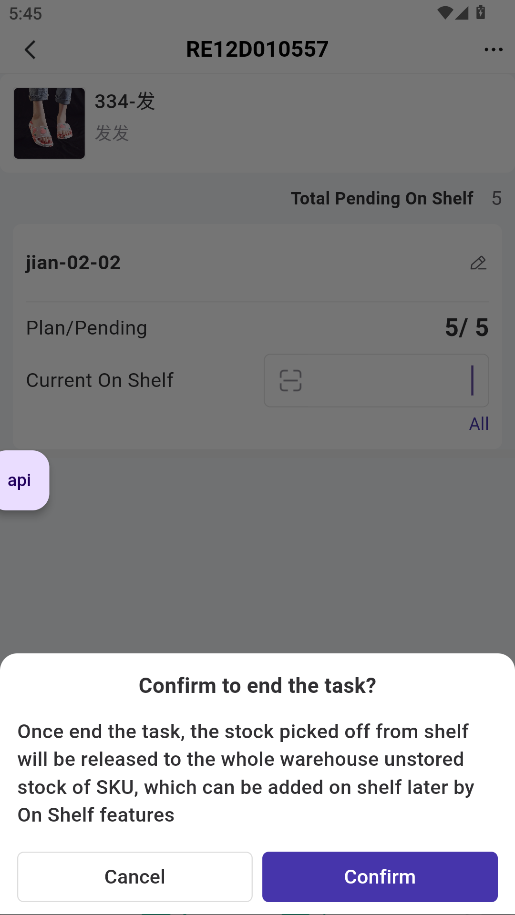
2. You can end the move task during picking and on shelf process. Just click the [...] button in the top right corner and select End the Task. Once end the task, the stock picked off from shelf wil be released to the whole warehouse unstored stock of SKU, which can be added on shelf later by On Shelf features.
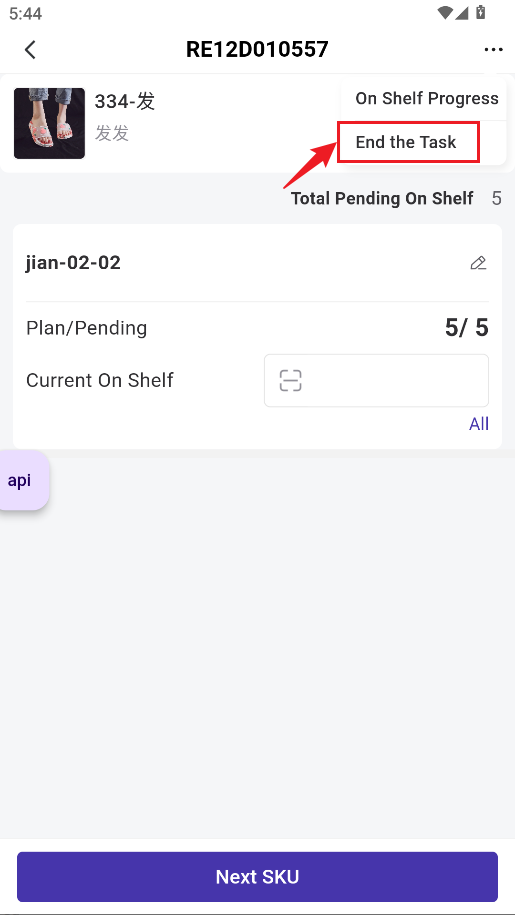
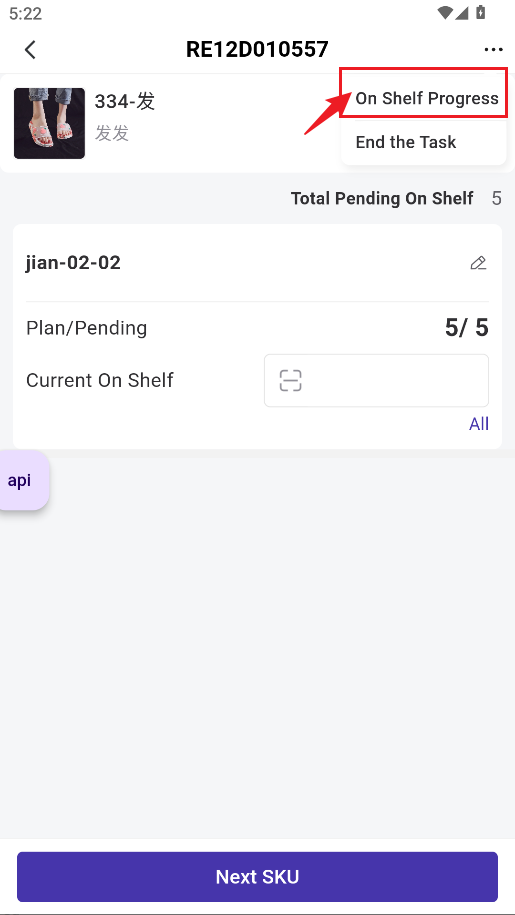
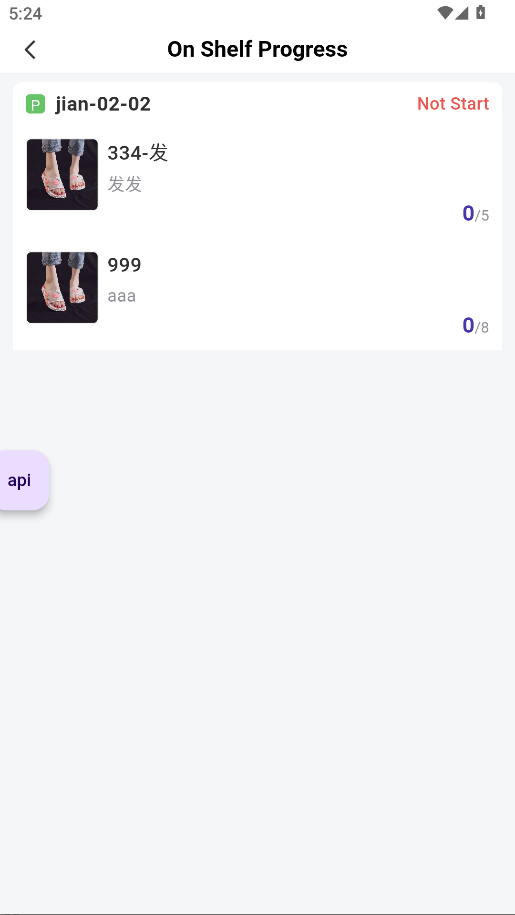
3. You can click the [...] button in the top right corner and to check Picking / On-Shelf Progress.
4. The restocking process will track the unstored Qty at the target shelf. For example, when items are picked from the shelf A (storage area) and moved to shelf B (picking area), the in-transit Qty is considered as unstored Qty of shelf B until the SKUs are placed on the designated picking shelf.
For example, when restocking 5 quantities from Storage Shelf A to Picking Shelf B using BigSeller APP:
- When picking from the storing shelves:
- The available stock quantity on Shelf A will decrease by 5
- The unstored quantity on Shelf B will increase by 5
- When adding on the picking shelf:
- The unstored quantity on Shelf B will decrease by 5
- The available stock quantity on Shelf B will increase by 5
For more info about Unstored Inventory Managemnet, please click here: Introduction to Unstored Inventory Management
5. If the 'On Shelf' process fails, the "pending on shelf" stock will be added to the whole warehouse unstored stock for that SKU, and can later be put on the shelf using the 'On Shelf' feature.
Is this content helpful?
Thank you for your feedback. It drives us to provide better service.
Please contact us if the document can't answer your questions